Introduction
LeadsDSP is a DSP SaaS platform. Through rapid white-label customization, users (Clients, companies engaged in DSP business) can have their own branded DSP platform, accessing SSP and ADX traffic through the platform to provide buying and advertising services to advertisers and Media Buyers.
LeadsDSP offers a user-friendly interface, allowing users to create campaigns, upload creatives, target audiences, and monitor the performance of campaigns. The platform is equipped with powerful machine learning algorithms that automatically optimize delivery, enhancing the ROI of advertising campaigns.
Dashboard
After logging in to LeadsDSP, users are directed to the Dashboard page.

This page displays the general data within the system for the recent period. The default date range is today, but you can also select yesterday, the past 7 days, or the past 14 days. In the Dashboard, you can view metrics such as impressions, clicks, and expenses. Various charts for these metrics are also plotted for different campaigns.
Buyers and Suppliers
To engage in DSP buying activities, both buyers and sellers are needed. Within the LeadsDSP system, the seller is referred to as Supply, while the buyer is referred to as Media Buyer. The administrator manages the accounts for these two roles and sets up transaction channels for both parties.
Client Administrator
The Client Administrator refers to the administrator of the LeadsDSP Client account. This administrator account is created and provided by the SaaS platform when the LeadsDSP Client account is set up. After the initial login, the administrator should change their login password.
This role is responsible for managing all resources within the system:
- Managing Supply accounts to access their traffic.
- Managing Media Buyer accounts and allocating traffic to them.
- Managing advertiser accounts and assigning them to specific Media Buyers.
- Creating Campaigns, uploading creatives, targeting audiences, and monitoring Campaign performance.
Supply
The first thing the administrator needs to do is integrating traffic, which means accessing traffic from SSP and ADX. Each traffic supplier is referred to as a Supply. In the top-right corner menu of the system, choose the "Supplies" option to access the Supply management functionality.
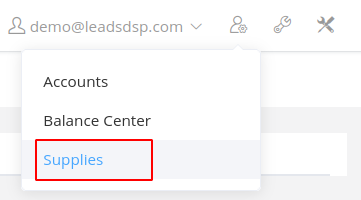
In the Supply list, all Supplies within the system are listed, and quick filtering can be done based on status and name.
- System Name: If the Supply system conforms to RTB standards, it can be directly connected without customization; however, some Supply systems may require customization beyond RTB standards before they can be connected. Please contact the LeadsDSP team. The following are customized systems:
- Google ADX
- InMobi
- OpenX
- Samsung
- TopOn
- Vungle
- Token: The unique identifier for this Supply. Click the "Bidding Link" button below the identifier to copy the traffic access End Point (EP) for this Supply. The EP contains the unique Token of the Supply.
- QPS: The QPS (Queries Per Second) limit for this Supply, indicating the maximum number of requests from the Supply per second. Requests exceeding this limitation will be ignored by the system.
- Detection Service: Supply’s detection service for advertisements. The system is integrated with the GeoEdge service. After configuring this service, you can choose it according to Supply requirements. If the Supply system requires ad approval before delivery and needs API integration in the background, LeadsDSP has integrated AD detection for Google ADX. For other integrations, please contact the LeadsDSP team.
- Status: The status of the Supply, which can be Pending, Active, or Blocked. The system only accepts traffic from Supplies in the Active status.
- Traffic Filter: Supply-provided traffic typically includes traffic from multiple apps or sites. You can choose to receive traffic from specific apps only (whitelist) or exclude traffic from certain apps (blacklist).

Above the traffic list, a summary of the total QPS of Active Supplies is displayed. This provides an overview of the total amount of traffic currently integrated into the system.
At the top of the page, there is an SaaS Traffic toggle option. SaaS Traffic refers to the traffic already integrated into the LeadsDSP SaaS platform. If you wish to purchase these traffic, you can accept it. Subsequently, you can contact with our LeadsDSP team to allocate the traffic you require.
Media Buyer
Media Buyers act as agents for advertisers and can create private advertisers under their management. They use the LeadsDSP platform to purchase traffic for advertisers. Media Buyers can create Campaigns, upload creatives, target audiences, and optimize campaign performance.
Click on the "Media Buyers" menu to access the Media Buyer list page, where all Media Buyers within the system are listed. You can use filters based on status and name for quick navigation.

Click the "New" button at the top of the list to create a new Media Buyer. Both the "Name" and "Email" must be unique within the system. Media Buyers will use their provided Email and password to log in to the system.
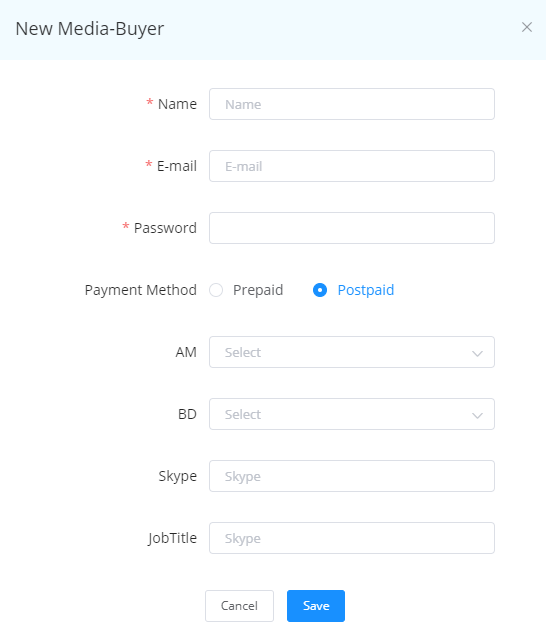
If there are many Media Buyers to manage or if your company has roles like BD (Business Development) or AM (Account Manager) responsible for serving specific Media Buyers, you can assign BD and AM personnel to those Media Buyers.
The "Payment Method" explains how the Media Buyer’s payments are managed and can be either "Postpaid" or "Prepaid."
- Postpaid: Media Buyers buy traffic upfront and subsequently settle advertising fees with LeadsDSP Client on a scheduled basis (e.g., weekly or monthly).
- Prepaid: Media Buyers deposit funds into their accounts with LeadsDSP Client prior to acquiring traffic. As campaigns run and the balance decreases, they must replenish their accounts for continued use.
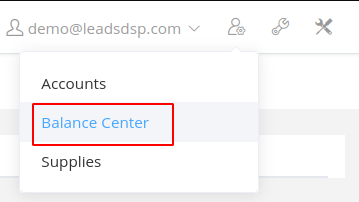
The entry point for recharging prepaid accounts is located in the pop-up menu at the top-right corner of the system.
Within the "Charging" tab, click the "New" button to recharge the balance of a prepaid Media Buyer.
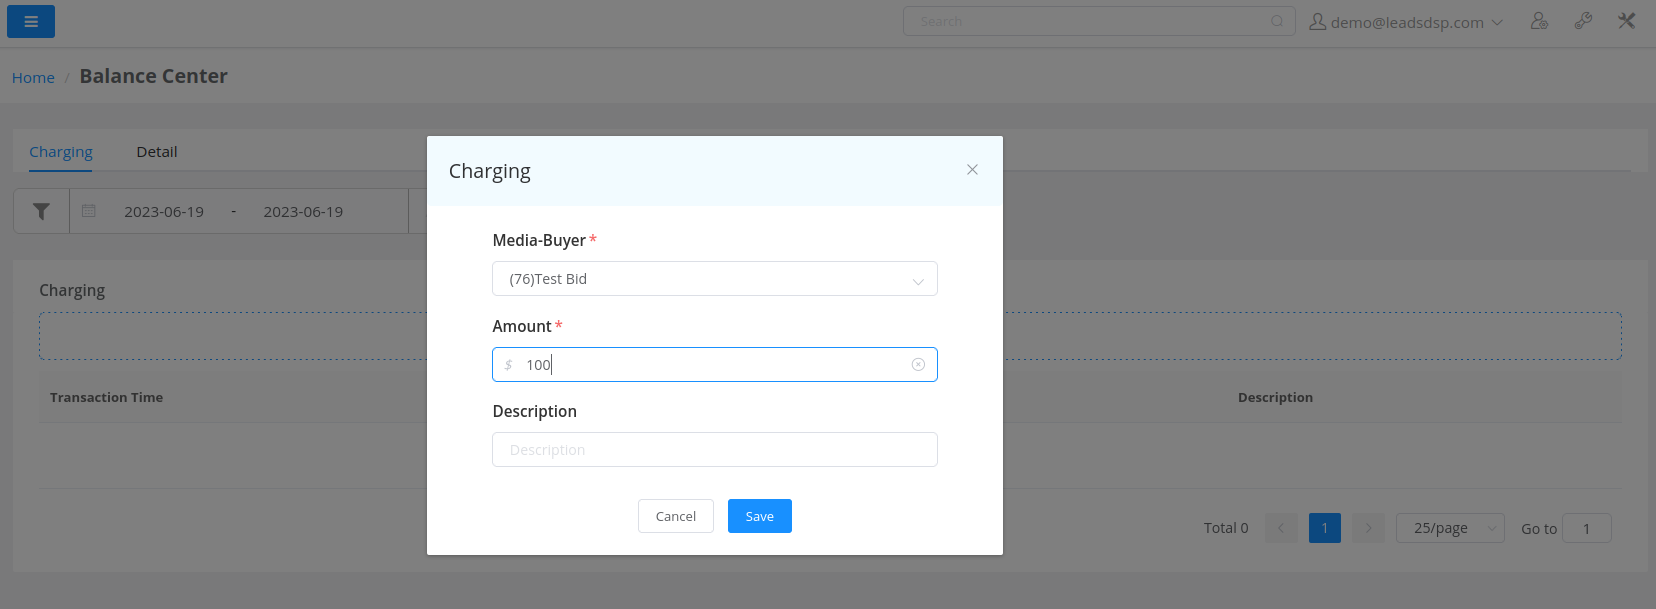
After recharging, the recharge record will be displayed in the list.
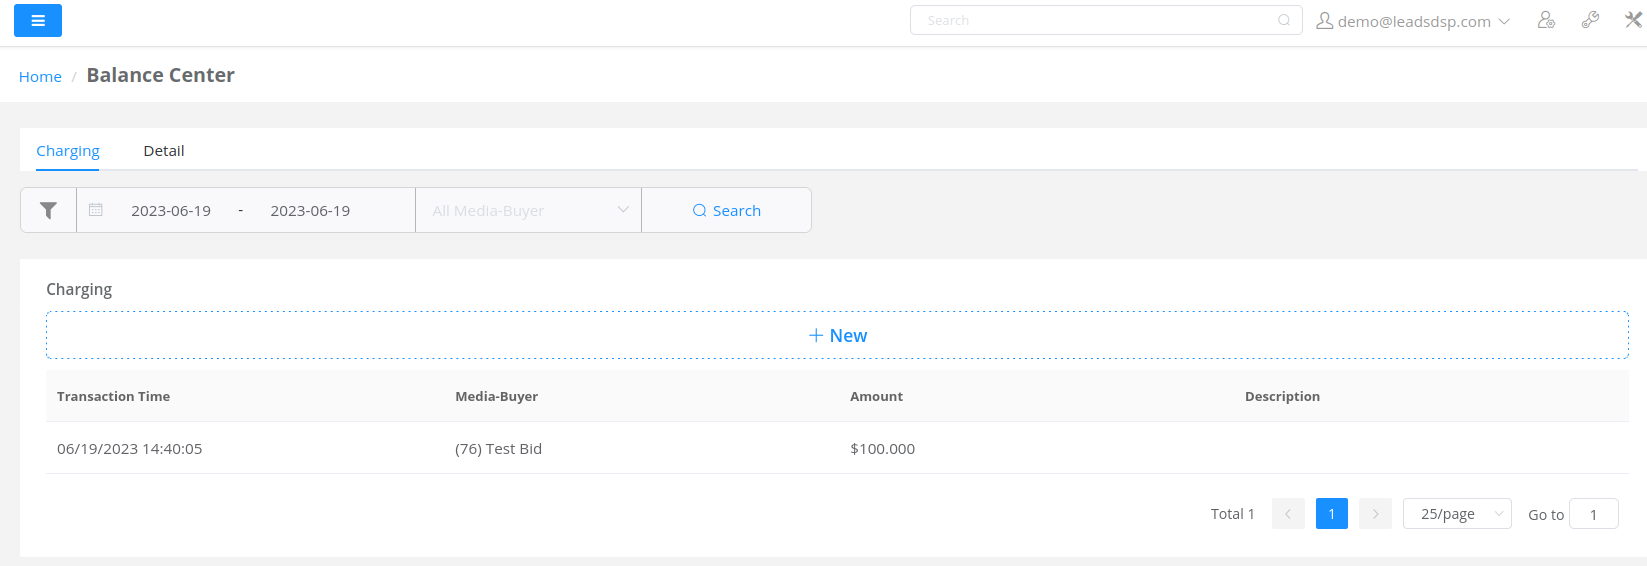
Following the recharge, the balance of the Media Buyer will increase, and this balance will be shown in the "Balance" column of the Media Buyer list.
Transaction Channels
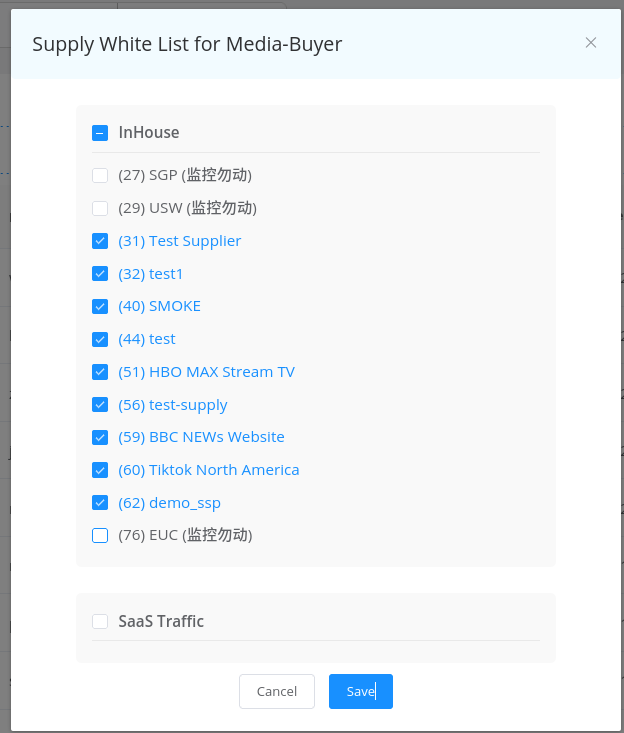
To enable a Media Buyer to purchase traffic from a specific Supply, administrators need to establish a transaction channel between the Media Buyer and the Supply. This is achieved through the Media Buyer’s Supply whitelist. The entry point for this whitelist can be found in the "Supply White List" column of the Media Buyer list.

The Supply whitelist displays the Supplies created by administrators. Selecting a Supply from this list implies that the Media Buyer can buy traffic from that Supply.
If the administrator accepts shared SaaS platform traffic, an option called "SaaS Traffic" will appear at the bottom of this Supply whitelist. Checking this option allows the Media Buyer to purchase traffic shared by LeadsDSP’s SaaS platform.
Advertisers
Media Buyers obtain advertising requirements and budgets from advertisers, purchase traffic, and run advertising campaigns on their behalf. Each Media Buyer can create multiple advertisers, and when creating a Campaign, it’s specified which advertiser the Campaign serves. Advertisers can also log in to the system to monitor the performance and expenses of Campaigns under their ownership.
Administrators or Media Buyers can create advertisers by clicking on the "Advertisers" menu to access the advertiser list page.

For performance-based Campaigns, it’s necessary for the advertiser’s system to provide conversion data. LeadsDSP’s postback link can be directly used for this purpose. Most advertiser systems don’t require special integration and can be set up directly. However, there are some special requirements for certain advertiser systems that LeadsDSP has integrated with:
- AliExpress RTA: Requires confirmation from the AliExpress system before delivery, regarding the device’s eligibility for advertising, as well as materials and landing pages for delivery.
- Apple SKNetwork: Has specific requirements regarding the method and timing of receiving conversion data.
- Lazada RTA: Requires confirmation from the Lazada system before delivery, regarding the device’s eligibility for advertising.
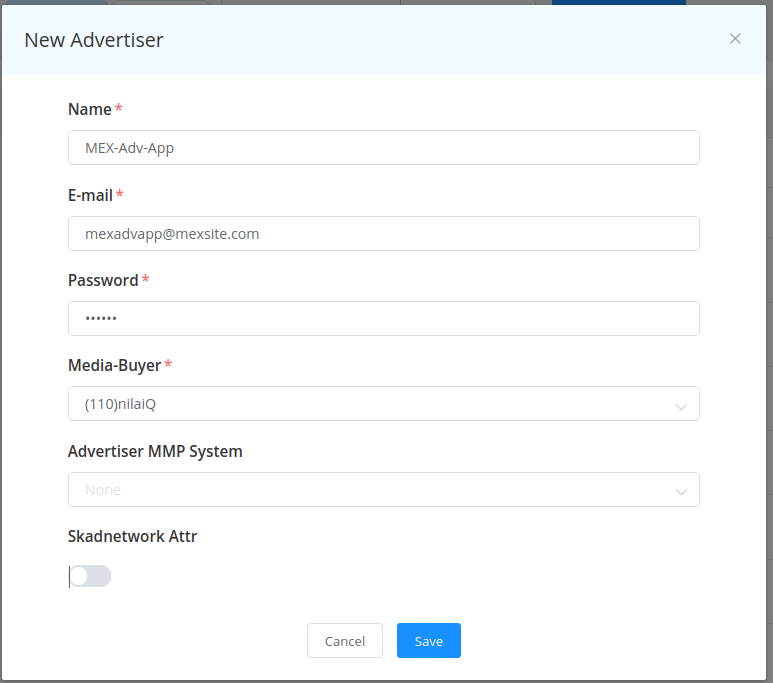
Clicking the "New" button at the top of the list allows you to create a new advertiser. If created by an administrator, the associated Media Buyer needs to be specified. After creation, advertisers can log in to the system using their Email and password.
Campaign
A Campaign corresponds to a promotional task from an advertiser, including targeting, budgeting, delivery phases, strategies, and revenue models.
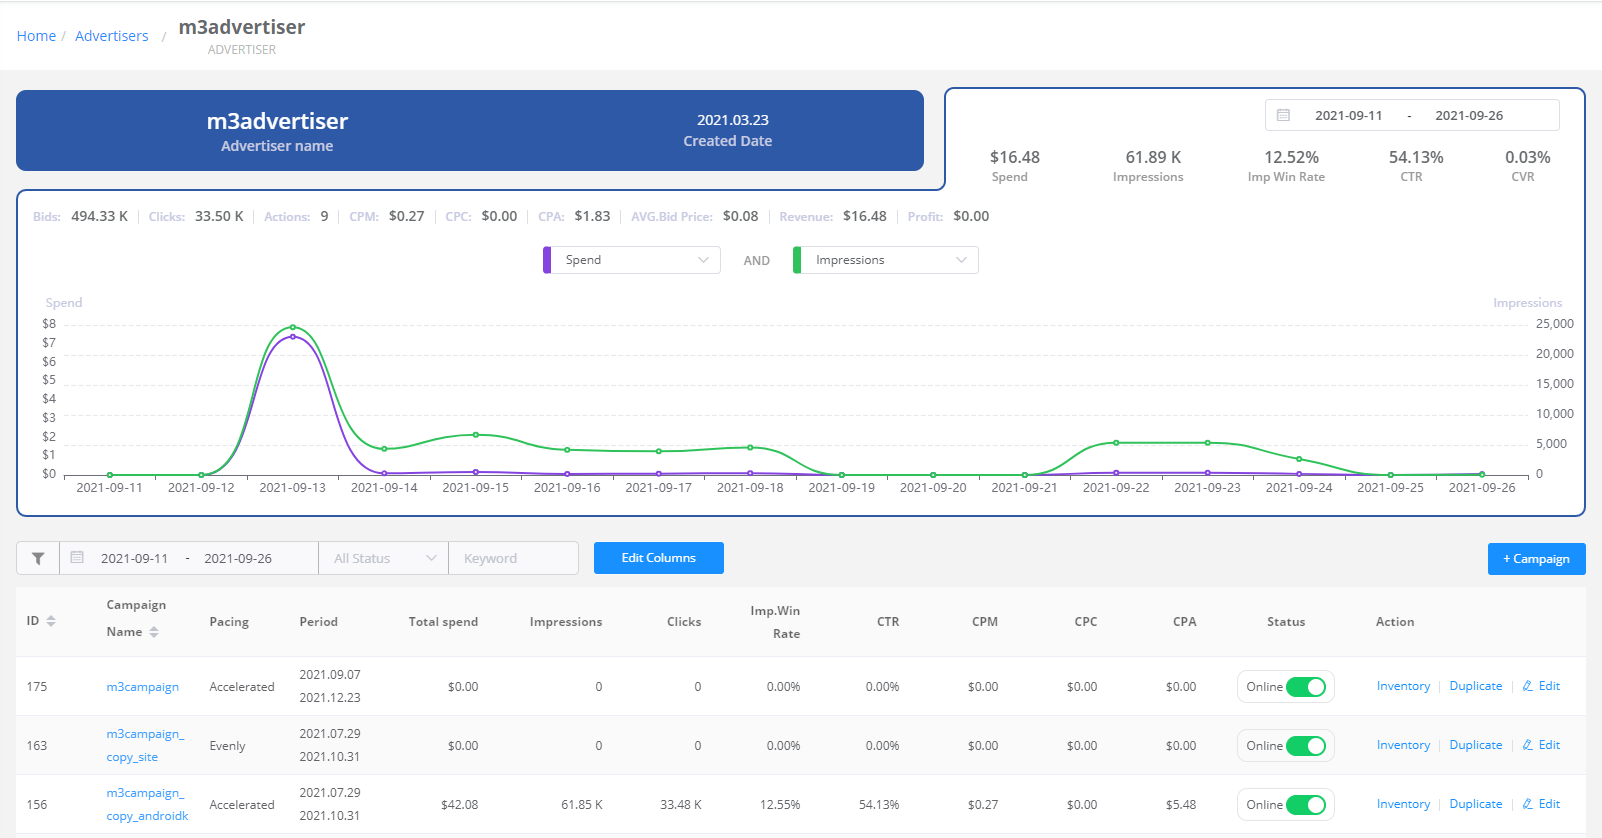
Access the Campaign list page through the "Setup Campaign" command in the advertiser list. The top section of the page displays overall metrics and graphics, while the Campaign list is located below. You can quickly change the status of campaigns in the list, enabling or pausing their delivery.
Creating a Campaign
Click the "+Campaign" command at the top-right corner of the list to create a new Campaign.
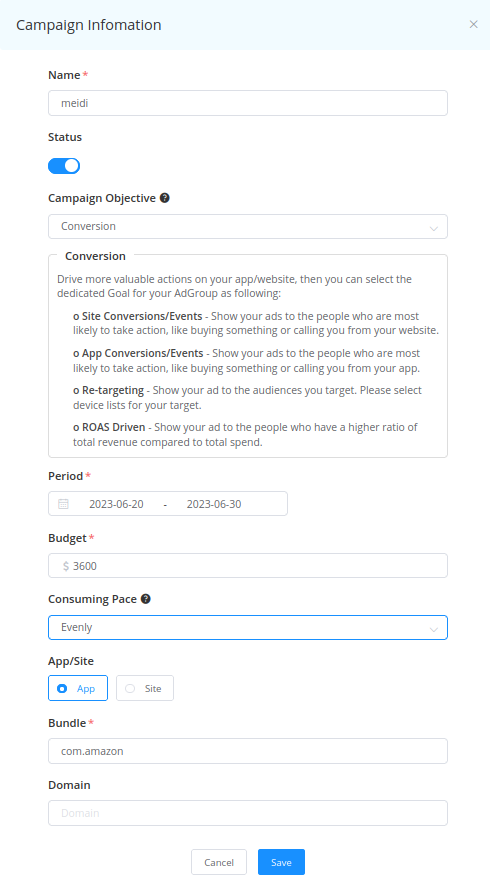
When creating a Campaign, specific information needs to be provided:
- Campaign Objective: The objective of the Campaign, which can be Awareness, Consideration, or Conversion. Different objectives correspond to different bidding modes, which are detailed in the Ad Group settings.
- Period: The delivery phase, including start and end dates.
- Budget: The total budget of the Campaign, in US dollars.
- Consuming Pace: The consumption speed, which can be Evenly or Accelerated. Evenly means an even daily budget consumption, while Accelerated aims to use the budget as quickly as possible.
- App/Site: Specifies whether the promotion target is an App or a Site.
- Bundle: If the promotion target is an App, the App’s Bundle ID needs to be specified.
- Domain: If the promotion target is a Site, the Site’s Domain needs to be specified.
Campaign Properties
After creating a Campaign, you can further configure additional properties to specify the details of the Campaign’s delivery. These properties are displayed in a hexagonal pattern, with previously set properties highlighted in blue and unset properties in gray.
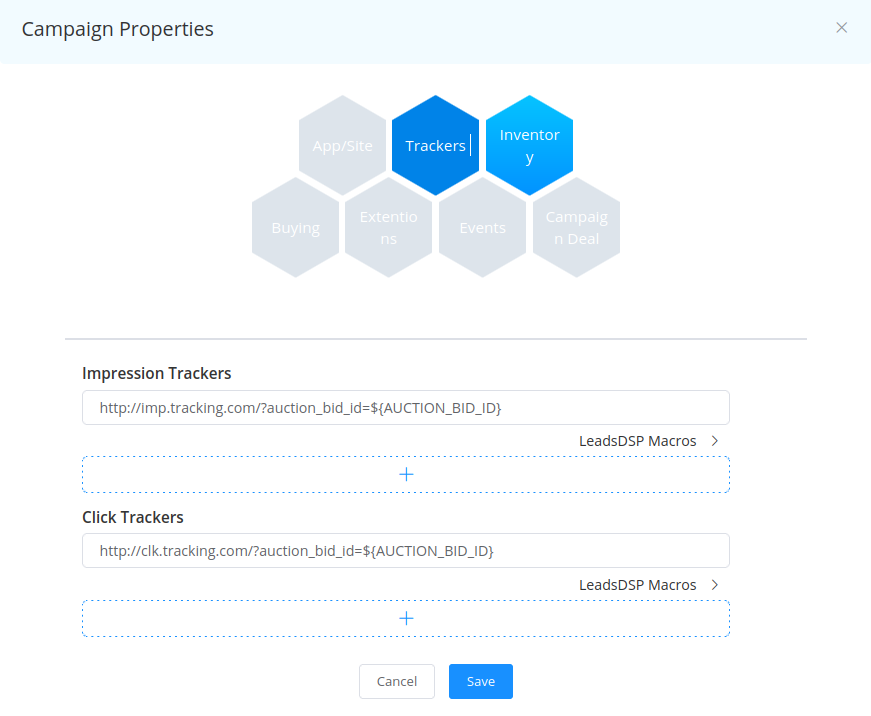
Explanation of Campaign properties:
- App/Site: Set the App store URL, Rating score, Likes count, and content categories. These categories follow the iAB RTB standard and can be multi-selected to match traffic demands.
- Trackers: Add impression and click tracker links from the advertiser’s system or other upstream systems to track the effectiveness of the Campaign.
- Inventory: Allocate traffic to the Campaign by assigning Supplies. The available options are based on the Media Buyer’s Supply whitelist. Additionally, you can quickly access the traffic allocation interface through the "Inventory" command in the Campaign list.
- Buying:
- Target Categories: The iAB categories of traffic required for the Campaign. Once set, only traffic that matches the selected categories will be eligible for the Campaign. Multiple categories can be selected.
- Revenue Model: The revenue model for the Campaign, which can be CPM/CPC/CPI.
- Extensions: Additional data in Key-Value format. If set, it will be included in the bid response during delivery and can be used for special integrations with upstream and downstream systems.
- Events: Configurable conversion events. Set event names and tokens; when receiving conversions, if a token is provided, it should match the token set here. If not set, all conversion events will be received.
- Campaign Deal: If a Private Inventory Rule with PMP (Private Marketplace) is configured, you can select a PMP for the Campaign here. Once selected, the Campaign will participate in the specified PMP deal.
Campaign Details
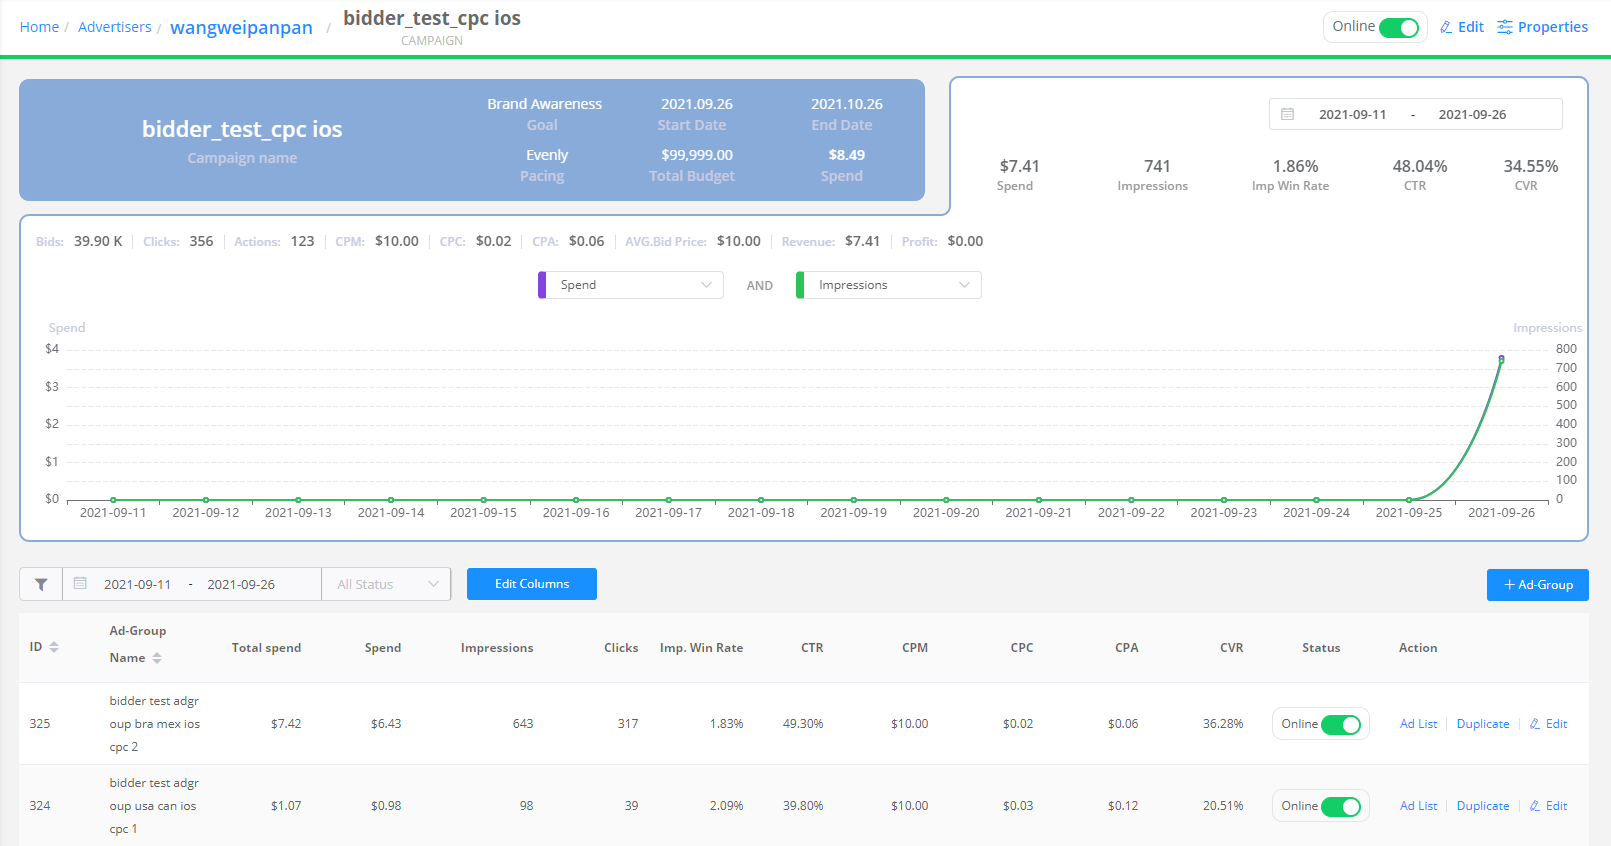
On the right side of the Campaign list, there are entry points to set Inventory, duplicate, and edit Campaigns. Clicking on the "name" column within the Campaign list leads to the Campaign details page.
The Campaign details page features quick status commands and property configuration links in the top section. The central section displays performance statistics and graphics for each Ad Group’s data within the Campaign. Below, you’ll find the list of Ad Groups.
Ad Group
As mentioned earlier, a Campaign corresponds to an advertiser’s delivery task. Under a Campaign, Ad Groups represent different delivery strategies, and Ads represent specific creative formats matched with traffic characteristics.
Since the primary management object under a Campaign is the Ad Group, the Ad Group list becomes a primary component of the Campaign details page. Click the "+ Ad Group" command above the Ad Group list to create a new Ad Group.
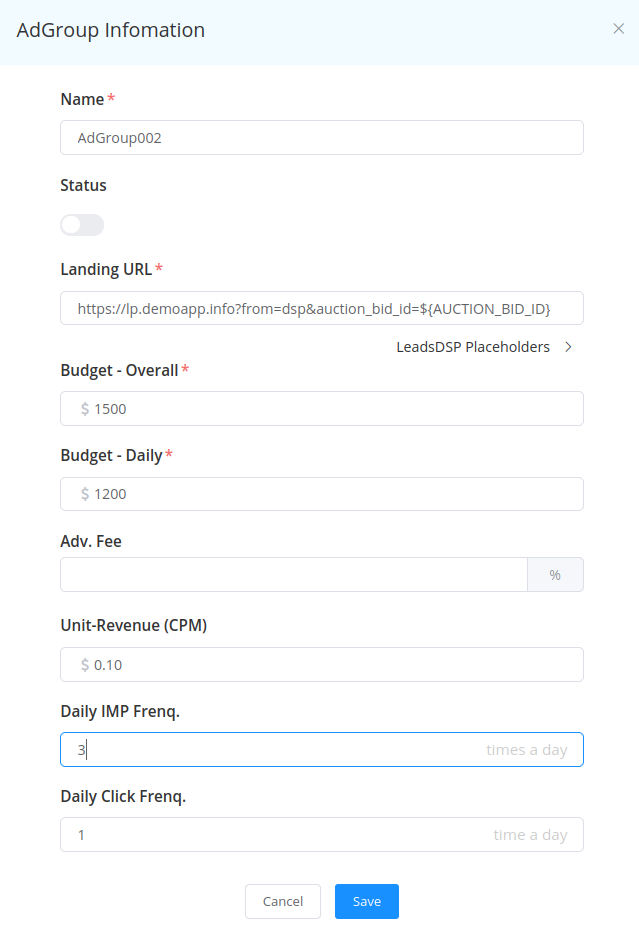
When creating an Ad Group, specific information needs to be provided:
- Status: Defaulted to "Offline," which requires manual activation after creating and configuring various attributes. If set to "Online," but essential settings are incomplete, the system won’t deliver ads for this Group.
- Landing Page: The landing page after clicking the ad. It can be the App Store or a Site’s landing page. The reason for setting the landing page at the Ad Group level is that different Ad Groups might have different landing pages due to country or language differences.
- Budget-Overall: The total budget of the Ad Group in US dollars. This budget must not exceed the Campaign’s budget.
- Budget-Daily: The daily budget of the Ad Group in US dollars. This budget must not exceed the Campaign’s budget and should not surpass Budget-Overall.
- Unit-Revenue: Set the unit revenue corresponding to the Campaign’s Revenue Model (CPM/CPC/CPI). This is the revenue price of the Campaign. Different countries might have different revenue prices, and these targeting conditions are set at the Ad Group level.
- Daily Impression Frequency: The maximum number of impressions for this Ad Group per device per day.
- Daily Click Frequency: The maximum number of clicks for this Ad Group per device per day.
After creation, the Ad Group is listed. Clicking the "Edit" command on the right side of the list opens the Ad Group’s property settings page to configure its attributes.

The layout of the Ad Group attribute page is similar to the Campaign attribute page, using a hexagonal pattern. Previously set attributes are highlighted in blue, and unset attributes have a gray background.
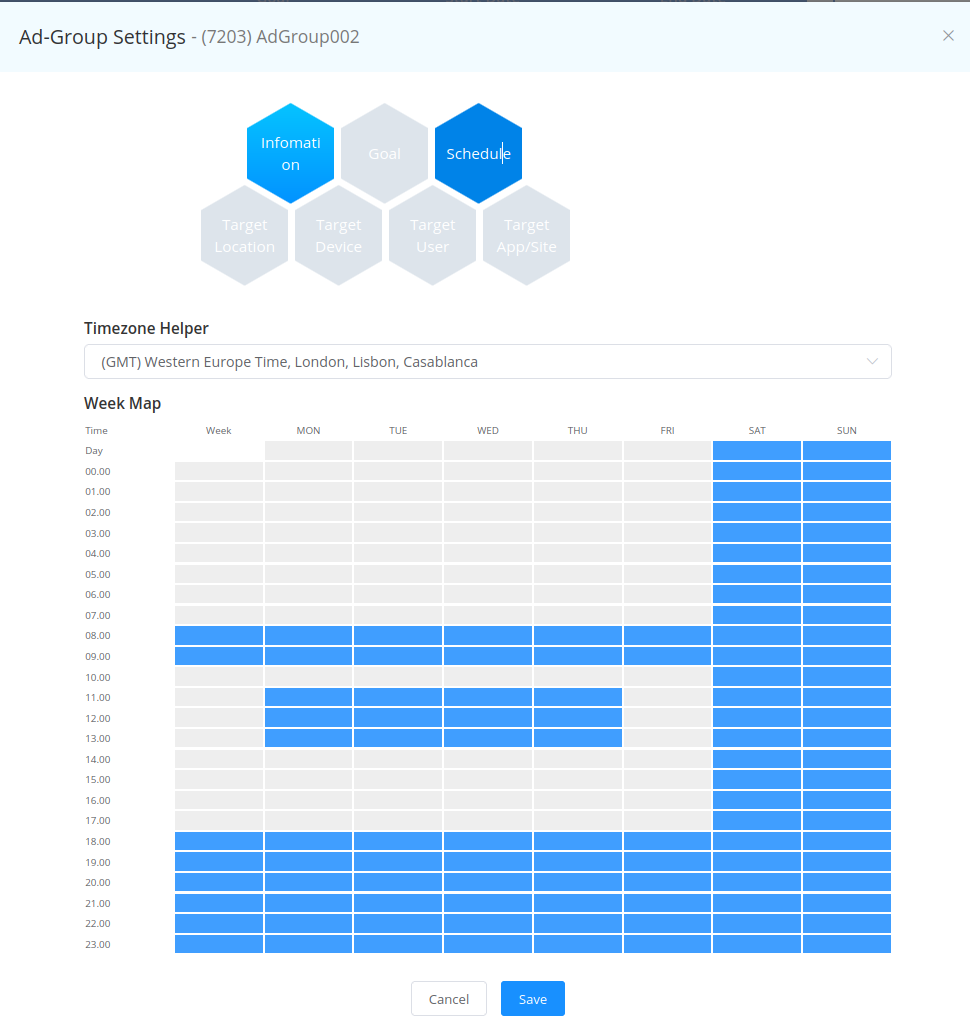
Ad Group Attribute
- Information: The information here is consistent with what was provided during creation and can be modified.
- Goal: Depending on the Campaign’s objective, the available options here vary. The selected Goal ultimately affects the bidding mode of the Ad Group.
- Schedule: Set the delivery schedule for the Ad Group. You can set it as needed, specifying time periods within the 7×24 hours of a week. The image above displays the Schedule setting interface.
- Target Location: Target geographical regions for the Ad Group. Multiple selections are possible. If not set, it implies no geographical restriction. You can also set excluded regions, meaning not delivering to specific areas.
- Target Device: Device-related targeting settings
- Device Type: Device types, multiple selections possible. If not set, it implies no device type restriction.
- OS: Operating systems, multiple selections possible. If not set, it implies no OS restriction.
- Device Brand: Device brands, multiple selections possible. If not set, it implies no brand restriction.
- IP Blacklist: IP blacklist. If set, it means not delivering to devices with these IP addresses.
- Target User: User-related targeting settings
- Gender: Gender, default "all" meaning no gender restriction. Alternatively, you can choose "Male" or "Female."
- Age: Age range for targeting. Default is 13~65+.
- Carrier: Carriers, multiple selections possible. If not set, it implies no carrier restriction.
- Language: Language, can be set in either blacklist or whitelist mode, multiple selections possible. If not set, it implies no language restriction.
- Target App/Site: App or Site targeting. Can be set in either blacklist or whitelist mode, multiple selections possible. If not set, it implies no App or Site restriction.
Ad Group Goal
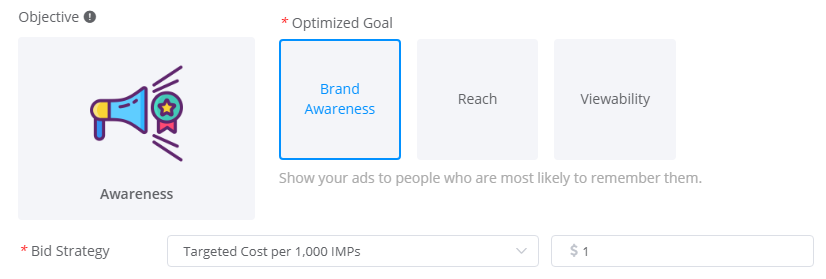
Ad Groups have various bidding modes, each of which is explained below:
- Fixed CPM: Sets a fixed CPM bid.
- Targeted Cost per 1000 IMPs: Sets a target CPM bid. The system automatically adjusts the bid based on traffic to achieve a CPM close to the target.
- Targeted Cost per Click: Sets a target CPC bid. The system automatically adjusts the bid based on traffic and its effectiveness to achieve a CPC close to the target.
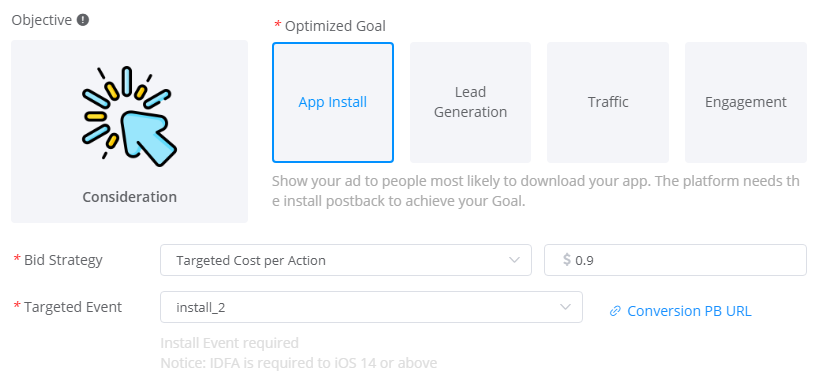
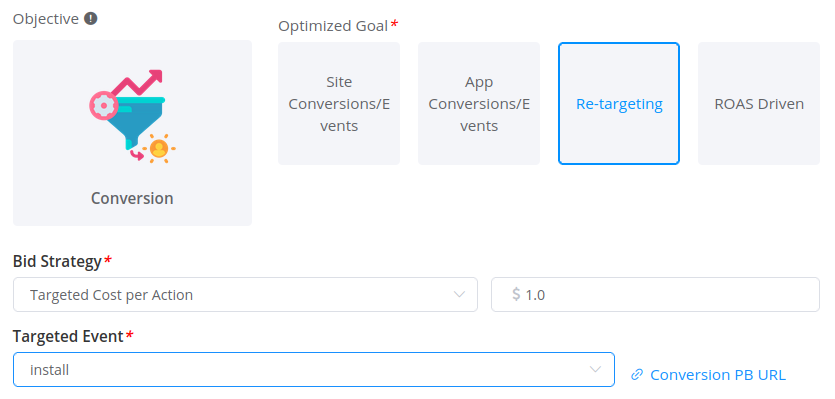
- Targeted Cost per Action: Sets a target CPA bid. The system automatically adjusts the bid based on traffic and its effectiveness to achieve a CPA close to the target. This mode requires selecting an event in the Campaign’s Events attribute to serve as the Campaign Revenue event.
- Targeted ROAS: Sets a target ROAS. The system automatically adjusts the bid based on traffic and its effectiveness to achieve a ROAS close to the target. This mode requires selecting an event in the Campaign’s Events attribute to serve as the Campaign Revenue event.
The available bidding modes depend on the Campaign’s objective, as shown in the table below:
| Campaign Objective | Ad Group Goal | Fixed CPM | Targeted Cost per 1000 IMPs | Targeted Cost per Click | Targeted Cost per Action | Targeted ROAS |
|---|---|---|---|---|---|---|
| Awareness | Brand Awareness | √ | √ | |||
| Awareness | Reach | √ | √ | |||
| Awareness | View ability | √ | √ | |||
| Consideration | App Install | √ | √ | |||
| Consideration | Lead Generation | √ | ||||
| Consideration | Traffic | √ | ||||
| Consideration | Engagement | √ | √ | √ | √ | |
| Conversion | Site Events | √ | ||||
| Conversion | App Events | √ | ||||
| Conversion | Re-targeting | √ | √ | √ | √ | |
| Conversion | ROAS Driven | √ |
Here are examples of the Ad Group Goal setting interface:
- Campaign Goal: Awareness, Ad Group Goal: Brand Awareness
- Campaign Goal: Consideration, Ad Group Goal: App Install
- Campaign Goal: Conversion, Ad Group Goal: Re-targeting
Ad
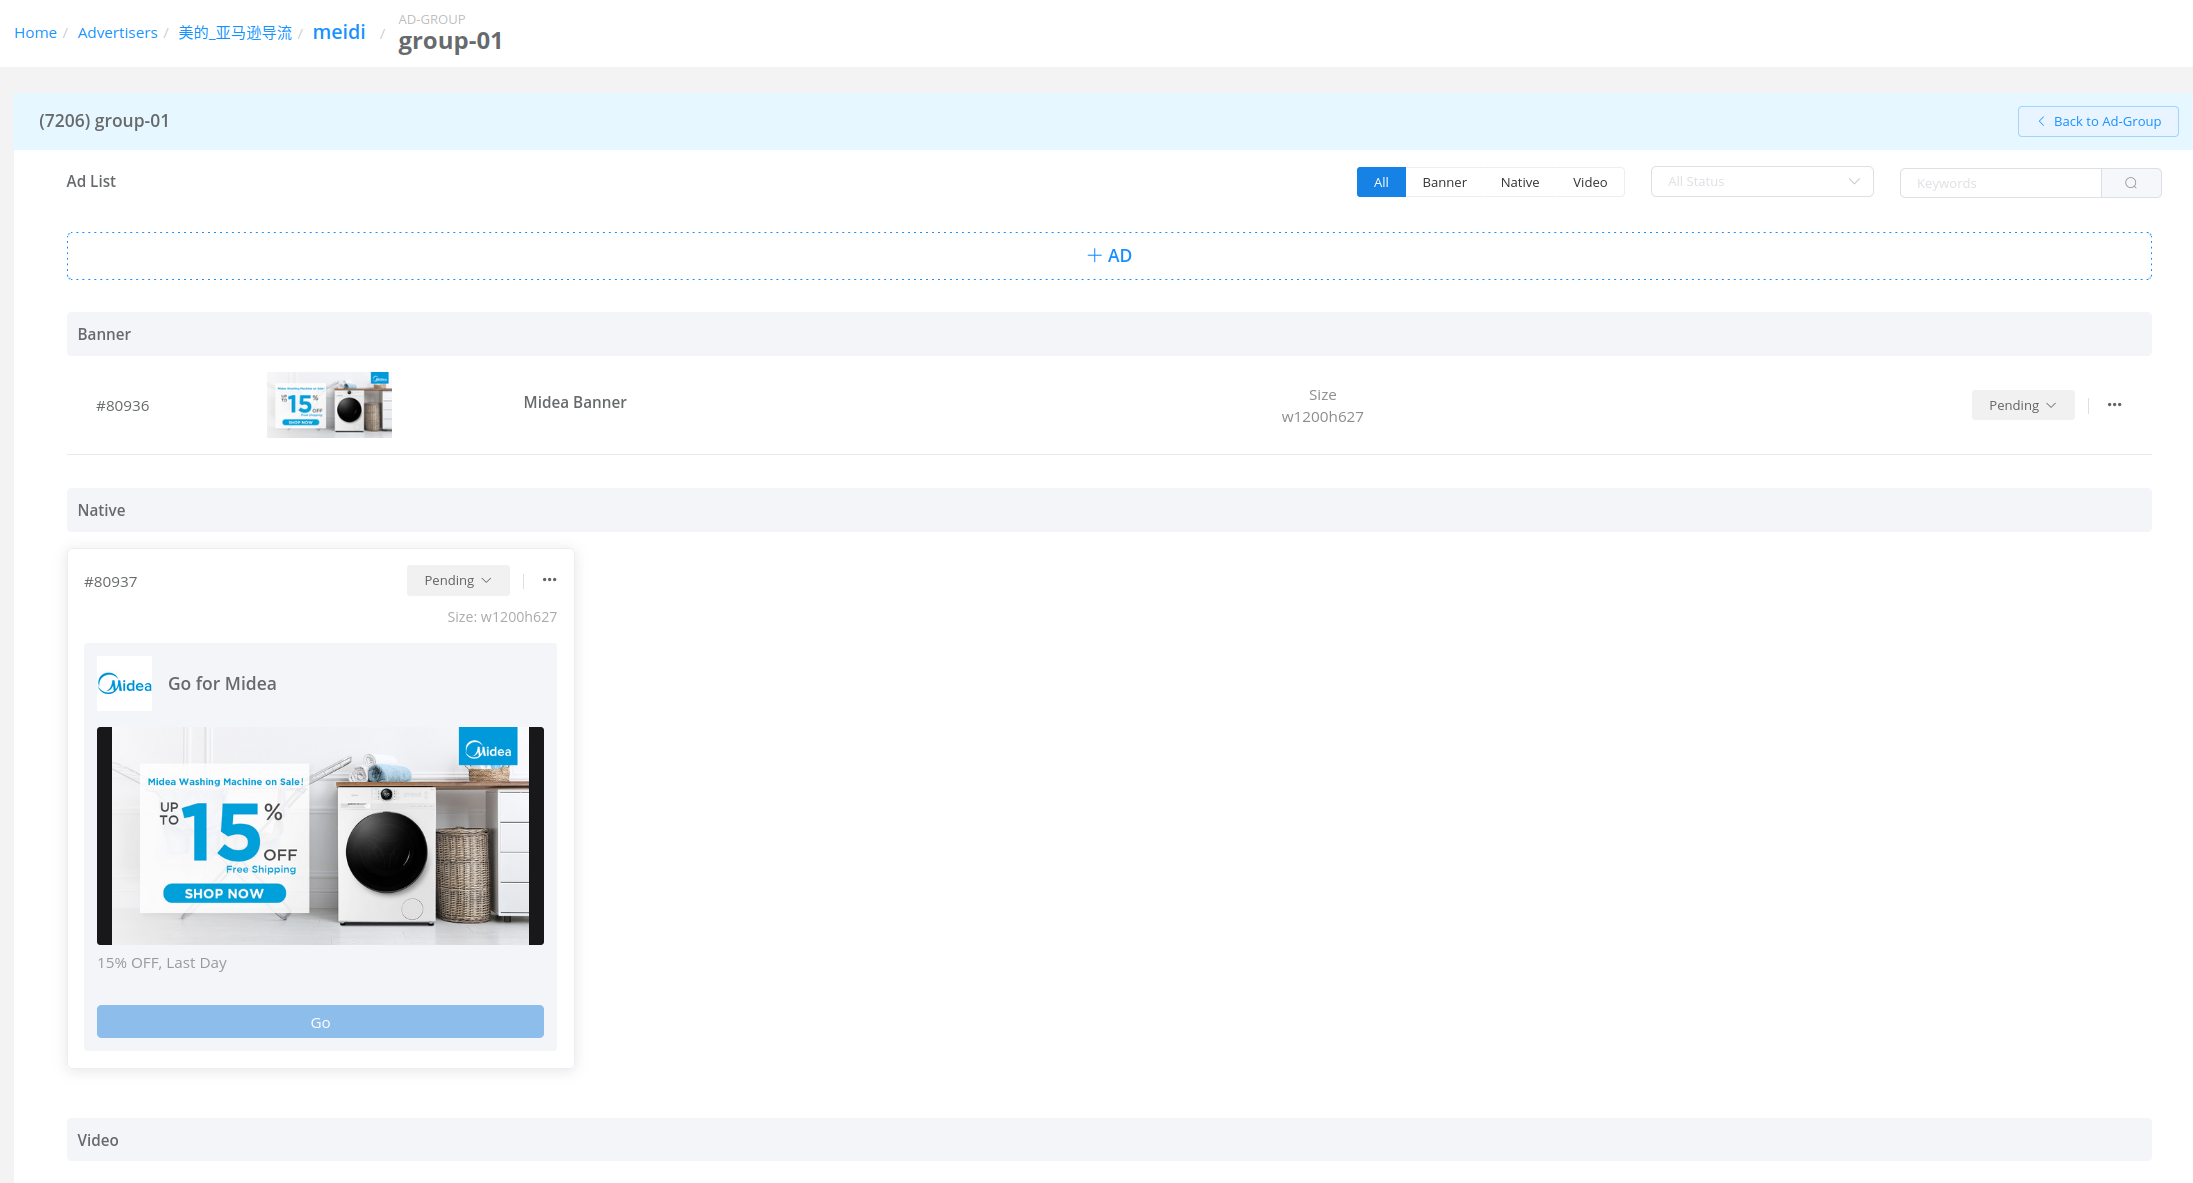
On the right side of the Ad Group List, clicking the "Ad List" command takes you to the Ad List. LeadsDSP supports three types of Ads: Banner, Native, and Video. The materials within Ads can include images, videos, or Tags (JS Tag, MRAID Tag).

The Ad List displays all Ads under the specific Ad Group, organized into three lists: Banner, Native, and Video. For existing Ads, you can set their status, edit them, or duplicate them to other Ad Groups. "Duplicate" means copying the selected Ad to other Ad Groups. After creating an Ad, its default status is "Pending." Once the status is changed to "Active," it can be delivered. Click the "+ AD" command above the list to create a new Ad.
Banner Ad
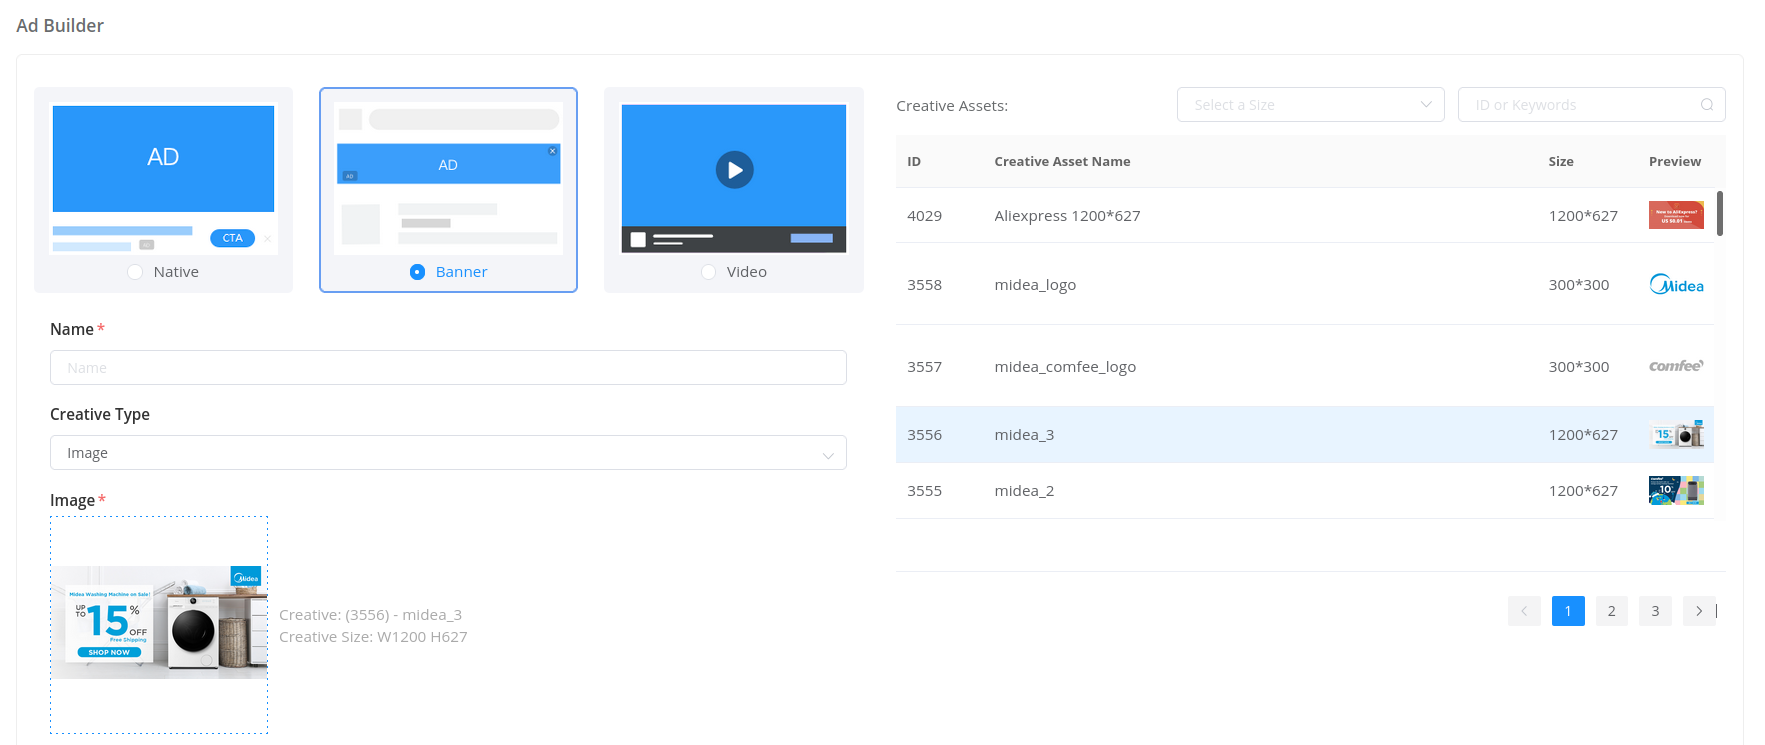
The material for Banner Ads can be an image or a Tag. Tags can be JS Tags or MRAID Tags, and the system provides a selection of available materials to choose from.
Native Ad
Native Ads are composed of a group of elements that the client uses for loading and rendering. These elements include:
- Title
- Description
- CTA: Call to Action
- Icon
- Main Image
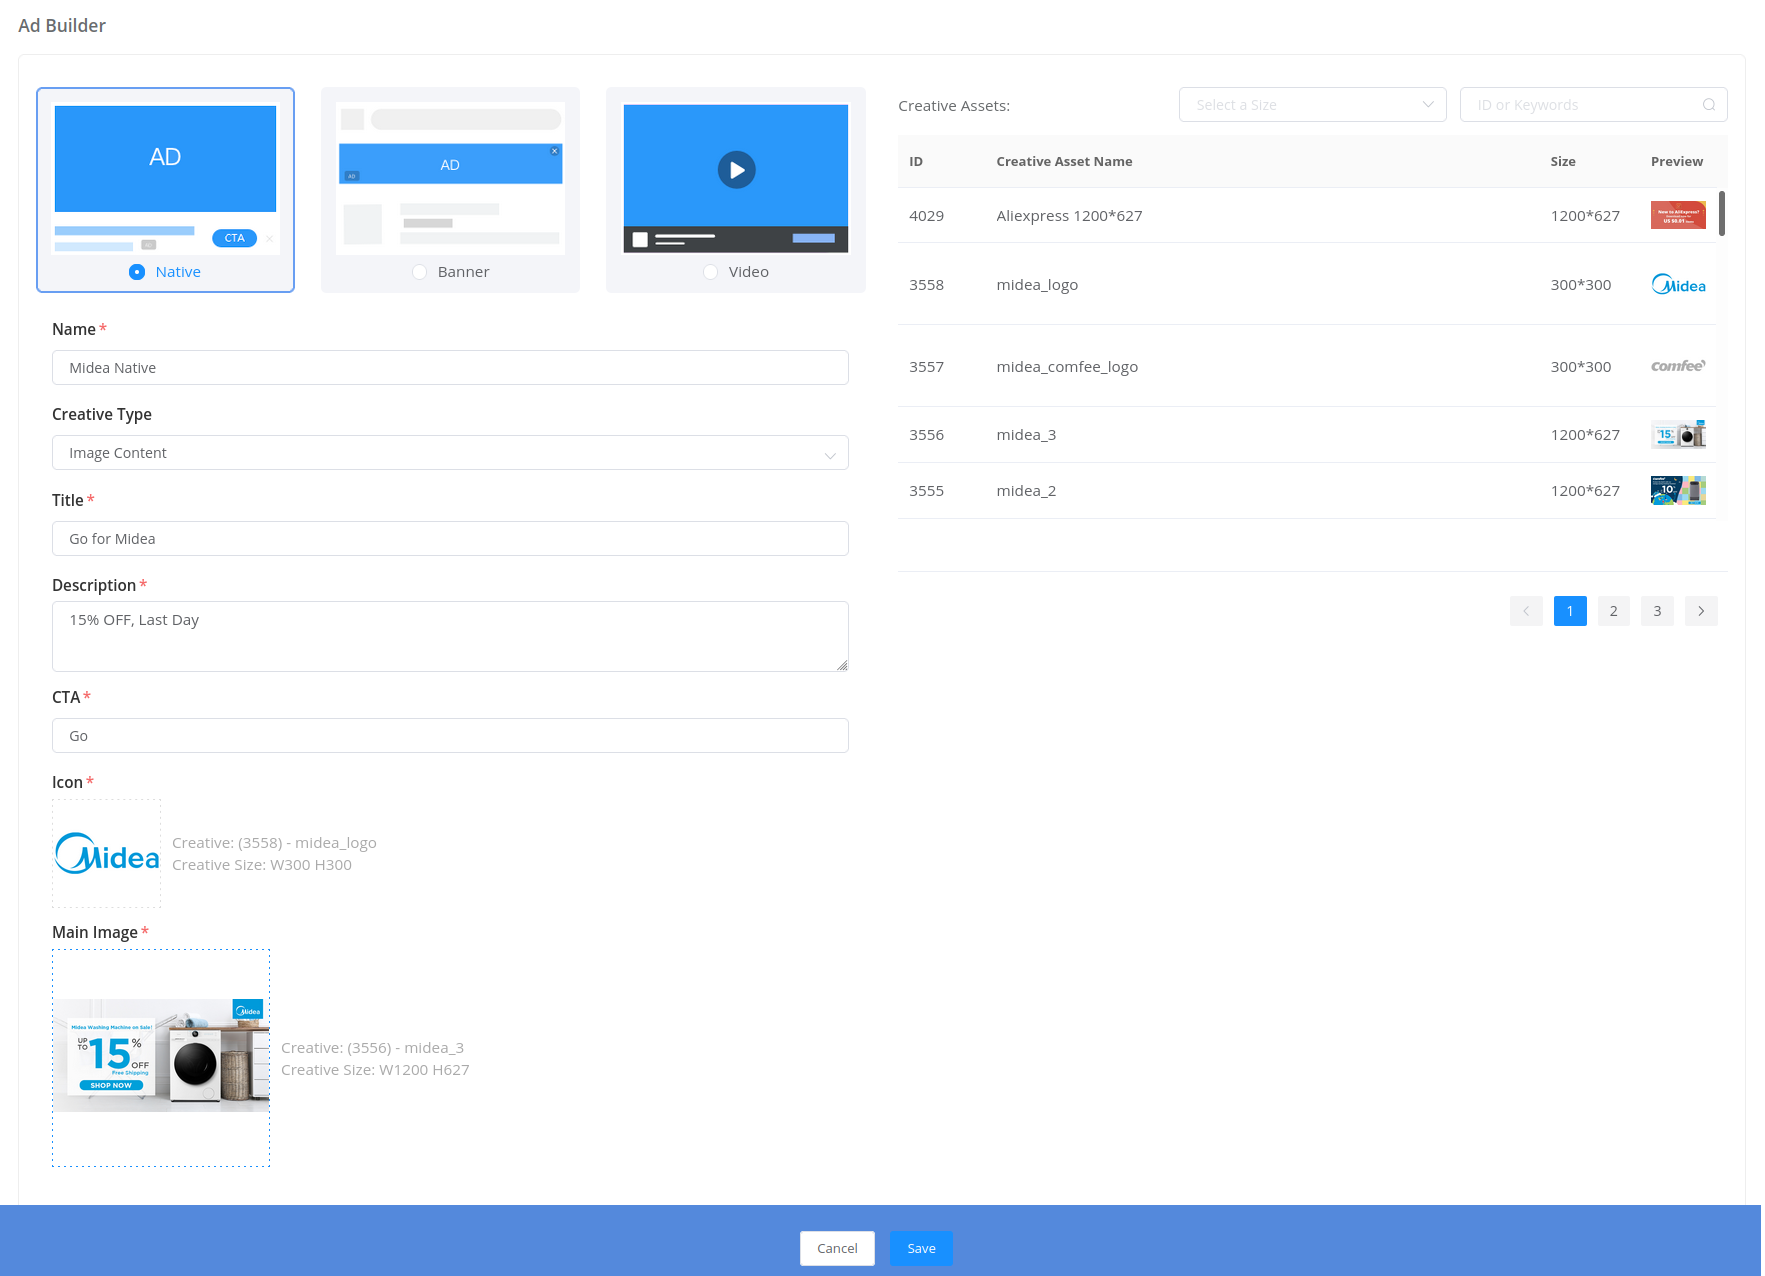
Native Ad’s Creative Type supports three options: Image Content, Video Content, and Video App Install. The last two options require specifying video material in addition to the main image.
Video Ad
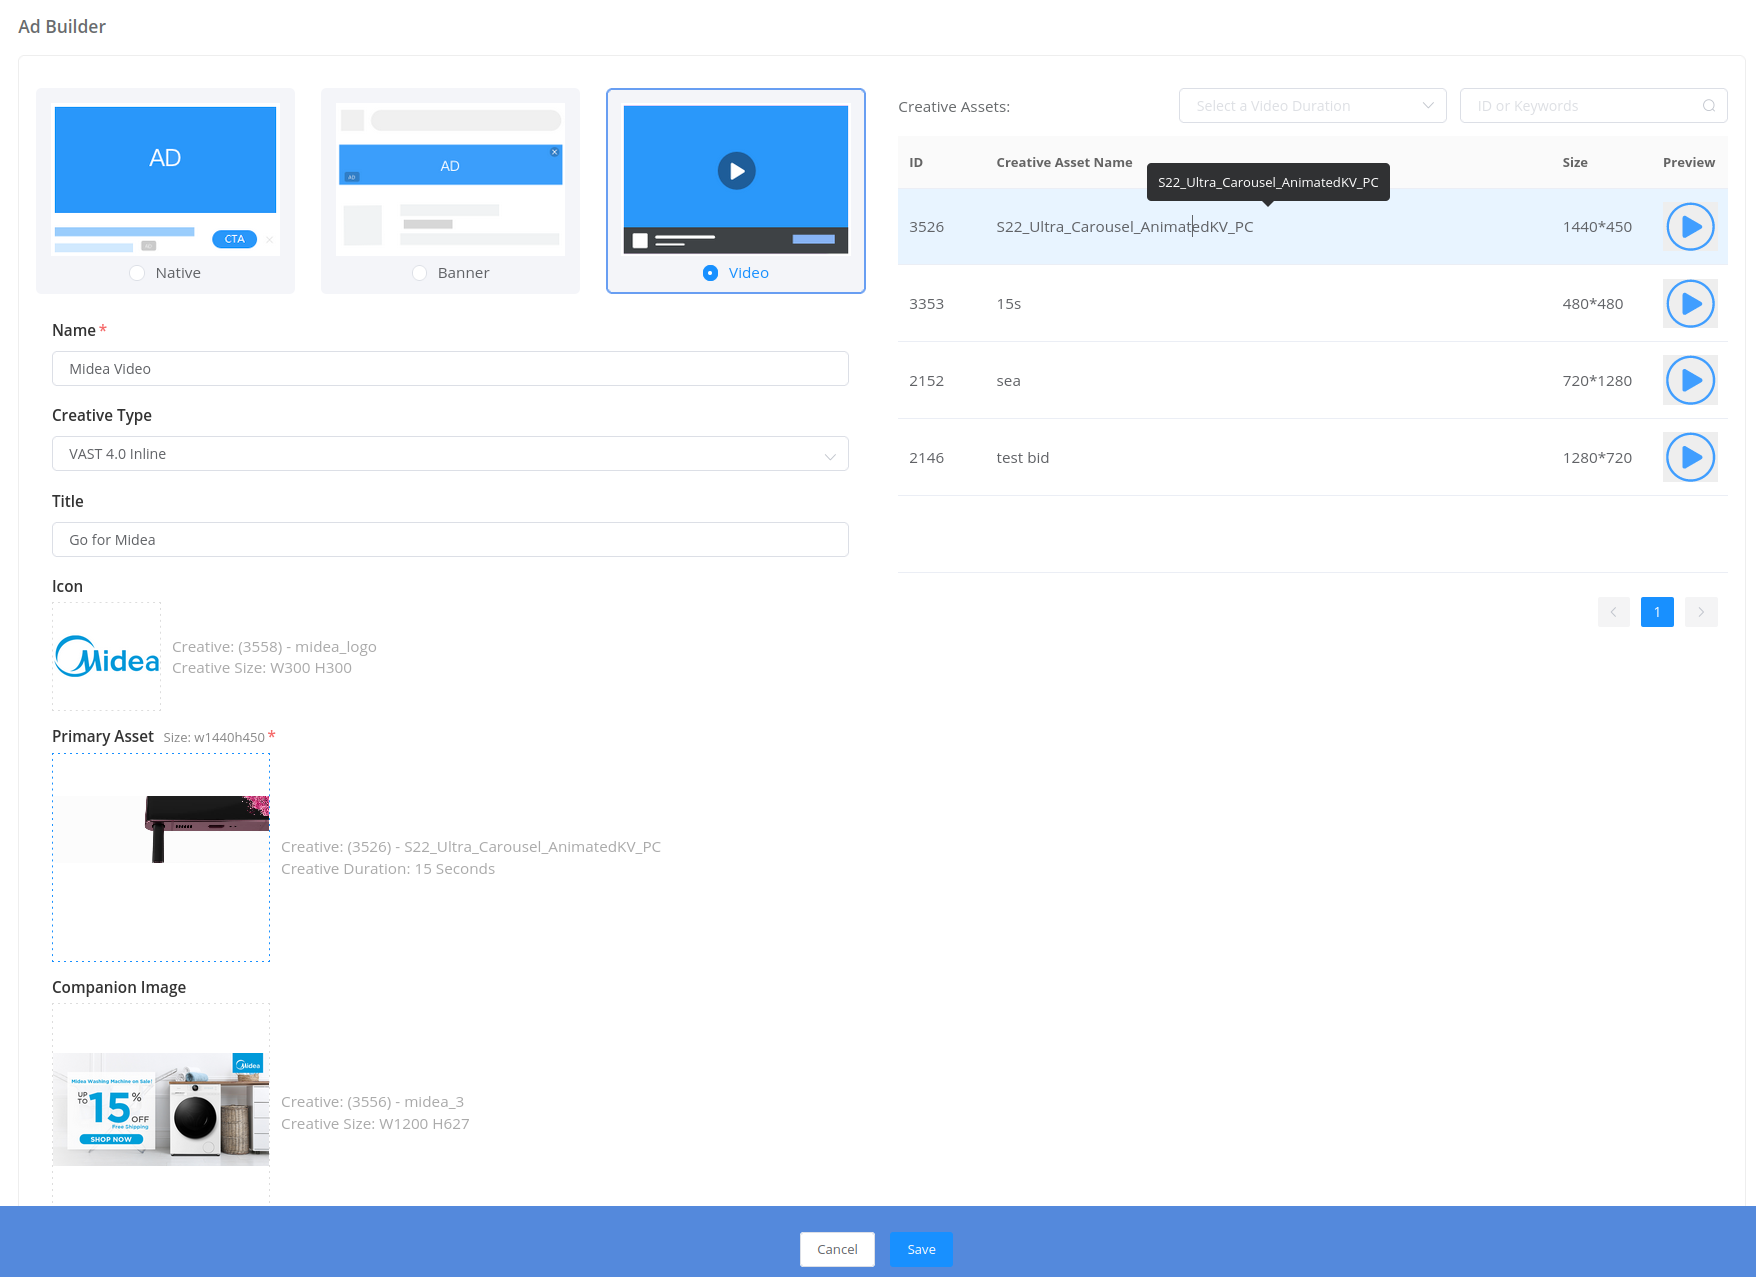
Native Video Ad is an Ad that displays video material in a Native format. Video Ad is rendered using the VAST protocol. Video Ad is formatted according to VAST 4.0 Inline by default. In addition to specifying the main video material, you can also set Title, Icon, and Companion Image to present the Ad in a more user-friendly way.
Creative
Creative refers to the aforementioned Ad materials, including images, videos, and Tags. Access the material list through the Creative Assets menu. The material list presents information such as the material’s type, size, preview, duration (Video), status, and more.
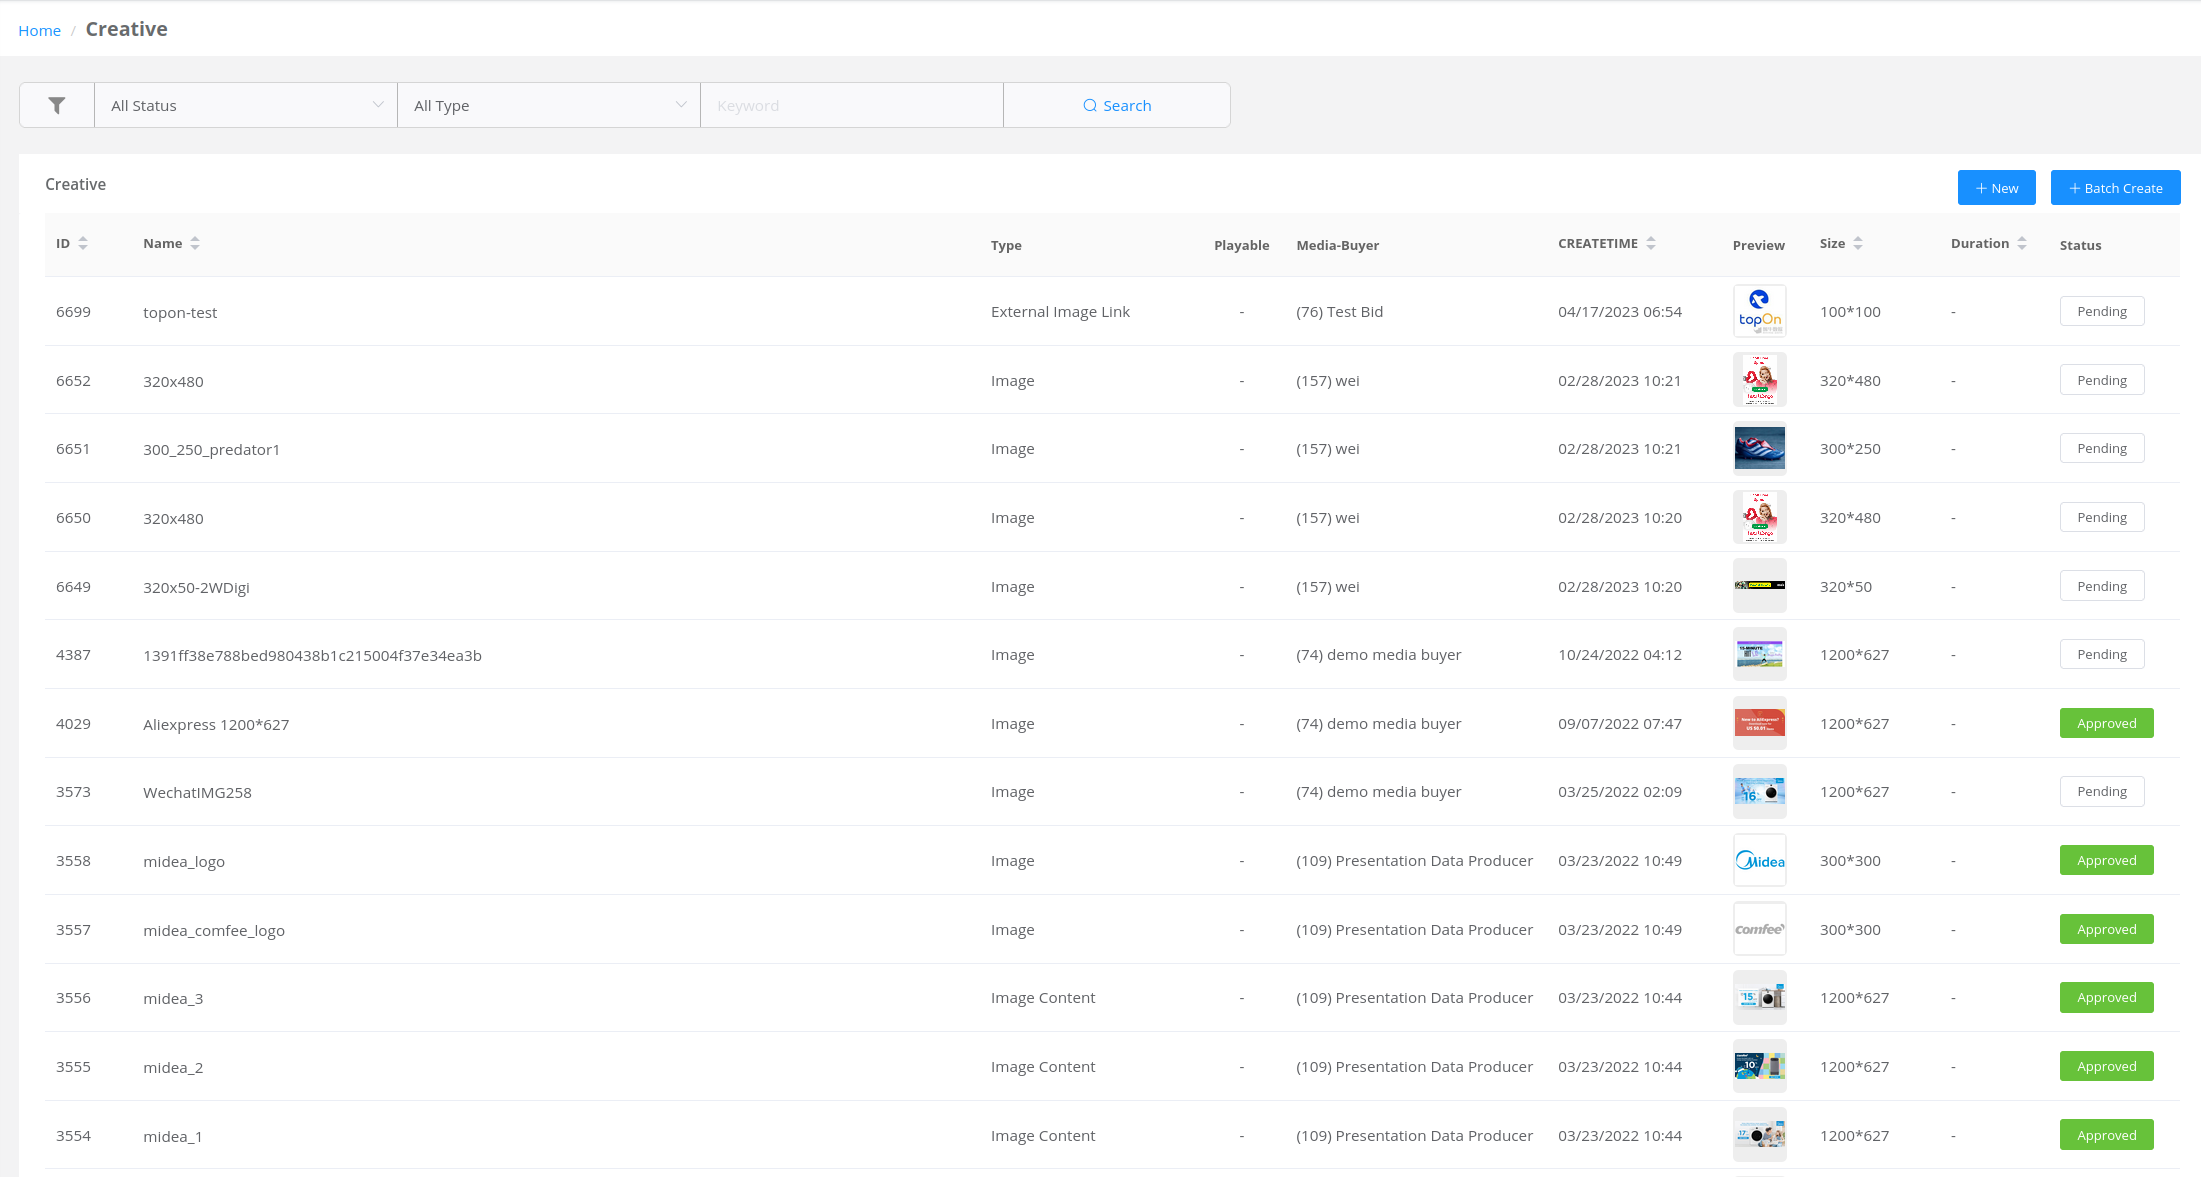
Click the "+ New" command above the Creative List to create new materials. The required information varies based on the material type.
Creative Type
LeadsDSP supports various types of materials, including images, videos, Tags, external links, and more.

- Image: Image material
- Tag
- JS Tag: JavaScript code snippet executed on the client to load or render the Ad
- MRAID Tag: Mobile Rich Media Ad Interface Definitions, rich media ads compliant with iAB standards
- DPA JS Tag: Dynamic Product Ads JS Tag, used for dynamic product ads (explained in detail in the DPA section below)
- Video: Video material; the system supports video durations of 15s, 30s, 60s
- External Image Link: External image material link
- External Video Link: External video material link
Among the above types, the two external link types refer to cases where the material files are stored outside the LeadsDSP platform. LeadsDSP platform has its default CDN distribution service. If clients have their own CDN distribution network, they can choose not to use LeadsDSP’s CDN service, in which case external link materials are applicable.
Creative Size
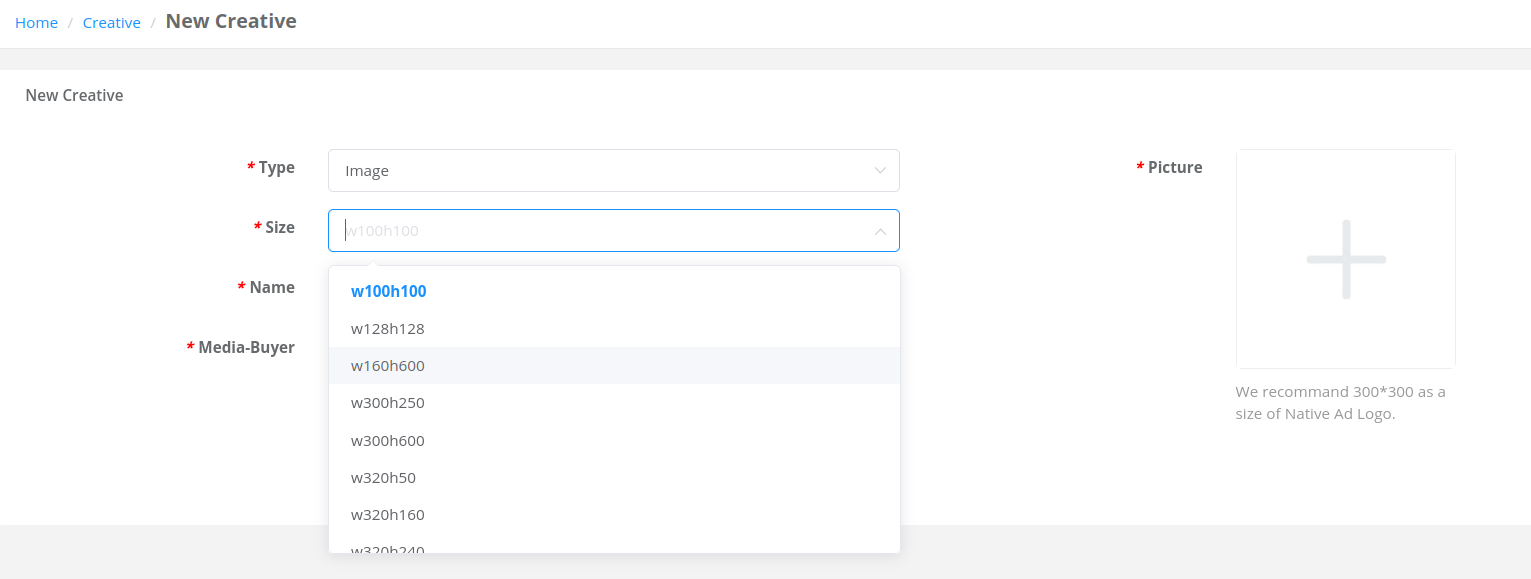
The system has compiled common sizes for App ad placements to be selected when creating materials. Over time, there might be new sizes. If you need new sizes, please contact the LeadsDSP team to add them. The size description uses width and height, such as w320h50 for a width of 320px and a height of 50px.
Creative Status
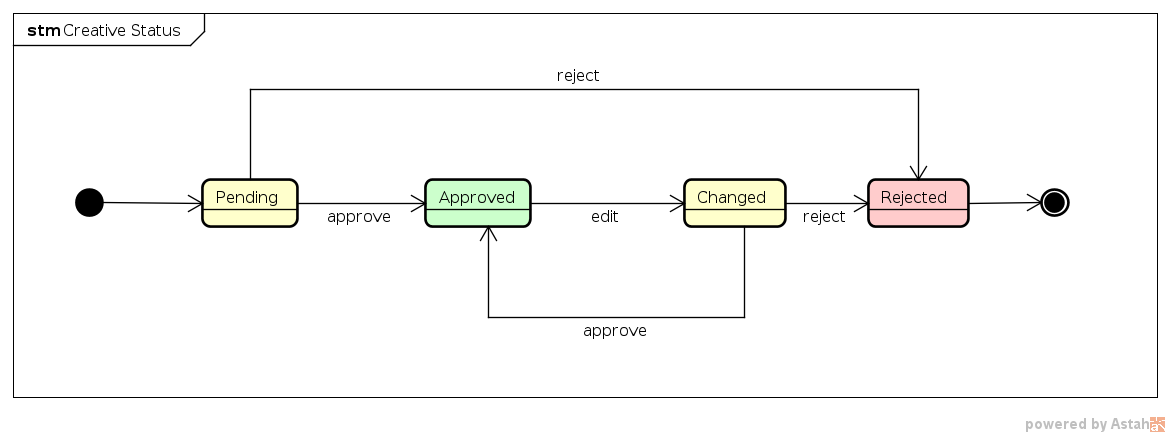
After creation, materials are in a Pending status. Administrators review them; if approved, the status becomes Approved; if rejected, the status becomes Rejected. For modified materials, the status is Changed, and they can only be used for delivery after being approved again. Ad using the material can only be delivered when the material is in an Active state; for other states, the Ad cannot be delivered using the material. The transitions between various material statuses are illustrated in the following diagram:
Report
The system records a variety of transaction and performance data, which can be analyzed in real-time within the system’s Report section.
Overall Report
The Overall Report is used to view the overall operation of LeadsDSP. It allows you to specify dimensions, aggregation methods, filtering conditions, and more for viewing and analyzing data.
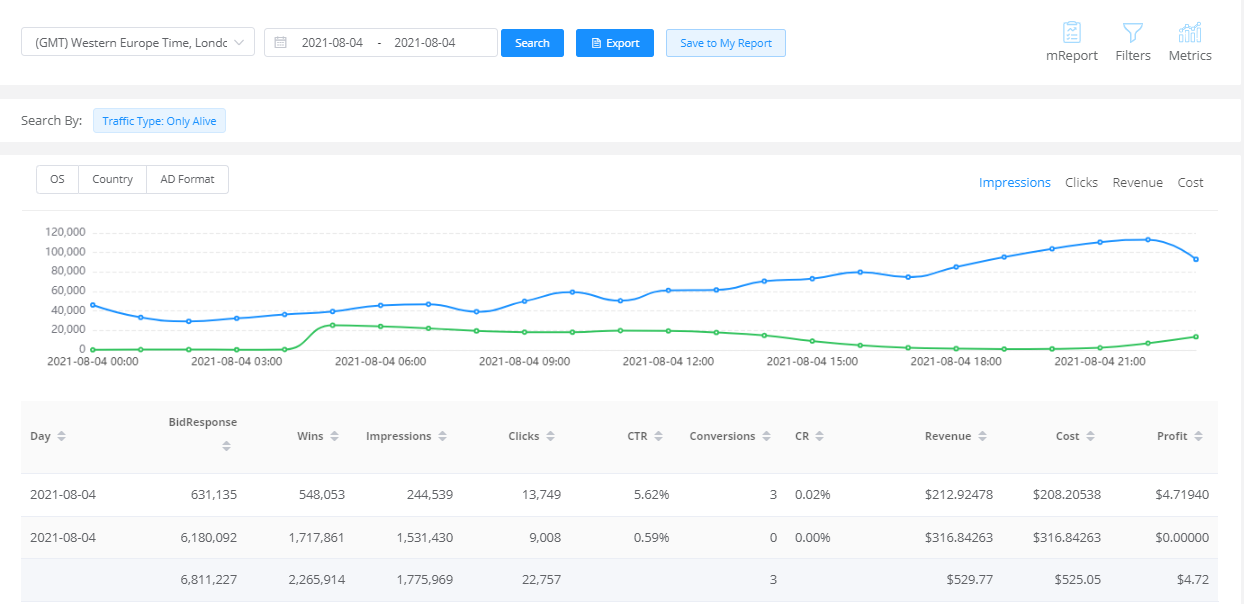
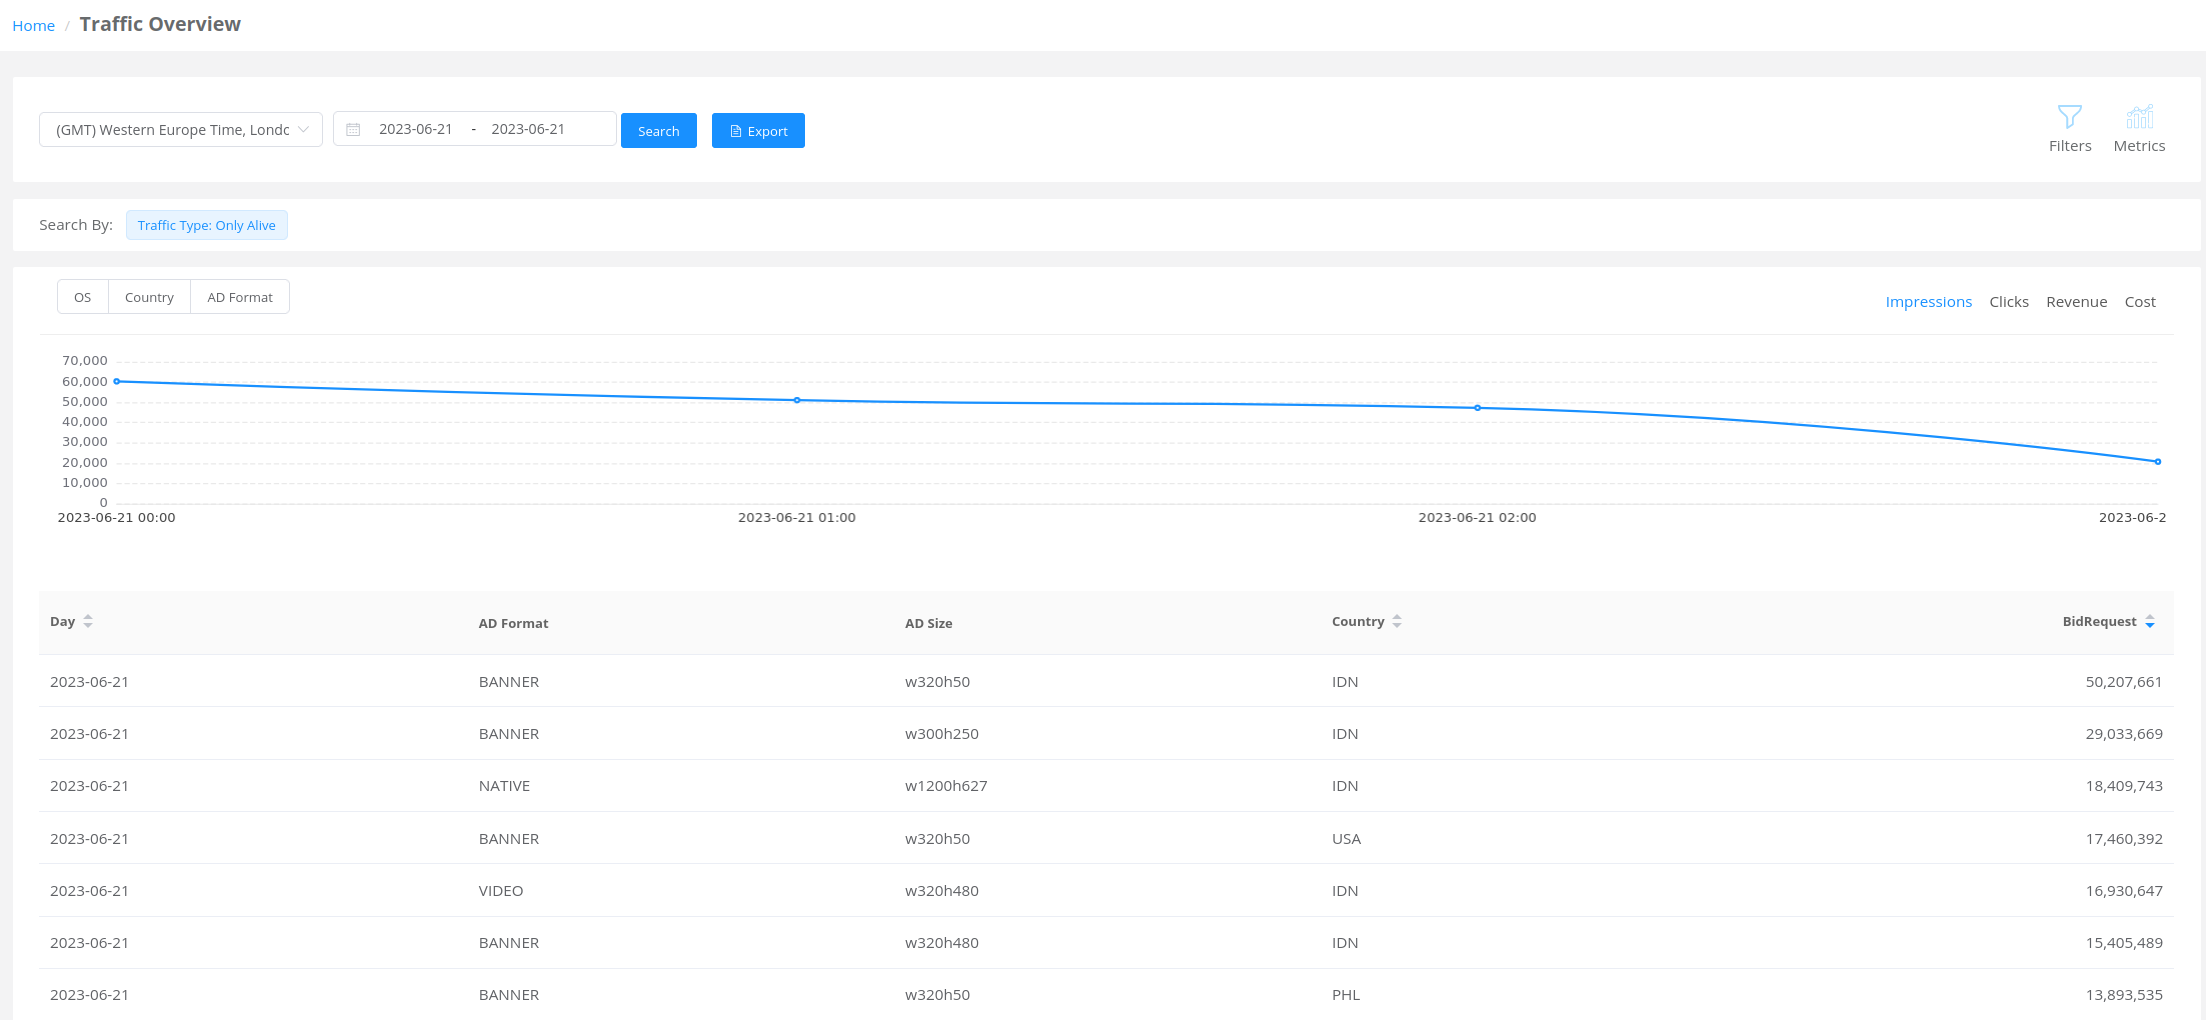
To facilitate reconciling data with upstream and downstream systems, the Overall Report allows you to specify the time zone for data queries. The system defaults to using the UTC time zone, but if you need to use a different time zone, you can select it in the top-left corner of the Overall Report.
The upper half of the page displays trend graphs for the main performance data of OS/Country/Ad Format, including Impression/Clicks/Revenue/Cost. The lower half displays a data table, and at the bottom of the table, there is a summary row for the data on the current page.
Metrics
Clicking on the "Metrics" command in the upper-right corner of the Overall Report page allows you to configure the data dimensions and aggregation methods for the report.
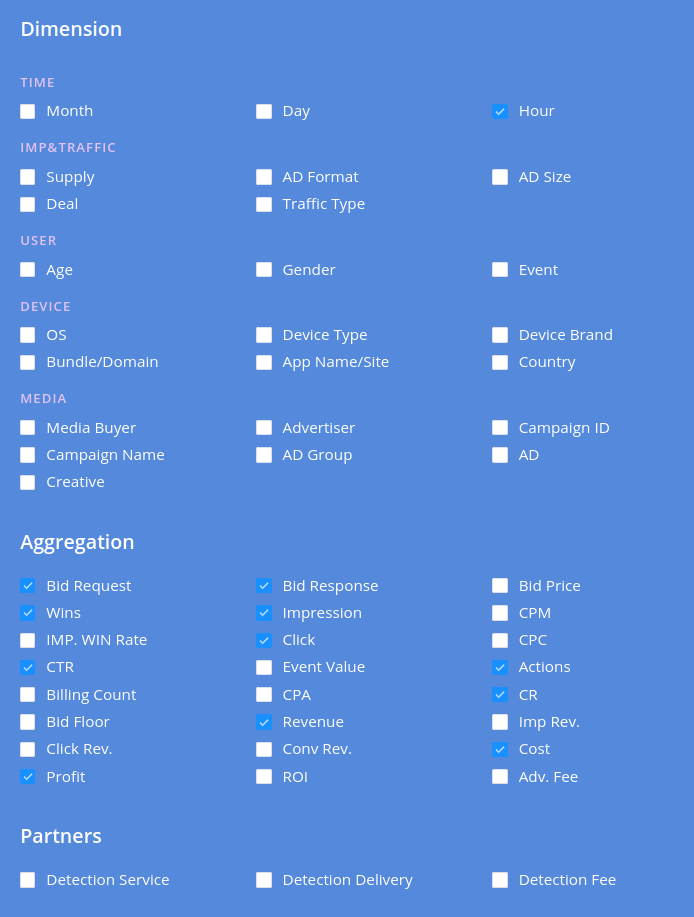
- Dimension: The data aggregation time window, with options such as Month, Day, and Hour
- TRAFFIC: Traffic characteristics
- USER: End-user features
- DEVICE: Device dimension features
- MEDIA: Buyer dimension data
- Aggregation: Aggregation columns
- Partners: Third-party monitoring service data
Filters
Clicking on the "Filters" command in the upper-right corner of the Overall Report page allows you to set filtering conditions for the report.
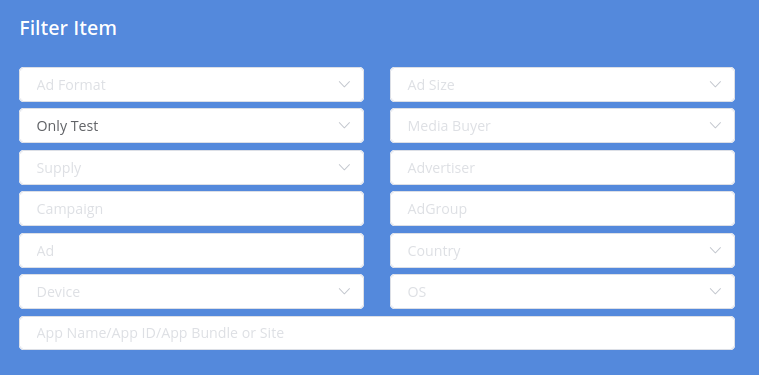
- Supplier Query Conditions: Supply, Country, OS, App, Device, Ad Format, Ad Size, Test/Alive
- Demand Query Conditions: Media Buyer, Advertiser, Campaign, Ad Group, Ad
Export Report
For the query results of the Overall Report, you can export the data in CSV format as a compressed zip file. Click the "Export" command at the top of the page to start exporting.

While the system generates the data file, the Export command button will display "Generating."

After the file is generated in the background, the Export command button will display "Download." Clicking on it will initiate the download of the data file through your browser.

My Report
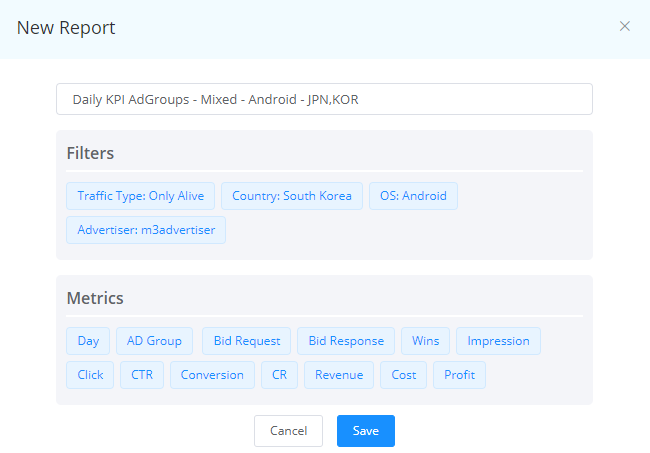
Report settings often involve multiple dimensions and filters. For commonly used configurations, you can save these combinations for quick use, reducing the need for repetitive setups. Click the "Save to My Report" command at the top of the page to save the current report settings. When saving, provide a meaningful name for easy reference.
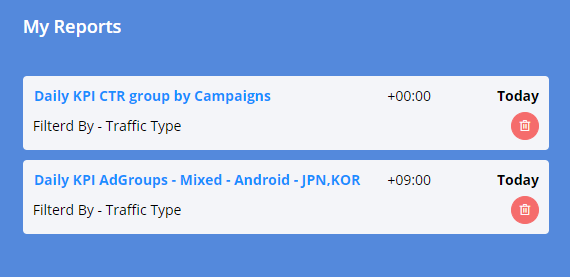
When you need to use the saved settings later, click the "mReport" command at the top-right of the page. In the pop-up dialog, select the combination you wish to use.
Traffic Report
The Traffic Report is used to query statistics for the LeadsDSP SaaS platform’s shared traffic offered to clients. It allows you to adjust operational strategies based on campaign targeting conditions, budget situations, and overall traffic performance.
DMP-Audience
DMP-Audience is the built-in data management system within the LeadsDSP platform. It receives data through various methods, processes the data, generates user profiles, and associates them with Ad Groups as targeting audience segments.
Data
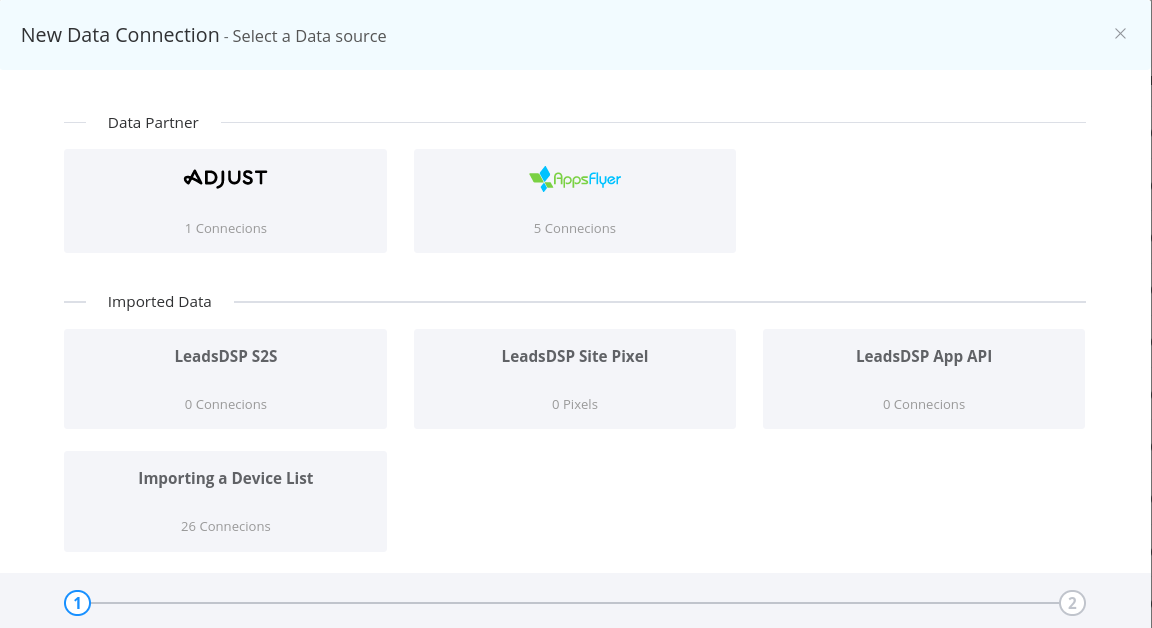
Select the Data menu to enter the data source setup page. The system supports multiple data sources.
Third-Party Data Partners
- Adjust: For Adjust Partners, advertisers can authorize certain app data from the Adjust platform to be imported into the LeadsDSP DMP-Audience system.
- Appsflyer:
- Appsflyer User Event Postback: For Appsflyer Partners, advertisers can authorize certain app data from the Appsflyer platform to be imported into the LeadsDSP DMP-Audience system.
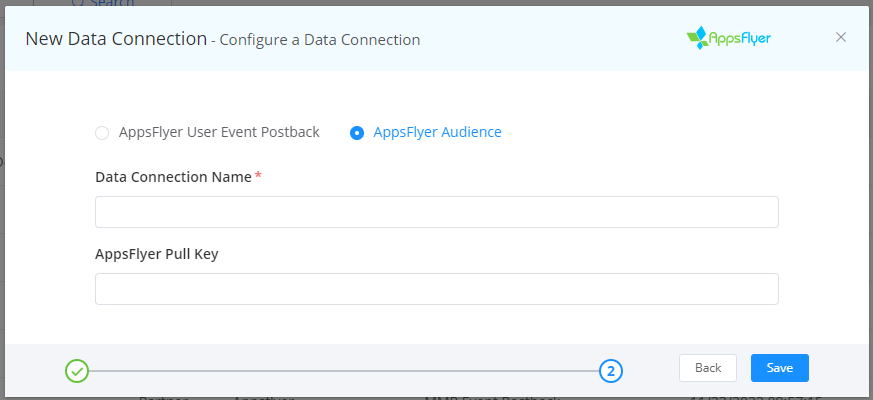
- Appsflyer Audience: LeadsDSP has integrated with the Appsflyer Audience API, allowing the automatic import of audience results generated on the Appsflyer platform into the LeadsDSP DMP-Audience system.
When using partner data sources with Event Postback method, it’s necessary to specify the authorized app package name, as shown in the following image:
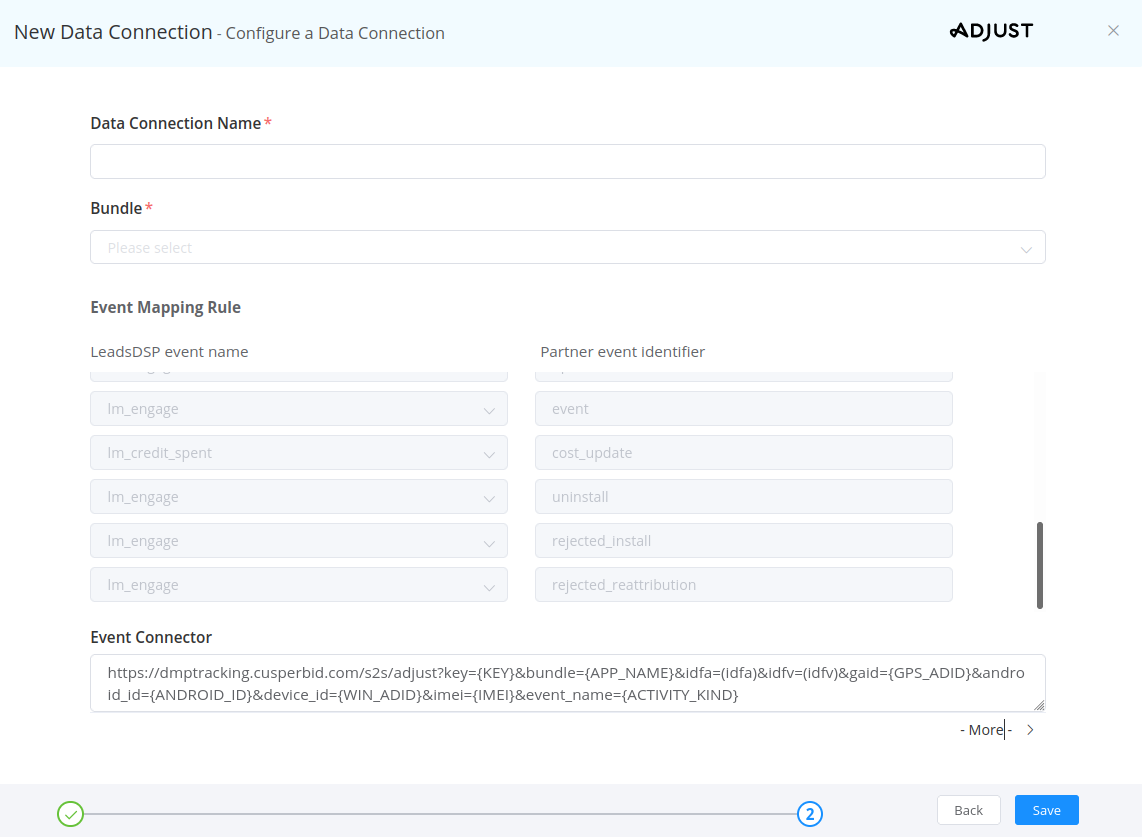
For third-party platforms such as Adjust or Appsflyer, configuring the receiving event’s Postback URL under the Partner account is required, as depicted in the Event Connector above.
For the Appsflyer platform, there’s another method using the Audience API. This method involves specifying conditions within the Appsflyer platform to generate a device list for the audience, which is updated daily. LeadsDSP’s backend has integrated with this method. By configuring the Data Connection Name and Pull Key generated within the Appsflyer platform, LeadsDSP periodically retrieves and synchronizes the updates. As shown below:
First-Party Data Sources
- LeadsDSP S2S: Advertisers or Media Buyers can transmit data to the LeadsDSP DMP-Audience system using the LeadsDSP S2S API.
- LeadsDSP Site Pixel: By integrating the LeadsDSP Site Pixel onto the advertiser’s website, data can be transferred to the LeadsDSP DMP-Audience system.
- LeadsDSP App API: In-app events can be forwarded to the LeadsDSP DMP-Audience system through the LeadsDSP App API.
Upload Device List
Directly upload a list of Device IDs to import into the LeadsDSP DMP-Audience system. The uploaded file should be in CSV format, with each Device ID on a separate line, as shown in the following image:

Audience
An Audience is a collection of user profiles that can be extracted from the DMP system’s data based on various dimensions such as user attributes, behaviors, devices, geographic location, and more, depending on business requirements. When creating an Audience, you need to specify a name and either a data source or filtering criteria.
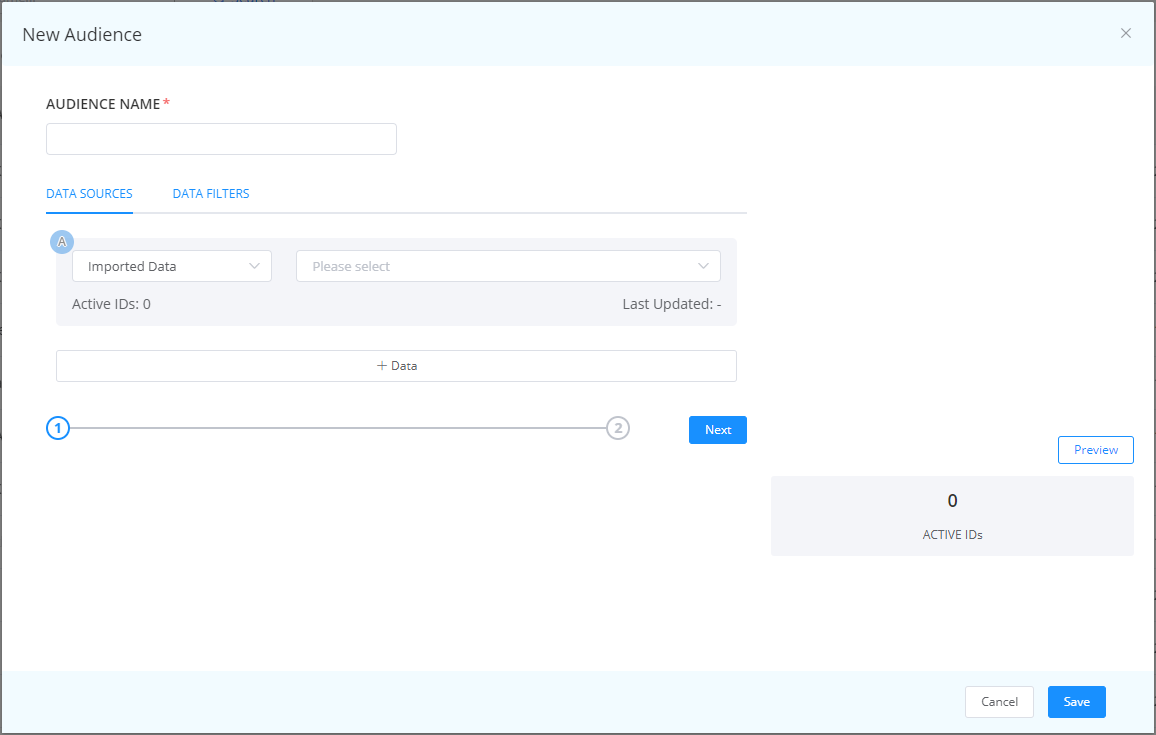
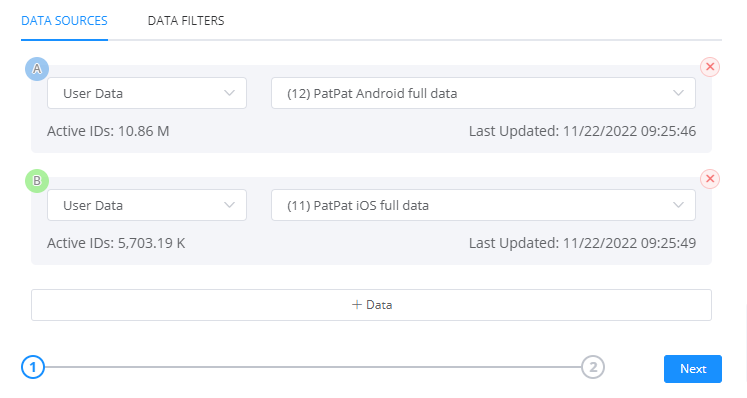
Specify Data Source:
- Imported Data: First-party data or uploaded device lists.
- User Data: Third-party data sources.
Multiple data sources can be selected, and the system will automatically merge the data.
For the selected data, you can further set conditions for filtering. These filtering conditions can be based on user attributes, behaviors, devices, geographic locations, and more, as shown in the following image:
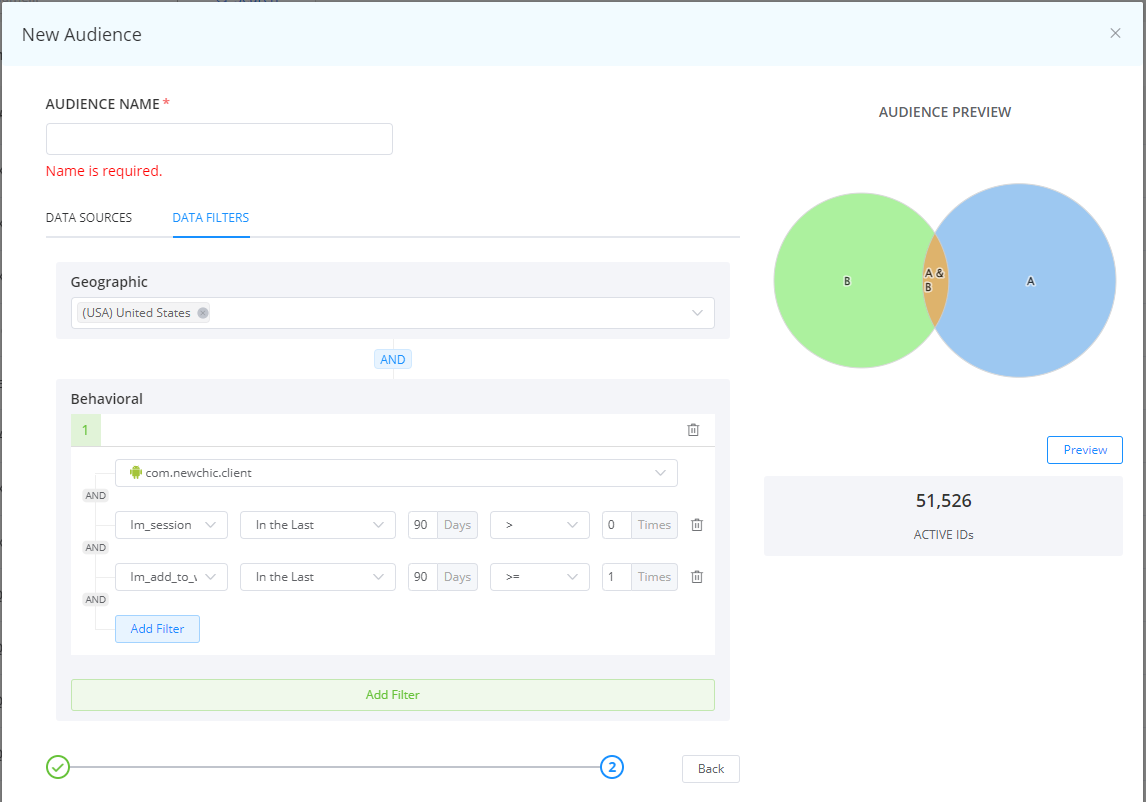
The filtering condition expression in the above diagram is:
counntry = "USA" and bundle = "com.newchic.client" and count(lm_session, 90d)>0 and count(lm_add_to_chart, 90d)>=1 This expression selects the following devices:
- Devices must be from the USA.
- Devices must have the Newchic App installed.
- Devices must have shown at least one app launch behavior within the past 90 days.
- Devices must have exhibited at least one instance of adding items to the cart.
As indicated in the image, there are currently 51,526 devices within the DMP that meet these specified conditions. The system will continue to receive new data and update the result set periodically based on the conditions mentioned above.
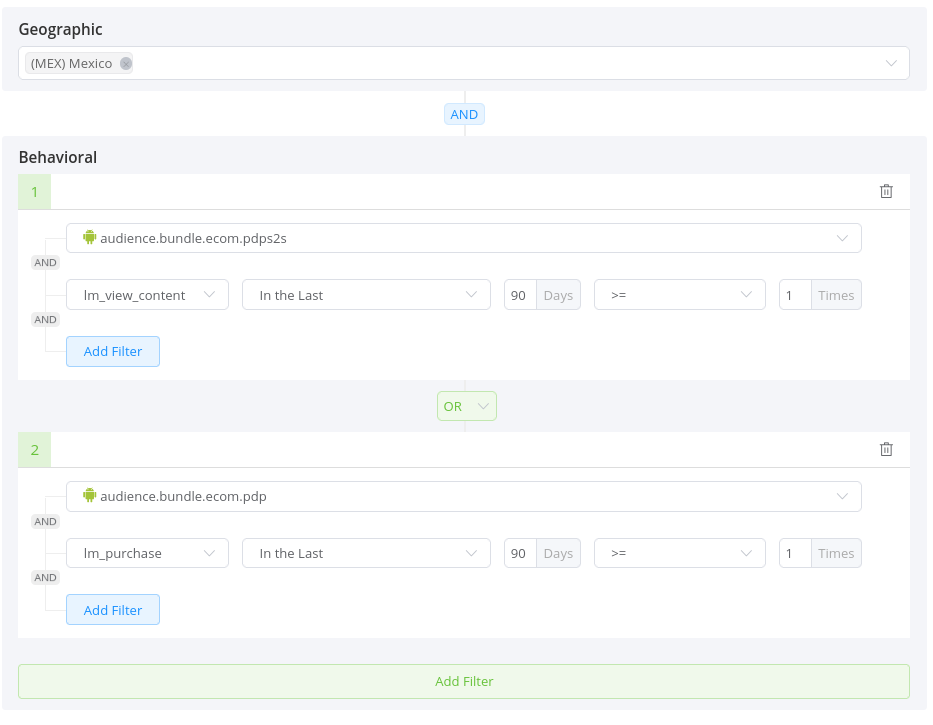
Furthermore, you can utilize the two-level condition mechanism within the Filter to specify even more complex compound conditions, as demonstrated in the image you provided. This allows for a more fine-tuned and specific segmentation of your target audience based on a combination of attributes, behaviors, and criteria.
Associating Audience with Ad Group
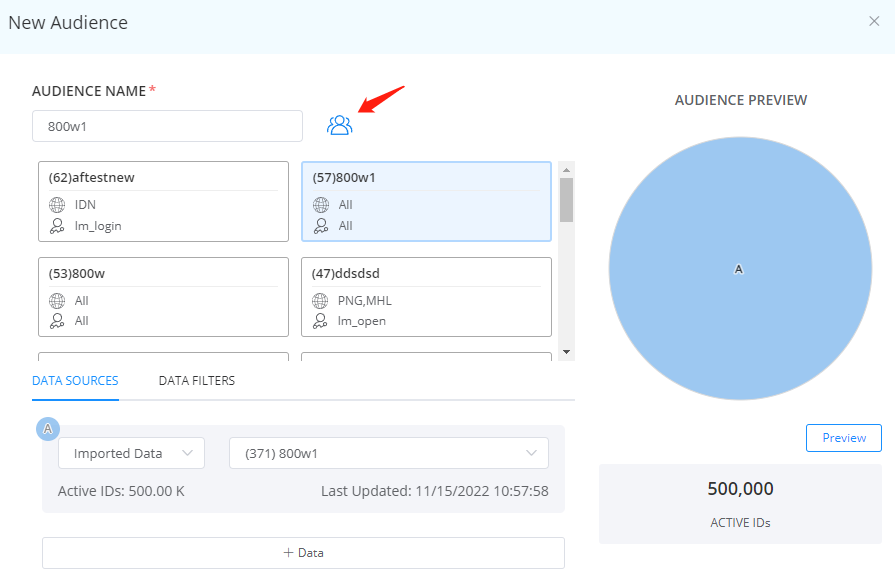
After creating an Audience, you can associate it with an Ad Group to use it as a targeted audience for your ad campaigns. To do this, use the "Audience" command in the Ad Group list, which provides access to the Audience selection and configuration feature:

You have the option to either select an existing Audience for the Ad Group or create a new Audience directly within this section.
After selection, the Ad Group will be only delivery to the chosen Audience.
PMP
PMP stands for Private Marketplace, which refers to a type of advertising transaction negotiated privately between advertisers and publishers. In this transaction model, advertisers can achieve better ad performance, while publishers can earn higher ad revenue. LeadsDSP offers PMP functionality, allowing advertisers to engage in PMP deals with publishers through the LeadsDSP platform.
Creating a PMP Deal
The entrance for managing PMP deals can be found in the top-right corner of the system, within the pop-up menu labeled "Private Inventory Rule," as shown below:
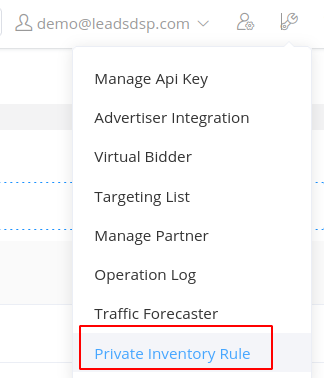
Upon clicking, you will enter the Private Inventory Rule list page, where you can add new PMP deals or modify existing ones, as depicted in the following image:

Details of Deal:
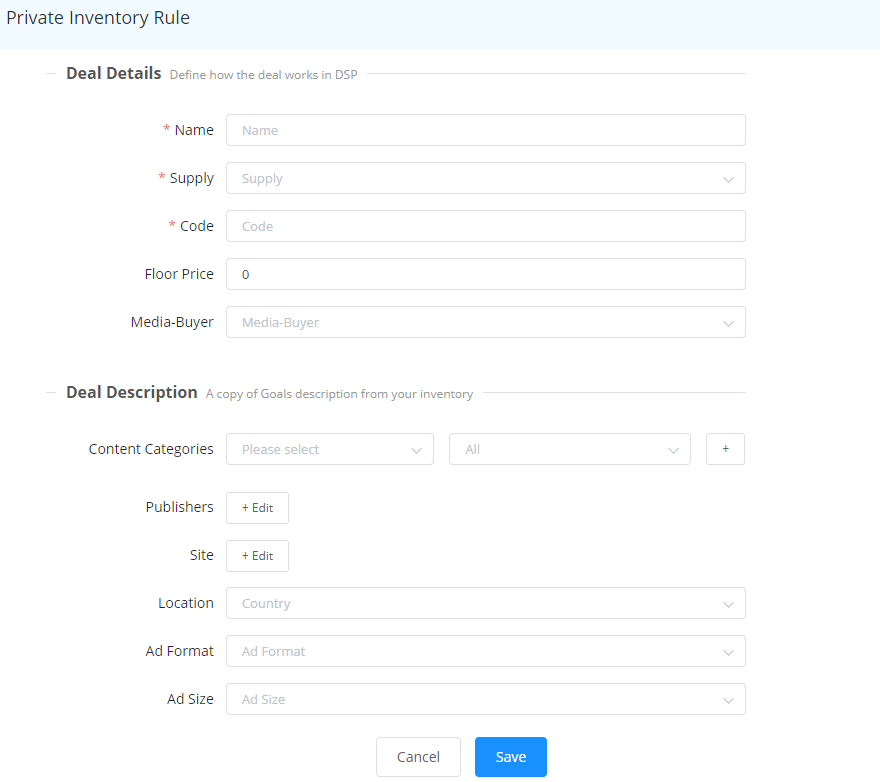
- Deal Details: Basic information of the Deal
- Deal Name: The name of the Deal
- Supply: The supply provide traffic for the Deal
- Code: Code assigned to the Deal, which appears in the Supply’s RTB request to identify the Deal request
- Floor Price: Minimum price set for the Deal, which appears in the Supply’s RTB request to identify the Deal request
- Media Buyer: The Media Buyer participating in this Deal transaction
- Deal Description: This section provides descriptive information about the Deal, outlining specific traffic characteristics. Usually, once configured in the Supply system, traffic that aligns with these characteristics will be earmarked for the Deal.
- Content Categories: Content categories such as News, Sports, Entertainment, etc.
- Publishers: Names of the media publishers
- Site: Media websites
- Location: Countries, can be selected multiple
- Ad Format: Ad formats, can be selected multiple
- Ad Size: Ad sizes, can be selected multiple
Associate PMP Deal with Campaign
After creating a PMP Deal, it can be associated with a Campaign. This association is configured in the Deal section of the Campaign’s properties, as shown below:
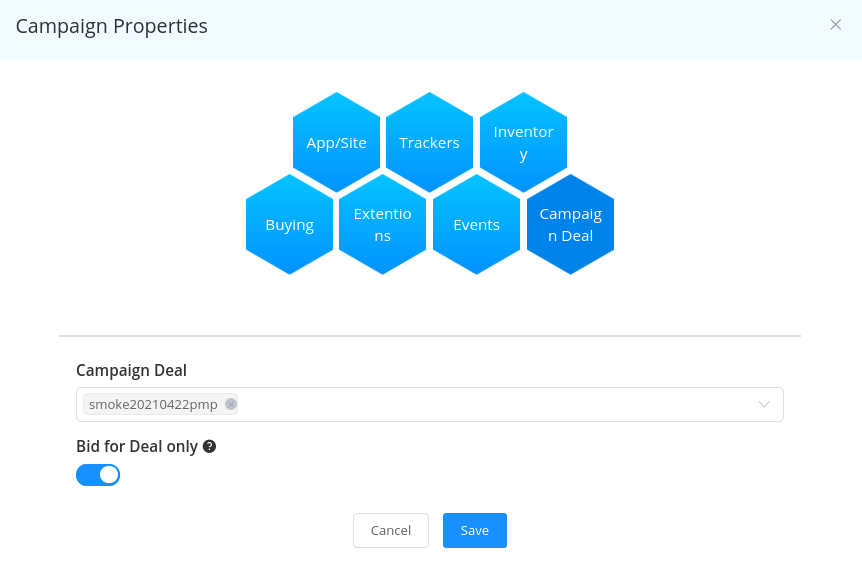
If the "Bid for Deal Only" toggle is enabled, the Campaign will exclusively target the associated PMP Deal. Otherwise, the Campaign will target all RTB traffic simultaneously.
Additionally, if a Private Auction is declared in the RTB Deal request, only Campaigns associated with the Deal will be able to participate in the auction.
Comments are closed.