Overview
LeadsADN is a powerful, white-label SaaS solution tailored specifically for the Ad Network industry. Deployed across the globe with a robust distributed architecture, this platform effortlessly handles millions of simultaneous impressions and clicks, ensuring lightning-fast redirections and providing real-time analytics that empower advertisers to unlock unprecedented levels of revenue.
This innovative platform streamlines operations by automating workflows end-to-end – seamlessly syncing offer data directly from advertisers’ systems, creating targeted campaigns for distribution among affiliates, and intelligently optimizing them based on live performance metrics. A standout feature is its AI-powered Smart Link technology, which expertly matches web traffic with relevant offers for maximum conversion potential.
Presenting a high level of customization, LeadsADN is designed as a white-label system that enables clients to tailor it into a unique, branded platform under their own identity. Personalization extends to custom login domains, logos, icons, and even the platform’s name. Additionally, it allows for the setup of multiple branded tracking domains to maintain consistency throughout your digital footprint.
To get started with LeadsADN, you have the option to easily register for an account through the LeadsWORK website or reach out to our team for a personalized sign-up process.
Dashboard
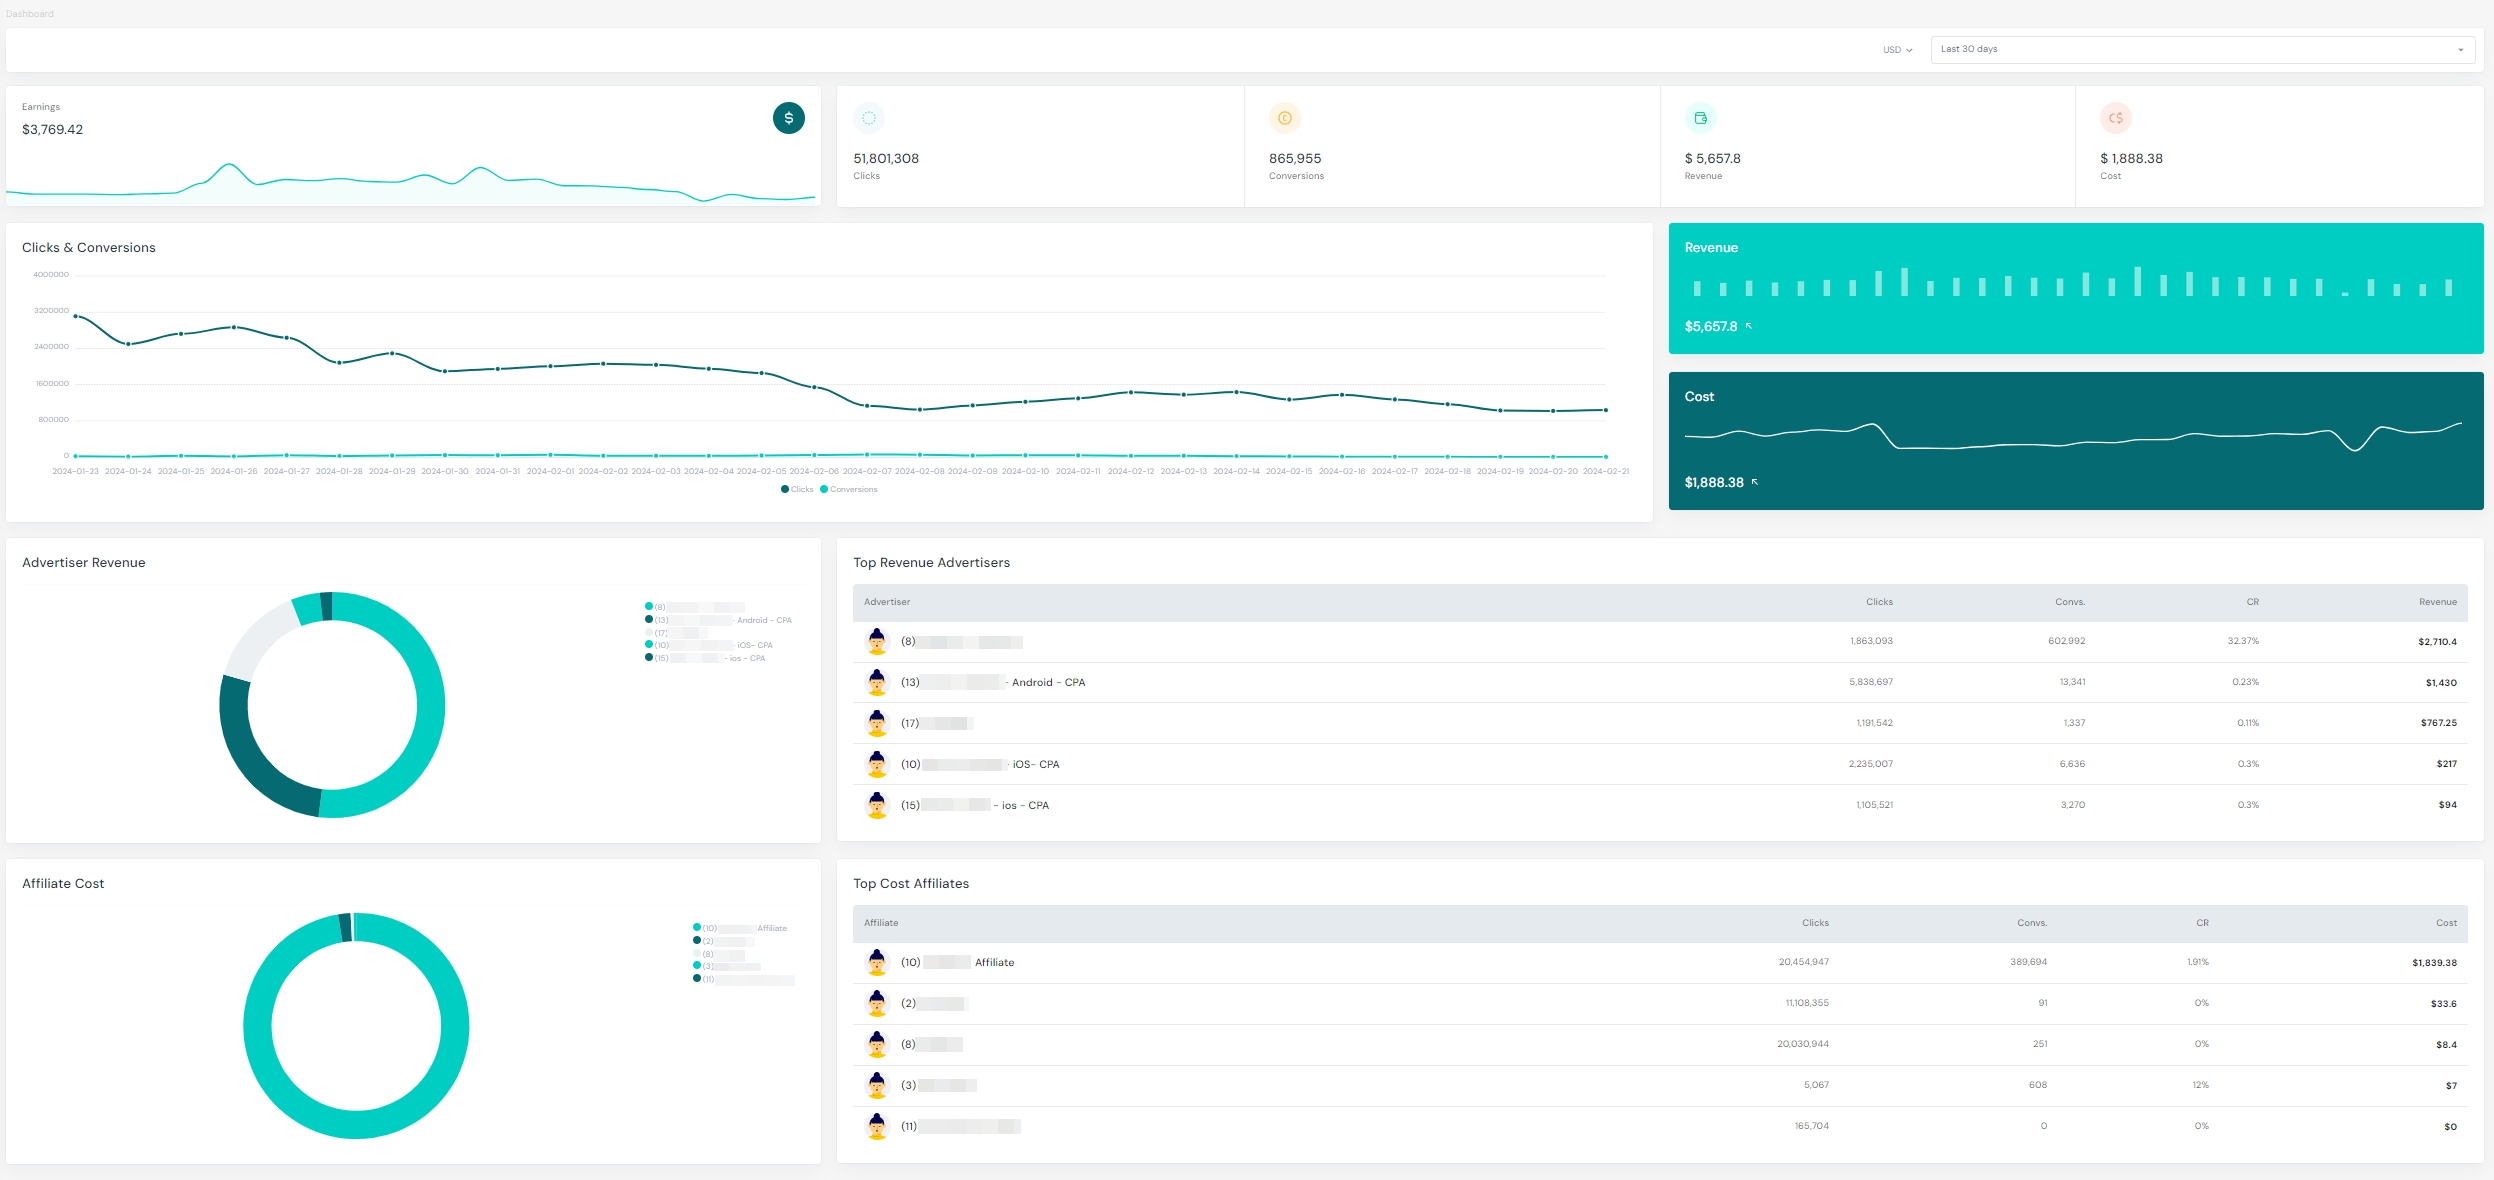
Upon successfully logging into the system using your email address and password, the interface defaults to the comprehensive Dashboard, which serves as a panoramic snapshot of your business activities.
The Dashboard presents a concise daily summary that encompasses critical performance indicators: traffic volume, conversion rates, generated revenue, incurred expenses, and net earnings, all visually augmented with an hourly trend graph. Furthermore, it delivers insightful rankings of advertisers and channels, meticulously organized according to their revenue contributions and associated costs.
For a broader perspective, users have the flexibility to toggle between various time frames – ranging from Yesterday’s metrics to the Last 7 Days, the Last 30 Days, This Month, and Last Month – thereby enabling access to the corresponding summary data for each specified period.
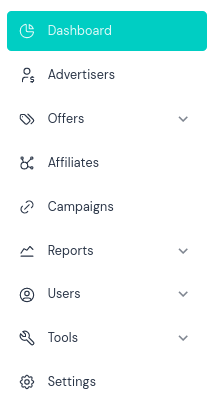
The main menu of the system is located on the left side and is divided into nine groups: Dashboard, Advertisers, Offers, Affiliates, Campaigns, Reports, Users, Tools, and Settings.
Advertisers
Advertiser list
Select the "Advertisers" menu to open the list of advertiser management.
The list displays information such as advertiser names, statuses, and other items. You can filter or search based on advertiser status, name, or other keywords.

The explanation of each column is as follows:
- ID: The ID assigned to the advertiser by the system
- Name: The name of the advertiser
- Email: The contact email of the advertiser
- Company: The name of the company associated with the advertiser
- Status: The status of the advertiser, which can be quickly modified here
- Active
- Blocked: The advertiser is blocked, and all offers associated with them cannot be accessed or updated
- Advertiser System: The name of the advertiser’s business system. LeadsADN integrates with other mainstream AD Network platforms to automatically sync and update offers
- Postback URL: The URL where LeadsADN receives conversion notifications. Click to copy this link and set it up on the advertiser’s platform
- Smart Link: Indicates whether the Smart Link feature is enabled for offers from this advertiser. You can quickly enable or disable this option here
- Holding Conv. Percent: To reduce risk, a percentage of conversions are initially placed in "Holding" status due to advertiser billing cycles and deductions. They’re released to affiliates upon settlement confirmation.
- Joining Date: The date when the advertiser joined the platform
- Actions
- Edit: Edit the basic information of the advertiser
- Integration: Configure integration settings for the advertiser’s system
Advertiser Properties
To create a new advertiser or modify an existing one, you can do so in the advertiser’s basic information editing dialog.
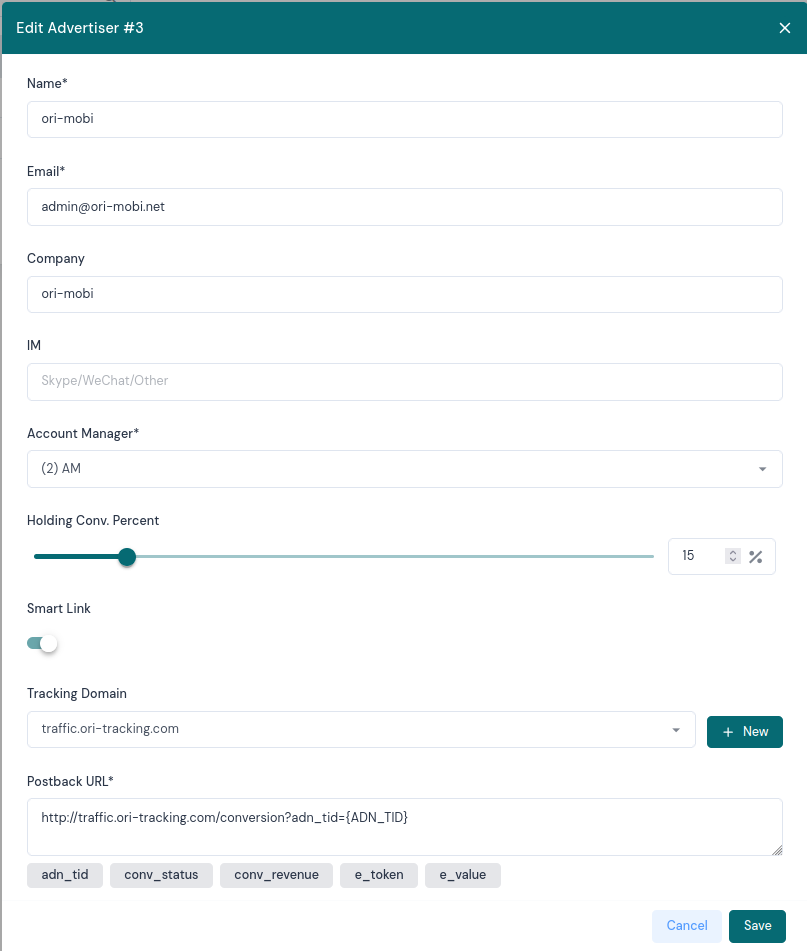
In addition to the properties already mentioned in the advertiser list, the advertiser editing dialog includes the following additional properties:
- IM: Instant messaging contact information for the advertiser
- AM: Account Manager
- Tracking Domain: Specifies a default tracking domain for the advertiser. When generating campaigns for the advertiser’s offers, this tracking domain is used by default
- Postback URL: Configures the Postback for the advertiser’s system. it should include the adn_tid parameter to pass back LeadsADN’s TID
Advertiser Postback Parameters
Copy the advertiser’s Postback URL, and set it in the advertiser’s system. When a conversion occurs, the advertiser’s system calls this Postback URL to notify LeadsADN about the conversion.
The parameter names that can be used in the Advertiser Postback URL are listed in the table below.
| Parameter Name | Description |
|---|---|
| adn_tid | the LeadsADN system assigns a globally unique ID to each click, ensuring accurate tracking within our platform. Upon a conversion, please ensure that this ID is included in the Postback URL as the value for the parameter ‘adn_tid’. |
| e_token | for multi-goal offers, utilize this parameter to specify the event corresponding to the conversion. If this parameter is not returned, the default event will be assumed, which refers to the event with an Event Token set to "default." |
| e_value | For CPS (Cost Per Sale) events, use this parameter to return the transaction amount. The system uses the transaction amount as the total, multiplying it by the percentage set for the CPS event to calculate the Revenue and Cost for the event. |
| adv_s1 | the additional information that needs to be passed back within the advertiser’s system |
| adv_s2 | the additional information that needs to be passed back within the advertiser’s system |
| adv_s3 | the additional information that needs to be passed back within the advertiser’s system |
| adv_s4 | the additional information that needs to be passed back within the advertiser’s system |
| adv_s5 | the additional information that needs to be passed back within the advertiser’s system |
Synchronize Offer automatically
In the "Actions" column of the advertiser list, selecting the "Integration" command will take you to the advertiser system integration settings page.
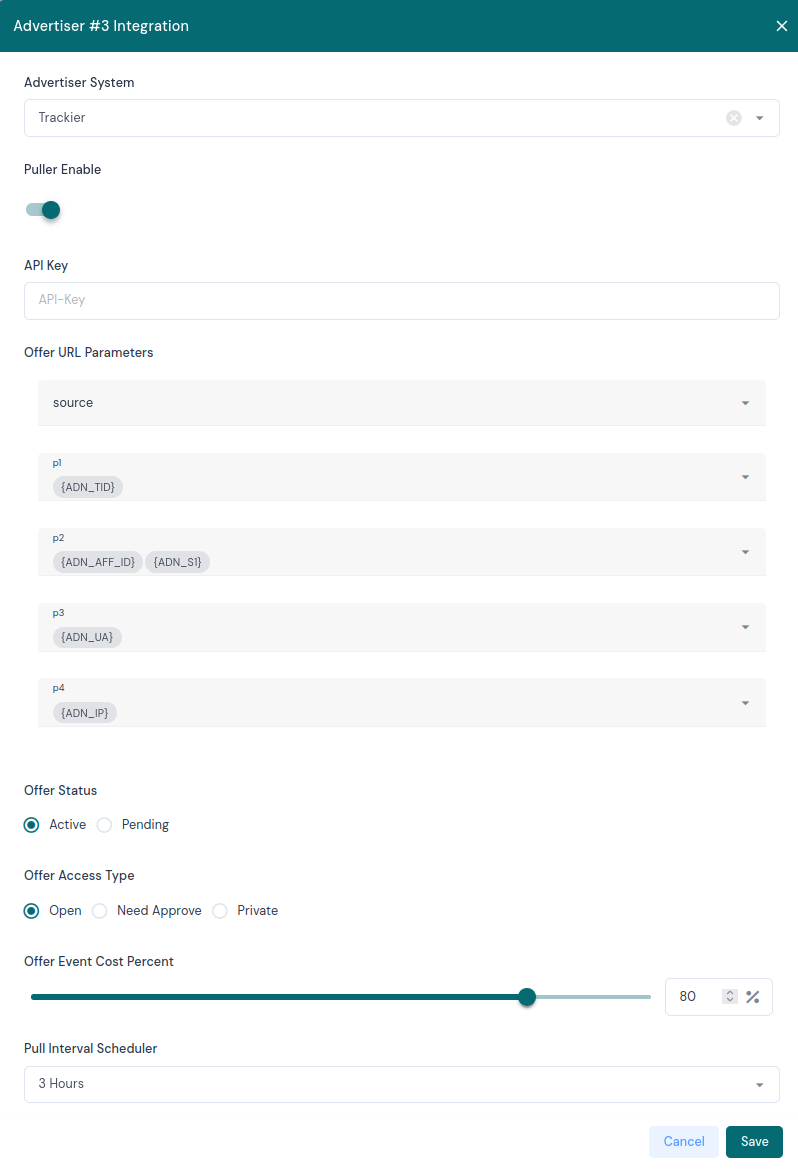
- Advertiser System: his column lists the advertiser systems that have already been integrated and from which offers can be automatically retrieved. If your advertiser system is not listed, you can contact your AM for integration
- Puller Enable: Enable this to synchronize offer automatically
- API Key: The API Key provided by the advertiser system for retrieving offers
- Offer URL Parameters: Parameters for integrating. The system displays the parameters available in the advertiser’s offer, and you can specify the value to be passed for each parameter as needed. These values are represented by parameter macros in LeadsADN, which will be replaced according to the macro rules during actual traffic redirection. Note that you need to assign {ADN_TID} to a parameter for conversion tracking
- Offer Status: The default status for newly retrieved offers
- Offer Access Type: The default visibility range for newly retrieved offers
- Offer Event Cost Percent: The default price given to affiliate, which is a percentage of the advertiser’s conversion price for this offer. For example, if the offer’s conversion price is $1.00 and this percentage is set to 80%, the conversion price provided to the affiliate will be $0.80
- Pull Interval Scheduler: The system requests the advertiser system at regular intervals to retrieve offer information. This option specifies the interval for this scheduler
Affiliates
An affiliate is a channel that provides traffic, which can be an AD network, media buyer, agency, etc.
Affiliate List
Through the "Affiliates" menu, you can open the affiliate management list, which displays information such as affiliate names, statuses, and other items. You can filter or search based on affiliate status, name, or other keywords.

The explanation of each column is as follows:
- ID: The ID assigned to the affiliate by the system
- Name: The name of the affiliate
- Email: The contact email of the affiliate. This email can be used by the affiliate to log in to the affiliate portal, view reports, and obtain promotional links
- Company: The company to which the affiliate belongs
- Status:
- Active
- Blocked: The affiliate is blocked, and all promotional links associated with them cannot be accessed or updated
- Tracking Domain: Specifies a default tracking domain for the affiliate. When generating campaigns for the affiliate’s promotional links, this tracking domain is used by default
- API Key: The API Key of the affiliate, which can be used to automatically retrieve offers, report data, etc.
- API Freq.: The API request frequency limit for the affiliate
- Smart Link: Indicates whether the Smart Link feature is enabled for the affiliate
- Allow Open Offer: Indicates whether the affiliate is allowed to access Open Offers. If this option is enabled, the affiliate can access offers with an Access Type of Open by default, without approval
- Holding Conv. Percent
- Joining Date: The date when the affiliate joined LeadsADN
- Last Login Time: The affiliate’s most recent login time
- Actions
- Edit
- Postback URLs: onfigure the affiliate’s Postback URLs
Affiliate Properties
To either create a fresh affiliate record or make amendments to an existing one, navigate to the affiliate’s Basic Information Editing Interface.
This interface is smartly bifurcated into two distinct sections: The upper half is dedicated to capturing and managing core affiliate details, while the lower half houses the Extended Configuration settings. To reveal or conceal these more intricate options, simply click on the "Advanced" toggle button. This intuitive action will expand or collapse the extended information area as per your needs.
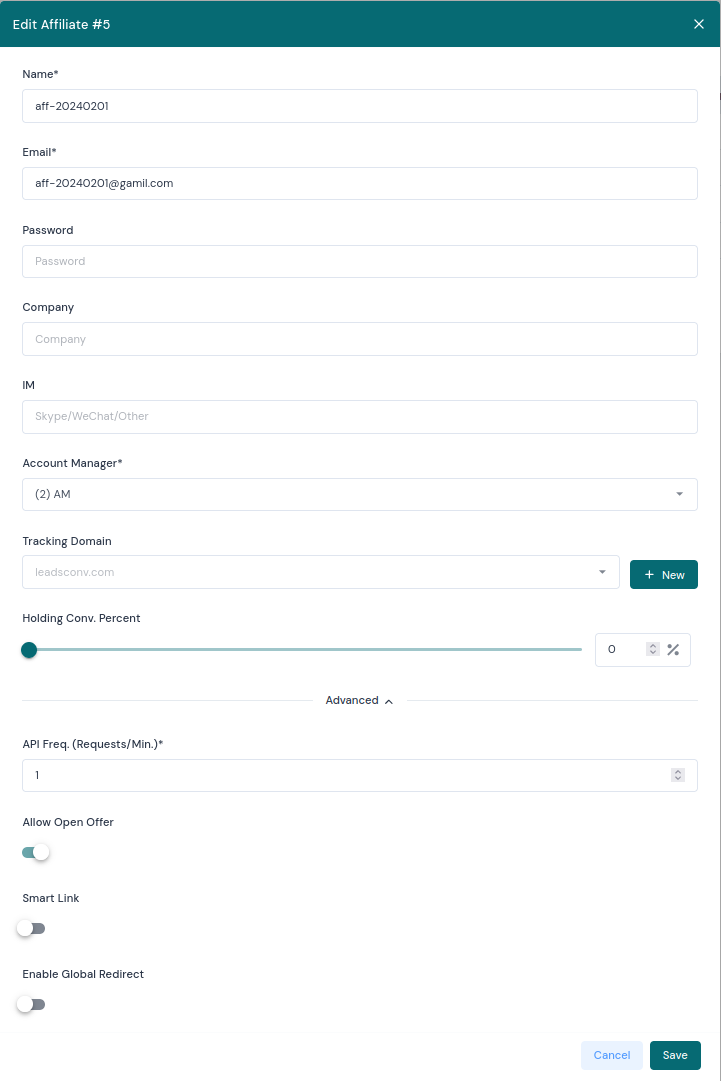
In addition to the properties already mentioned in the affiliate list, the affiliate editing interface includes the following additional properties:
- Password: The password for the affiliate to log in
- IM: Instant messaging contact information for the affiliate
- AM: The administrator assigned to the affiliate
- Enable Global Redirect: Indicates whether global redirect is enabled. If enabled, affiliate traffic that cannot reach a campaign or offer due to reasons such as CAP will be redirected to the global redirect link
Affiliate Postback URLs
Upon the system registering a conversion event, it must promptly inform the affiliate’s system about this occurrence. To facilitate this communication, setting up Postback URLs for the affiliate is essential.
When you select the "Postback URLs" option within the affiliate list, it opens up the dedicated Postback URLs Configuration Interface. Here, you can establish the necessary URLs to ensure seamless transmission of conversion data between the systems.
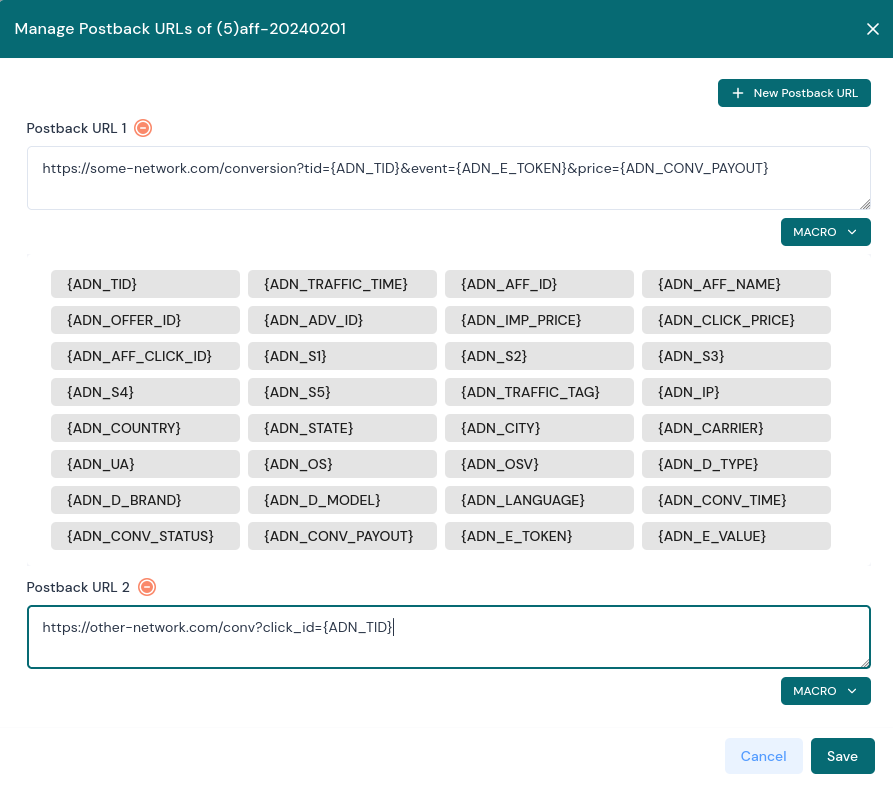
In the Postback URLs configuration interface, you have the capability to set up multiple Postback URLs for a single affiliate. Each time a conversion takes place, the system will send a notification to every registered URL.
To add a Postback URL, simply input it into the designated field. For passing specific parameters to the affiliate system, utilize the MACRO function. This option allows you to choose and insert dynamic placeholders that represent the variables to be included in the postback payload. By doing so, crucial data related to the conversion will be accurately transmitted to the affiliate’s system upon successful notification.
Affiliate Postback Macros
In the Affiliate Postback URL, use MACROs to pass back parameter values. The system searches for MACROs in the URL and replaces them with the corresponding data.
The available MACROs and their corresponding data are described as follows:
| MACRO | VALUE |
|---|---|
| {ADN_AFF_CLICK_ID} | The channel system’s click ID, whose value comes from the aff_click_id parameter in the tracking link. |
| {ADN_S1} | the value of s1 in the tracking link |
| {ADN_S2} | the value of s2 in the tracking link |
| {ADN_S3} | the value of s3 in the tracking link |
| {ADN_S4} | the value of s4 in the tracking link |
| {ADN_S5} | the value of s5 in the tracking link |
| {ADN_TRAFFIC_TIME} | click time in Unix Timestamp format for precision down to the second. |
| {ADN_OFFER_ID} | the offer ID of the LeadsADN system. |
| {ADN_IP} | the IP address from where the traffic originates |
| {ADN_COUNTRY} | the country of origin for the traffic |
| {ADN_STATE} | the state of origin for the traffic |
| {ADN_CITY} | the city of origin for the traffic |
| {ADN_UA} | the User Agent of the client when making a request to the system |
| {ADN_OS} | client OS type |
| {ADN_OSV} | client OS version |
| {ADN_D_TYPE} | client device type |
| {ADN_D_BRAND} | client device brand |
| {ADN_D_MODEL} | client device model |
| {ADN_CONV_ID} | in the LeadsADN system, the unique identifier corresponding to the conversion. For multi-event offers or events that can occur multiple times, a single click may result in multiple conversions. The {ADN_CONV_ID} can be used to differentiate between multiple conversions. |
| {ADN_CONV_TIME} | conversion time in Unix Timestamp format for precision down to the second. |
| {ADN_CONV_STATUS} | conversion Status |
| {ADN_CURRENCY} | currency |
| {ADN_CONV_PAYOUT} | the payout amount of the conversion |
| {ADN_E_TOKEN} | the event token of the conversion |
Holding Conv. Percent
To minimize financial risks associated with advertiser billing cycles and possible deductions, a portion of the recorded conversions are initially assigned a "Holding" status. This safeguard measure ensures that these conversions are not immediately reflected in the affiliate’s payable balance. Upon successful settlement confirmation and clearance of any contingencies, these held conversions are then released and credited to the affiliate’s account accordingly.
There are several places in the system where you can set the "Holding Conv. Percent," listed in priority order from highest to lowest:
- Campaign Level: You can set the "Holding Conv. Percent" at the campaign level. This setting applies to all conversions associated with the campaign.
- Affiliate Level: You can set the "Holding Conv. Percent" at the affiliate level. This setting applies to all conversions generated by the affiliate.
- Offer Level: You can set the "Holding Conv. Percent" at the offer level. This setting applies to all conversions associated with the offer.
- Affiliate Level: You can set the "Holding Conv. Percent" at the affiliate level. This setting applies to all conversions generated by the affiliate.
Offers
An offer represents a promotional assignment sourced from the advertiser’s platform. Each offer comes with a dedicated landing page (Offer URL), and the primary objective is to drive traffic to this page. Success is measured when visitors perform specific actions (like installing an app, signing up, or making a purchase) on the landing page, thereby accomplishing the intended marketing goal.
Offer List
Click the ‘Manage Offers’ command in the Offers menu group to open the Offer list page.
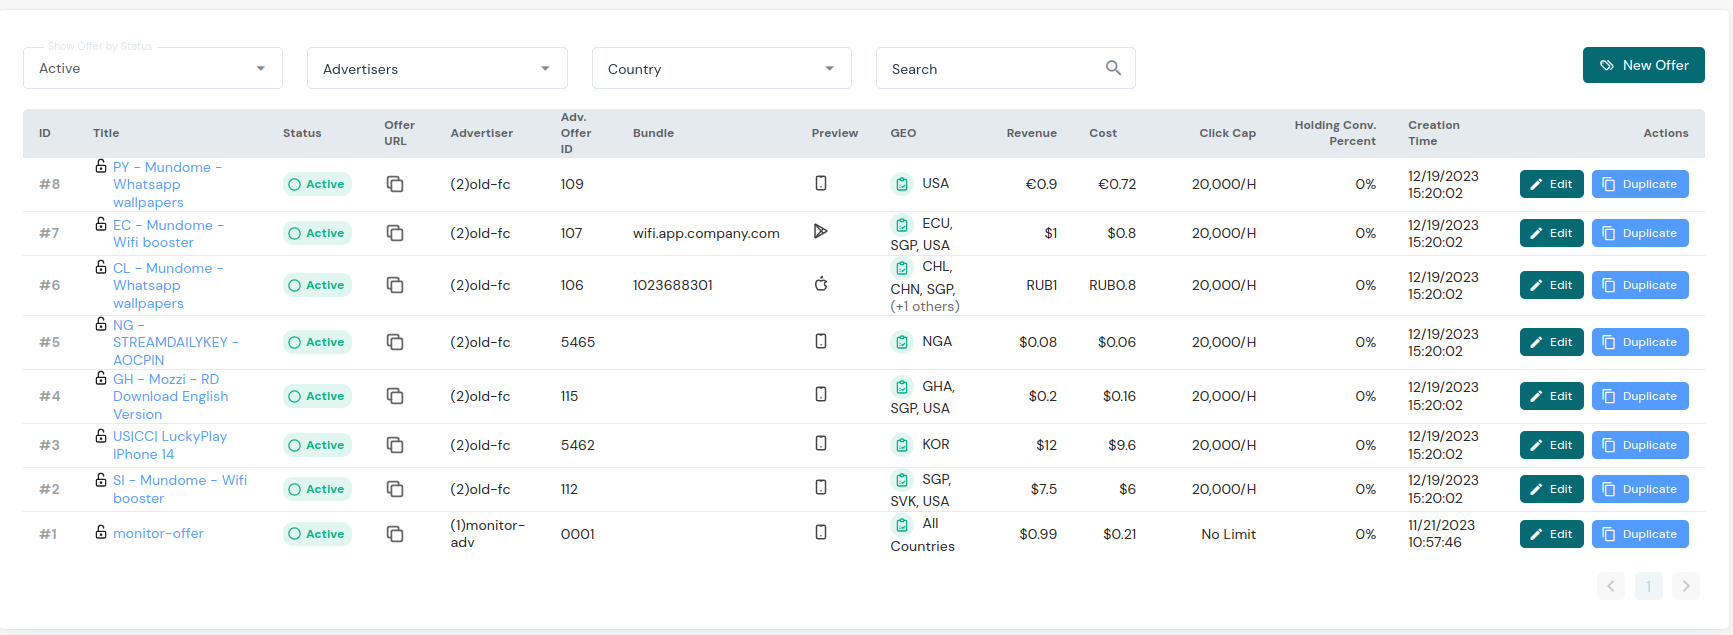
On the Offer list page, you have the ability to refine and sort your view by utilizing various filtering and searching options. You can easily narrow down the list by selecting an offer status, advertiser, country, ID, name, or other applicable criteria. Additionally, for better organization and viewing convenience, you can modify the number of items displayed per page by adjusting the page size setting.
Here is an explanation of each column:
- ID: The ID assigned to the offer by the system
- Title: The title(or name) of the offer
- Status
- Pending: Awaiting approval
- Active: Active and running
- Paused: Offer has been paused
- Expired: Offer has expired
- Deleted: Offer has been deleted
- Offer URL: The landing page URL of the offer. Click to copy the link
- Advertiser: The ID and name of the advertiser
- Adv. Offer ID: The offer ID in the advertiser’s system
- Bundle: The bundle to which the offer belongs
- Preview: Click to view the offer preview page
- GEO: The country or region for which the offer is promoted
- Revenue: The revenue generated by the offer’s conversions
- Cost: The cost incurred by the offer’s conversions
- Click Cap: The limit on the number of clicks for the offer
- Holding Conv. The default percentage of conversions set to Holding status
- Creation Time: The time when the offer was created
- Actions:
- Edit
- Duplicate: Duplicate the offer. Some systems call this "Clone Offer."
Offer Details
To create a new Offer or edit an existing one, you can either click the "New Offer" button positioned above the Offer list, or select the "Edit" option corresponding to a particular Offer within the Offer list. This action will initiate the Offer editing window or dialog box.
Inside the Offer editing interface, the configurations are systematically arranged in multiple sections flowing from the top downwards. These sections encompass the following key aspects:
General Information
Tracking Settings
Targeting Parameters
Offer Caps (limits)
Conversion/Goal Definition
Advanced Options
Each section contains detailed fields and settings relevant to the respective aspect of the Offer, allowing for precise control over the entire promotional task.
Offer General Information
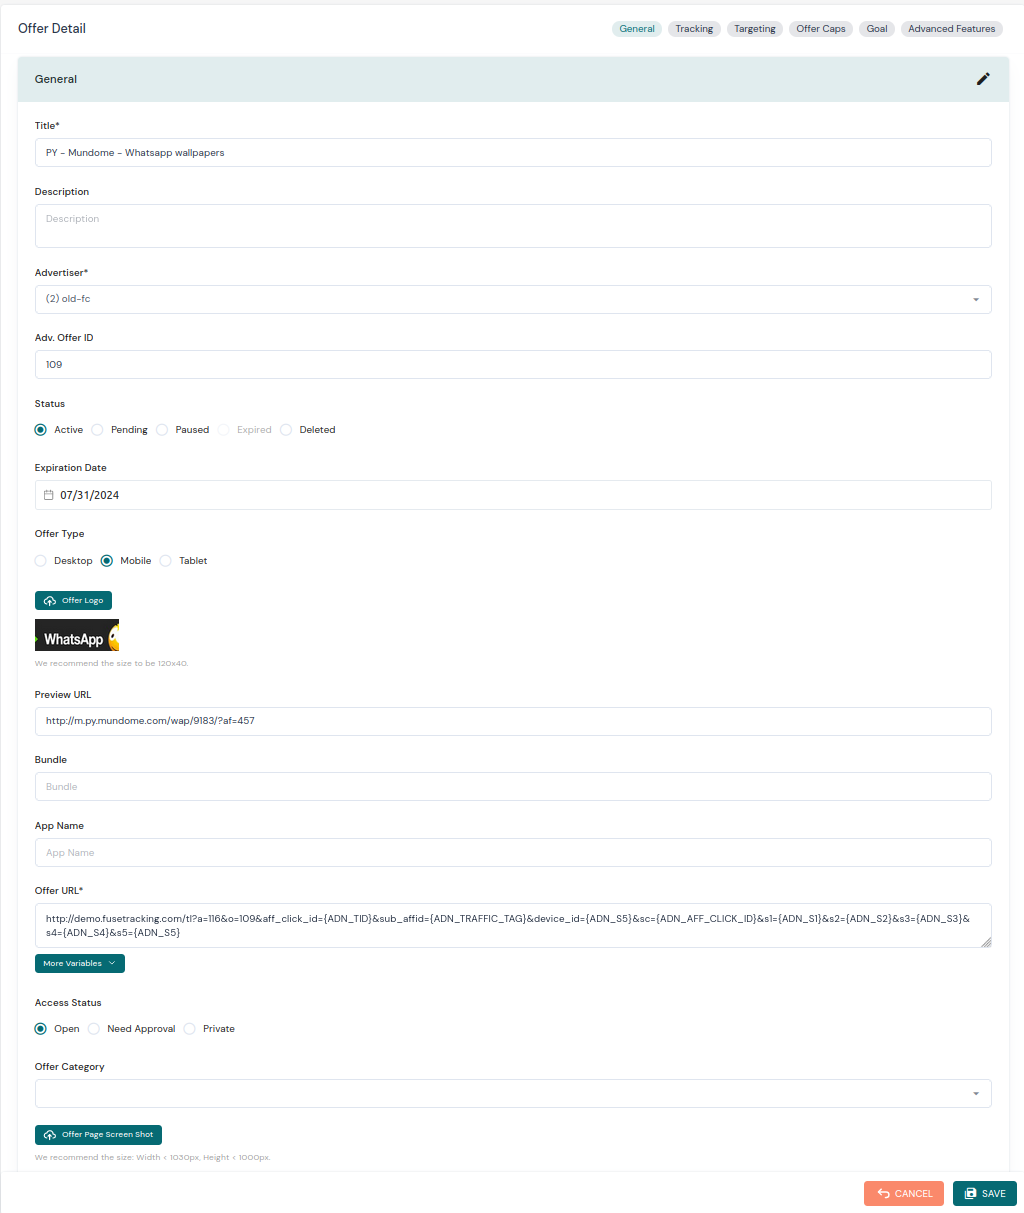
- Title
- Description
- Advertiser: The ID and name of the advertiser.
- Adv. Offer ID: The offer ID in the advertiser’s system
- Status
- Expiration Date: The expiration date of the offer. After expiration, the system automatically changes the offer status to "Expired" and it will no longer be promoted
- Offer Type, The type of devices the offer is applicable to
- Desktop
- Mobile
- Tablet
- Offer Logo: The logo image of the offer
- Preview URL: The preview link of the offer
- Bundle: Offer The bundle of the target application or the APP ID
- App Name: The name of the target application
- Offer URL: The landing page URL of the offer. Note that this link needs to include the {ADN_TID} macro for the system to pass the unique Transaction ID
- Access Status
- Open: No approval required. Channels with the "Allow Open Offer" option enabled can promote it
- Need Approval: Channels can apply for promotion. After approval by the AM, channels can promote the offer
- Private: Private offer. Only channels specified by the AM can promote it
Offer URL Macros
In the Offer URL, use MACROs to pass data to the advertiser’s system. The system searches for MACROs in the URL and replaces them with the corresponding data.
The MACROs available for use in the Offer URL and their corresponding data are described as follows:
| MACRO | VALUE |
|---|---|
| {ADN_TID} | The LeadsADN system assigns a globally unique ID to each click, ensuring precise tracking on our platform. Using this macro to convey this ID to the advertiser’s system, which should then be included in the postback URL sent back to our platform. |
| {ADN_TRAFFIC_TIME} | click time in Unix Timestamp format for precision down to the second |
| {ADN_AFF_ID} | the affiliate ID of the LeadsADN system |
| {ADN_AFF_NAME} | the affiliate name of the LeadsAND system |
| {ADN_ADV_ID} | the advertiser ID of the LeadsADN system |
| {ADN_OFFER_ID} | the offer ID of the LeadsADN system |
| {ADN_CLICK_PRICE} | For CPC (Cost Per Click) Offers, this value corresponds to the click price, which can be understood as the traffic purchase price based on the CPC model. |
| {ADN_S1} | the value of s1 in the tracking link |
| {ADN_S2} | the value of s2 in the tracking link |
| {ADN_S3} | the value of s3 in the tracking link |
| {ADN_S4} | the value of s4 in the tracking link |
| {ADN_S5} | the value of s5 in the tracking link |
| {ADN_TRAFFIC_TAG} | After enabling the Traffic Tag feature for an Offer, the system randomly assigns a Traffic Tag to each click. This MACRO can be used to pass the Tag to the advertiser’s system. |
| {ADN_IP} | the IP address from where the traffic originates |
| {ADN_COUNTRY} | the country of origin for the traffic |
| {ADN_STATE} | the state of origin for the traffic |
| {ADN_CITY} | the city of origin for the traffic |
| {ADN_UA} | the User Agent of the client when making a request to the system |
| {ADN_OS} | client OS type |
| {ADN_OSV} | client OS version |
| {ADN_D_TYPE} | client device type |
| {ADN_D_BRAND} | client device brand |
| {ADN_D_MODEL} | client device model |
Offer Tracking Information
![]()
- Currency: LeadsADN supports multiple currencies, choose the currency in which the offer’s revenue and cost are calculated
- Tracking Domain: The platform can set multiple promotion domains. Here, you can specify the domain used for the promotion links of campaigns under this offer
- Session Lifespan: Each user click corresponds to a session, and you can specify the valid time for each session. Generally, this setting corresponds to the time window of the offer’s attribution system
- Unique ID Rule: To evaluate traffic quality, statistics and counting are based on click attribute data. For example, the rule "Offer ID, IP & 1 Day" can be set to track how many unique IP clicks the offer receives each day. Available unique attributes include:
- Offer ID
- Affiliate ID
- IP
- User Agent
- Sub Affiliate
- Sub ID 1
- Sub ID 2
- Sub ID 3
- Sub ID 4
- Sub ID 5
- Conversion Point: Description the action that triggers the conversion. For example, "Install" or "Registration"
- Enable Smart Link: Indicates whether the offer accepts Smart Link promotion
- S2S Traffic: Indicates whether the offer accepts Server-to-Server traffic
- Secondary Offer: Backup offer. If the offer is paused or reaches its cap, the system can redirect traffic to the secondary offer
- Need Approval for Conversion: Indicates whether conversions for the offer require approval. Default is off
- Holding Conv. Percent: Default percentage of conversions set to Holding status
Offer Targeting Information
The "Targeting" section is used to set targeting rules for the offer’s promotional campaigns.
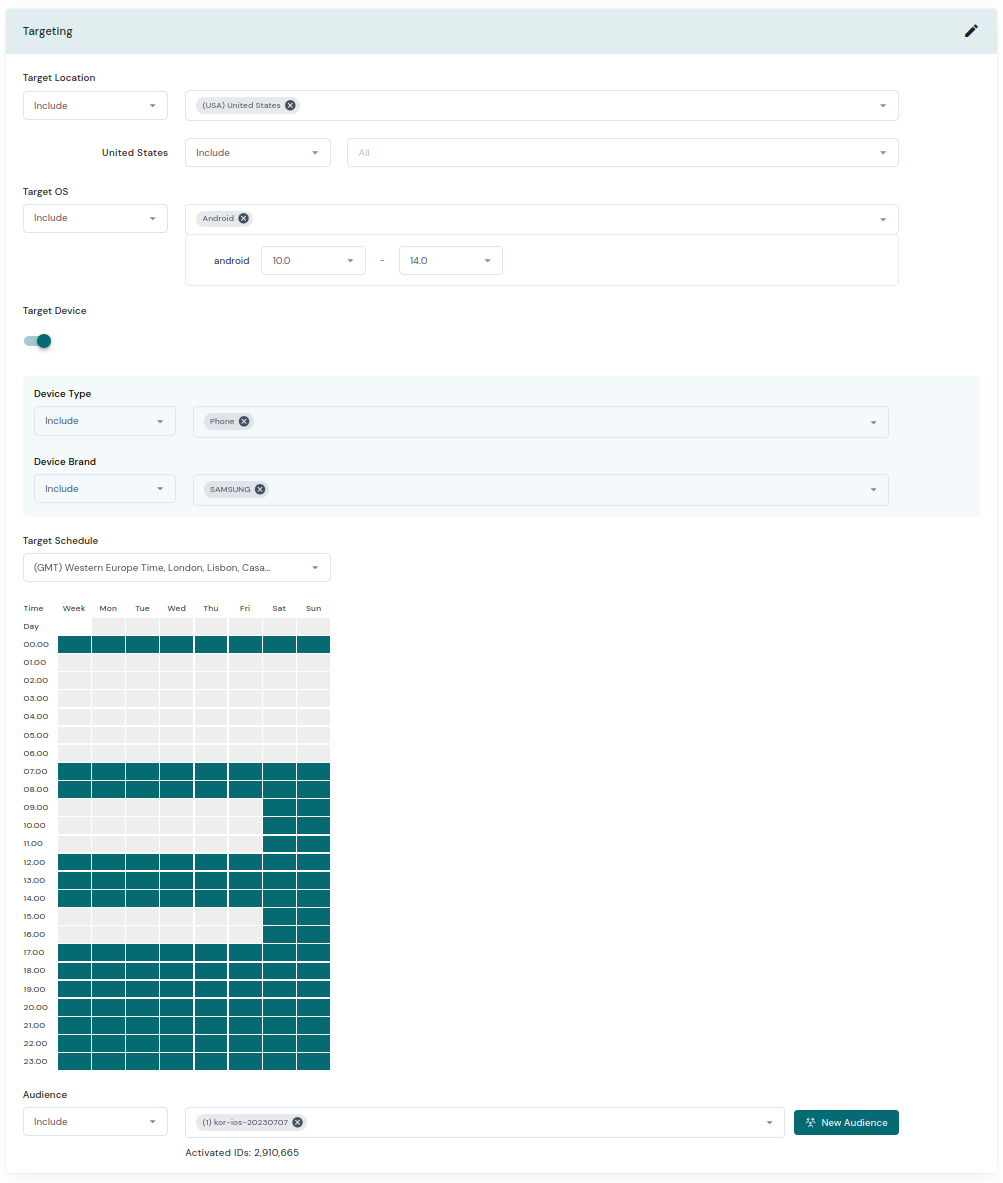
- Target Location: Geographic location (country/region, province, city) targeting rules. You can set multiple countries/regions or exclude certain countries/regions
- Target OS: Operating system targeting rules. You can set multiple operating systems or exclude certain operating systems. For specific OS versions, you can also set targeting rules
- Target Device
- Device Type: Device types. You can set multiple device types or exclude certain device types
- Device Brand: Device brands. You can set multiple device brands or exclude certain device brands
- Target Schedule: Promotion schedule targeting rules. You can set specific hours or time periods within a week for promotion
- Audience: Specific device targeting rules. You can set to include certain devices or exclude them. For example, for offers targeting user engagement, you can set to include devices already installed, while for user acquisition offers, you would set to exclude devices that are already installed
- New Audience: Upload a list of devices here
- Activated IDs: Total number of devices in the selected device list
Offer Caps Information
Set limits for traffic and conversions to prevent overload. You can also stop sending traffic when the number or amount of conversions reaches the limit.
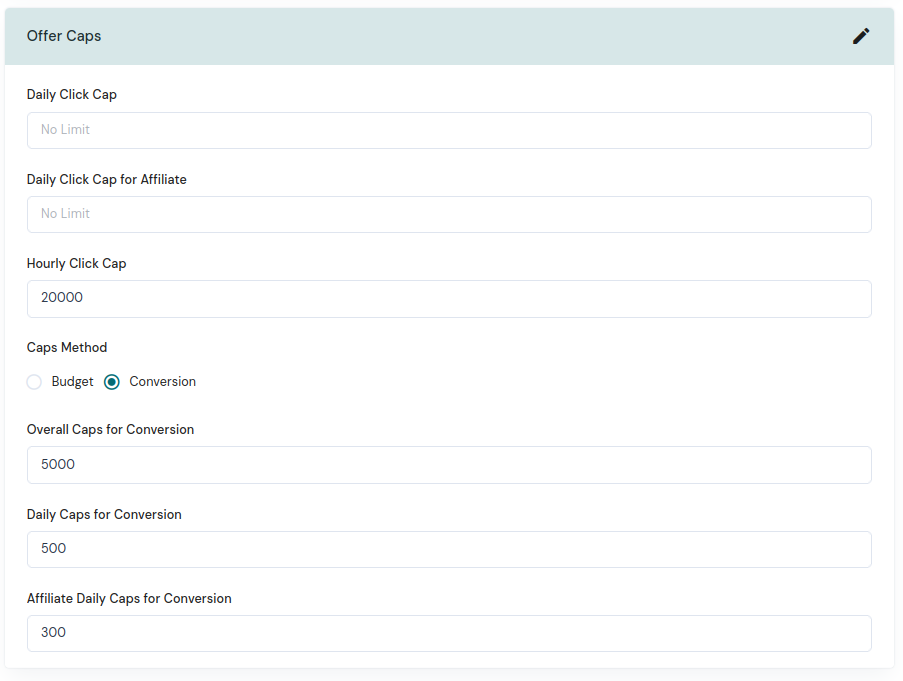
- Daily Click Cap: The maximum number of clicks the offer can receive per day
- Daily Click Cap for Affiliate: The maximum number of clicks each campaign under the offer can receive per day
- Hourly Click Cap: The maximum number of clicks the offer can receive per hour
- Caps Method: The method used to limit conversions
- Budget: Limits the conversion cost
- Conversion: Limits the number of conversions
- Overall Caps for Conversion(or Budget): The total conversion cost or number limit for the offer
- Daily Caps for Conversion(or Budget): The conversion cost or number limit per day for the offer
- Affiliate Daily Caps for Conversion(or Budget): The conversion cost or number limit per day for each campaign under the offer
Offer Goals Information
Each offer has one or more conversion events, which also serve as the offer’s goals.
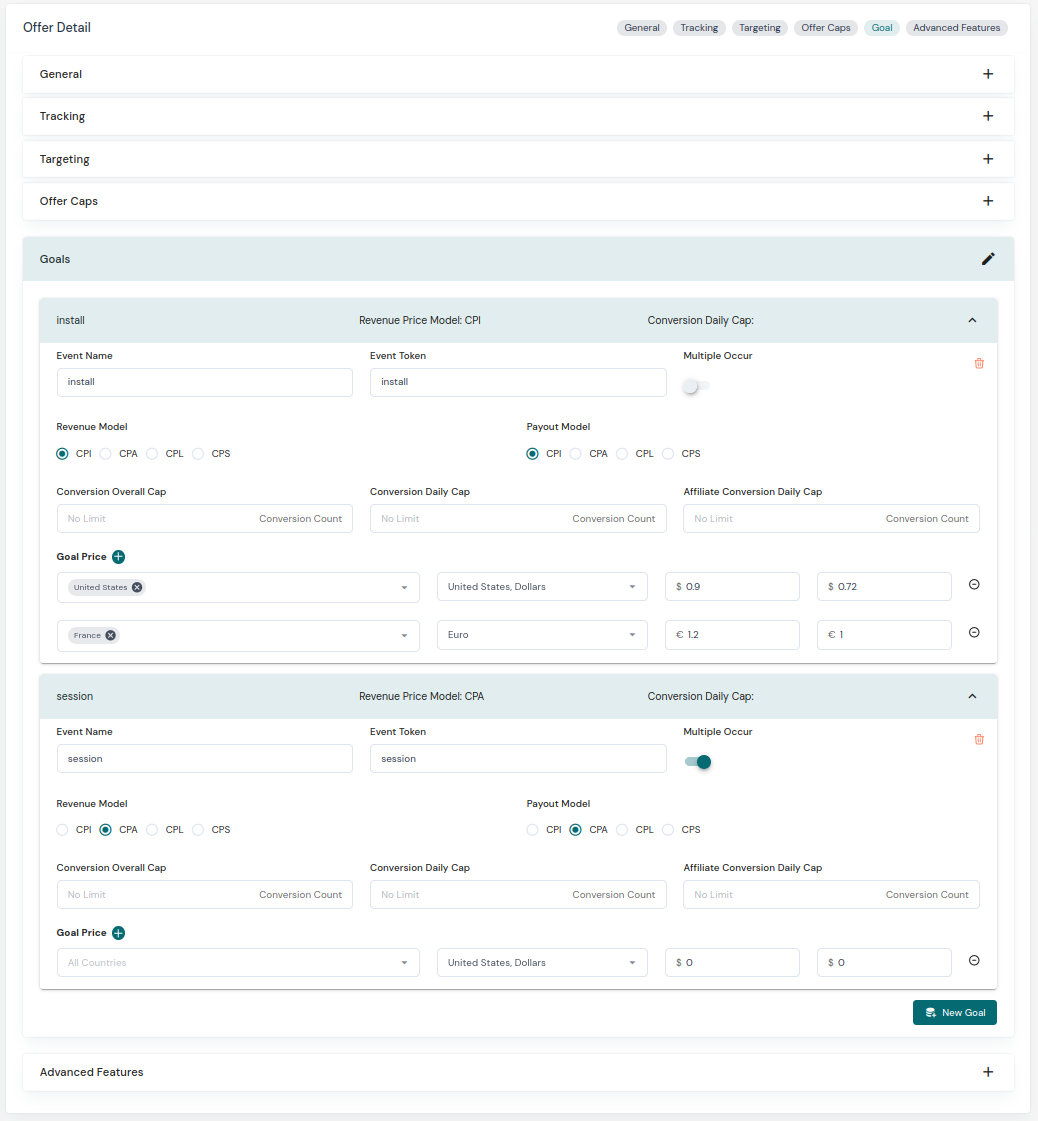
For each conversion event, you can set the following attributes:
- Event Name: The name of the event, such as registration, activation, purchase, etc., for easy understanding
- Event Token: The event identifier that needs to be passed when the conversion occurs
- Multiple Occur: Whether the event can occur multiple times. For example, one installation event can have multiple session events
- Revenue Model: The revenue model for the event, such as CPI, CPA, CPL, or CPS
- Payout Model: The payout model for the event
- Conversion Overall Cap: The total conversion limit for the event
- Conversion Daily Cap: The daily conversion limit for the event
- Affiliate Conversion Daily Cap: The daily conversion limit for the event for each affiliate
- Goal Price: The target price for the event. You can set different currencies and prices for different regions. For example, the target price for an installation event in the US is 1.5 USD, and in France, it is 1.2 EUR
Offer Advanced Features
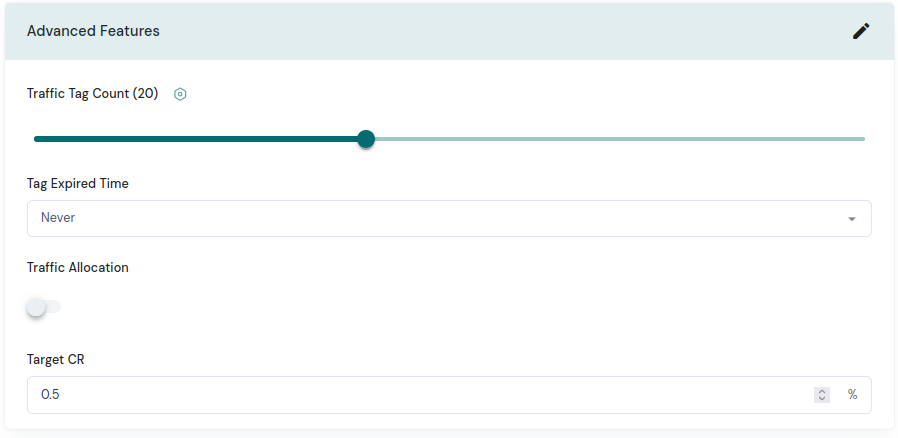
LeadsADN provides advanced features, including Traffic Tag, Traffic Allocation, and Target CR functionalities, to improve efficiency.
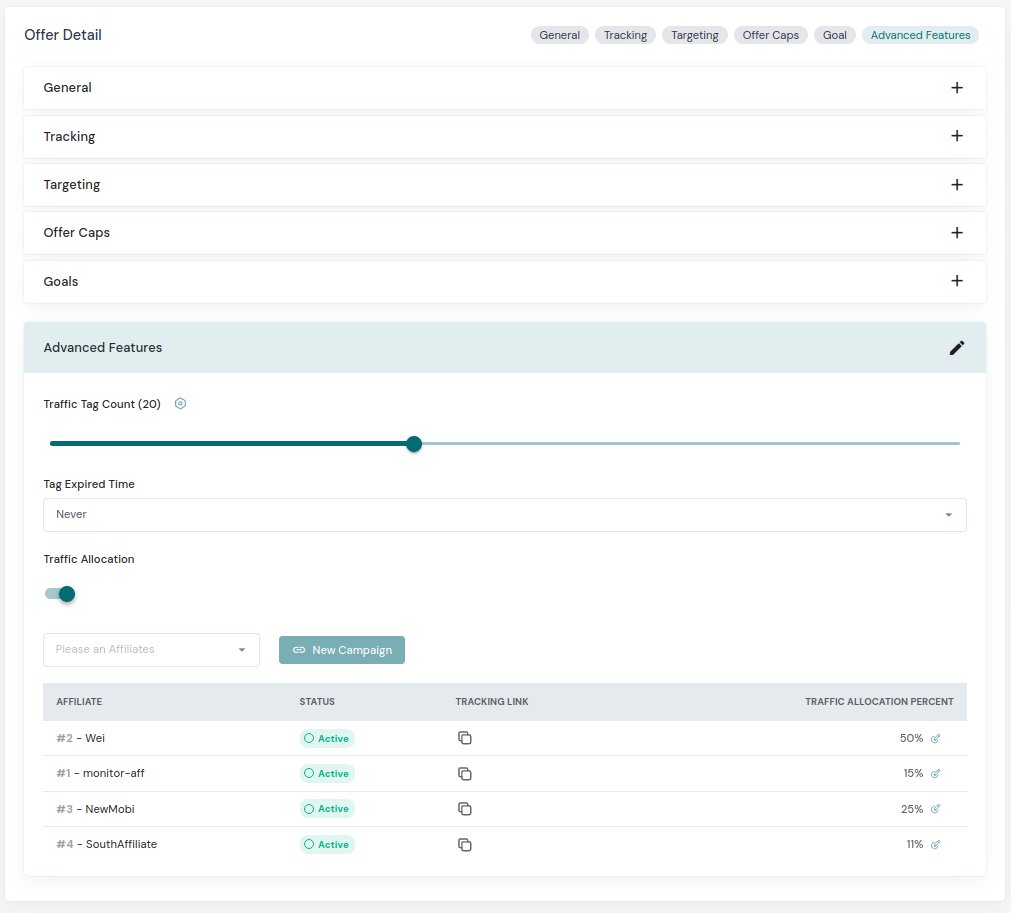
Traffic Tag functionality empowers users to randomly assign tags to incoming traffic, thus segmenting it into distinct groups based on these tags. Key elements include:
Traffic Tag Count: This denotes the total number of unique Traffic Tags in use.
Tag Expired Time: Each Traffic Tag has a defined lifespan; once expired, the system auto-generates a new tag to maintain the required quantity of active tags.
Traffic Allocation serves as a strategic tool that enables you to predefine the exact proportion of traffic that each campaign under an offer should receive. For instance, imagine you’ve got an offer running on your platform, and you want to direct 50% of the overall traffic from your Campaign Channel 2 to the advertiser’s system, followed by 15% from Channel 1, and then the remaining 35% for any unassigned or new channels.
This mechanism plays a vital role during the testing phase of new or experimental channels. By initially allocating a smaller percentage of traffic to these channels, you can assess their effectiveness and ROI before increasing their share of traffic based on performance metrics. In essence, Traffic Allocation helps in fine-tuning your marketing efforts, optimizing resources, and maximizing returns.
Target CR (Conversion Rate) is particularly relevant when advertisers require a specific conversion rate threshold. With Target CR enabled, the system dynamically adjusts the traffic allocation ratios to align with the desired conversion rate. To implement this, deactivate manual Traffic Allocation settings and establish the mandatory Target CR. The platform will then automatically optimize traffic distribution to hit that target conversion rate effectively.
Offer Overview
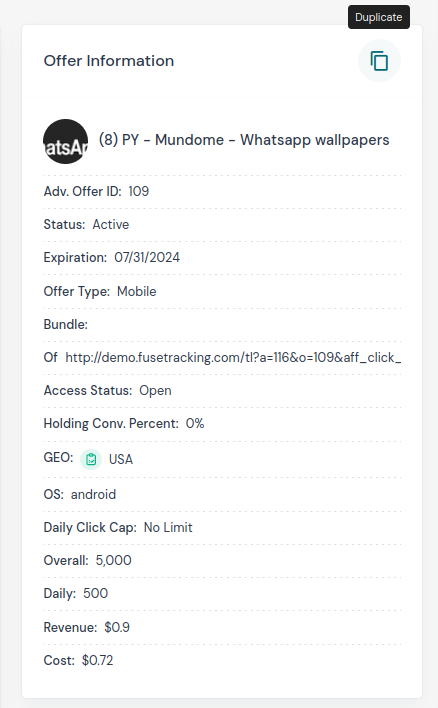
Navigating through the elaborate setup process for an offer, the system caters to user convenience by presenting a compact summary of frequently accessed information on the right-hand side of the Offer Detail page. This design choice facilitates swift review and modification of essential offer attributes.
Notably, nestled in the upper-right section of this summary area is a "Copy" button. Upon clicking this button, the system duplicates the entirety of the current offer’s information, expediting the creation of a new offer without requiring manual re-entry of all details. This feature saves time and effort, allowing users to leverage existing offer structures to craft new promotional tasks efficiently.
Audience Targeting
The "Audience" menu item under the "Offers" menu group is used to manage the device lists used by the Audience feature.
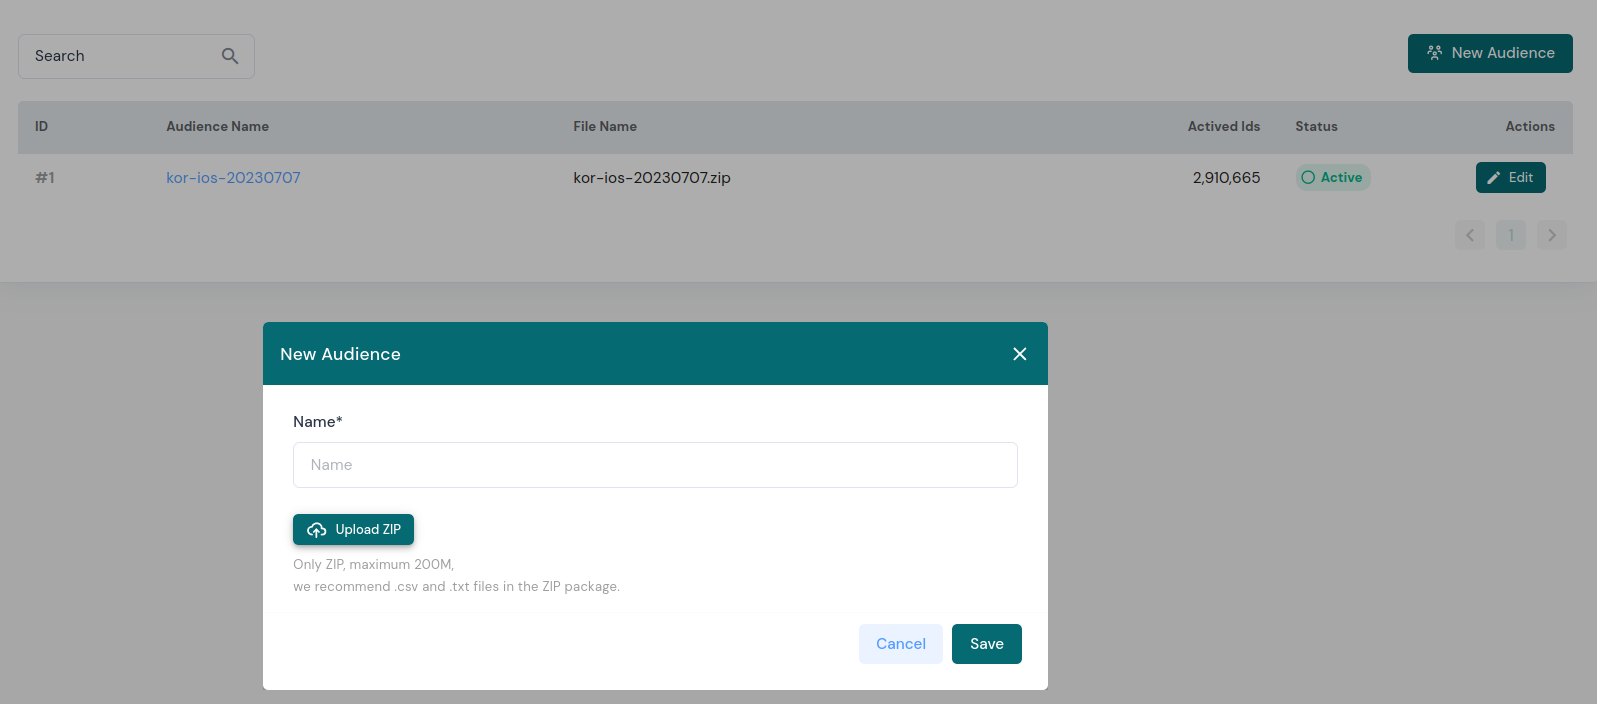
Clicking on this menu item will take you to the Audience list page, where you can see the uploaded device lists, including the name of the device list, the number of devices, the upload time, and other information.
At the top of the list, there is a button to upload a device list file. Clicking this button allows you to upload a device list file, which the system will automatically parse to generate the device list.
Campaigns
Campaign List
When you select the "Campaigns" option from the main menu, it will redirect you to the Campaign list page. On this page, you have a comprehensive overview of all the campaigns that you’ve created and managed.
Each campaign listing includes crucial details such as the associated Offer, the Affiliate tied to it, and its current status, providing you with an at-a-glance understanding of your entire campaign portfolio.
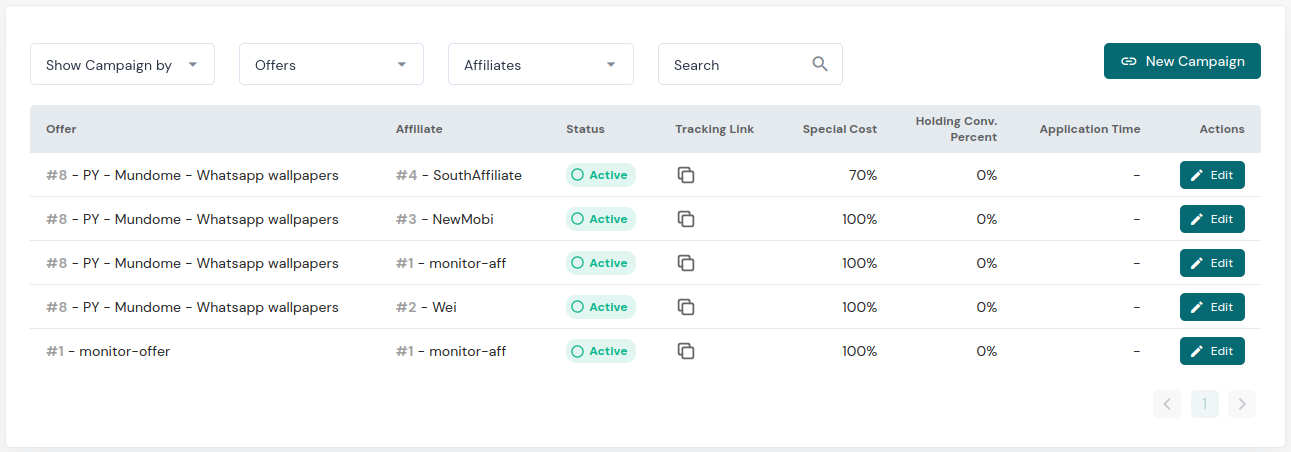
The meanings of each column are as follows:
- Offer: The Offer to which the Campaign belongs.
- Affiliate: The Affiliate to which the Campaign belongs.
- Status: The status of the Campaign, including Active, Blocked.
- Tracking Link: The click link for the Campaign, which can be copied directly.
- Special Cost: Allows you to set a special conversion price for the Campaign, which is a percentage of the conversion price defined by the Offer. For example, if the Payout price for an Offer is $1 and this is set to 70%, the Campaign’s Payout will be $0.7.
- Holding Conv. Percent: The default percentage of conversions set to Holding.
- Application Time: For Offers that require approval before promotion, this column shows the time when the Affiliate applied for the Offer.
- Actions
Campaign Details
Clicking on the "Edit" button in the Campaign list or the "New Campaign" button takes you to the Campaign editing page, where you can edit the detailed information of the Campaign.
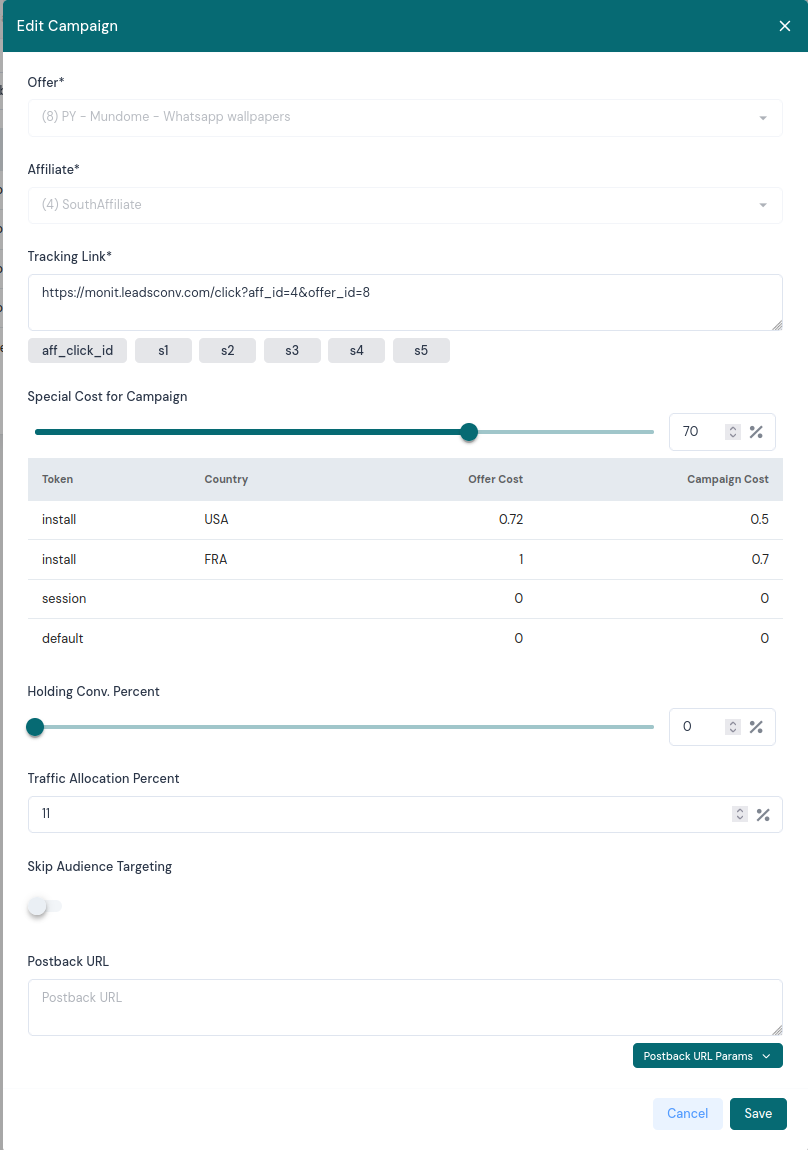
- Tracking Link: Configures the click link for the Campaign, which by default includes the aff_id and offer_id parameters (Affiliate ID and Offer ID, respectively). You can also add custom parameters:
- aff_click_id: Used to receive the Affiliate system’s Click ID. When a conversion occurs, the system can be configured to return this parameter to the Affiliate system.
- s1~s5: Used to receive custom parameters from the Affiliate system, such as package name, device ID, etc. When a conversion occurs, the system can be configured to return these parameters to the Affiliate system.
- Special Cost: Allows you to set a special conversion price ratio for the Campaign. Below this field, there is a list of offer events that calculates the special conversion price based on the default conversion price of the offer and the set ratio.
- Holding Conv. Percent: The default percentage of conversions set to Holding.
- Traffic Allocation Percent: If the Offer has Traffic Allocation enabled, you can set the percentage of traffic the Campaign will receive compared to the Offer. This can also be set on the Offer’s details page.
- Skip Audience Targeting: If the Offer has Audience Targeting enabled, you can set whether to skip the Audience Targeting feature for this Campaign.
- Postback URL: Usually, when a conversion occurs, the system calls the Postback URL set by the Affiliate. If you need to set a special Postback for a Campaign, you can do so here, which will only apply to this Offer.
Reports
The system provides a comprehensive Overall Report that delivers an overview of the operational performance, encompassing key metrics and indicators for assessing your business status.
Concurrently, there is also a dedicated Conversions Report available which delves into granular details about each conversion event. This report allows users to analyze the specifics of user actions, including but not limited to successful transactions, clicks leading to sign-ups or purchases, thereby providing in-depth insights into conversion rates and patterns.
Overall Report
To view the Overall Report, navigate to the Reports menu and select the Overall option. The report page is divided into two sections: the filter area and the data area.
In the filter area, you can set various parameters:
- Timezone: Select your preferred timezone.
- Date Range: Choose the date range for the report.
- Advertisers: Select one or more advertisers.
- Offers: Select one or more offers.
- Affiliates: Select one or more affiliates.
- Countries: Select one or more countries or regions.
- OS: Select one or more operating systems.
- Group By: Choose how the data should be grouped, such as by offer, affiliate, etc.
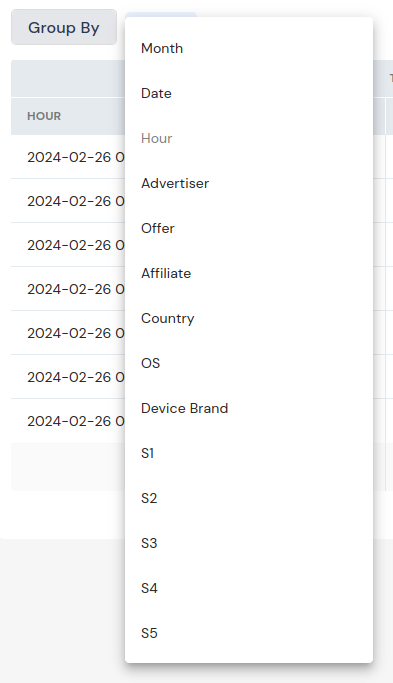
Click on the Search button, the data area below will then display the results of your query.

The data area includes traffic data, conversion data, and performance metrics:
- Dimension Data: Displays grouped data based on the Group By condition.
- TRAFFIC
- HOST: Number of clicks received by the platform.
- HIT: Number of clicks that reached the Offer page.
- UNIQUE: Number of unique clicks based on the Unique ID statistics rules set for each Offer.
- REVENUE: Revenue in CPC mode.
- APPROVED: Approved conversion data
- COUNT: Number of approved conversions.
- REVENUE: Revenue from approved conversions.
- PENDING: Pending conversion data.
- HOLDING: Holding status conversion data.
- REJECTED: Rejected conversion data.
- PERFORMANCE
- CR: Conversion rate, calculated as total conversions / HIT count.
- ROI: Return on investment.
- TOTAL: Total conversion data for all statuses.
- COUNT: Total number of conversions.
- REVENUE: Total revenue from conversions.
- PAYOUT: Total payout from conversions.
- PROFIT: Total profit from conversions.
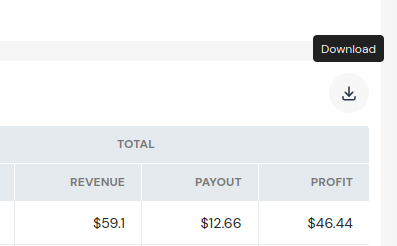
In the top right corner of the data area, there is an export button.
Clicking this button will generate a CSV format report file in the background, which can be downloaded.
Conversions Report
View detailed conversion data by accessing the "Conversions" report page under the "Reports" menu.
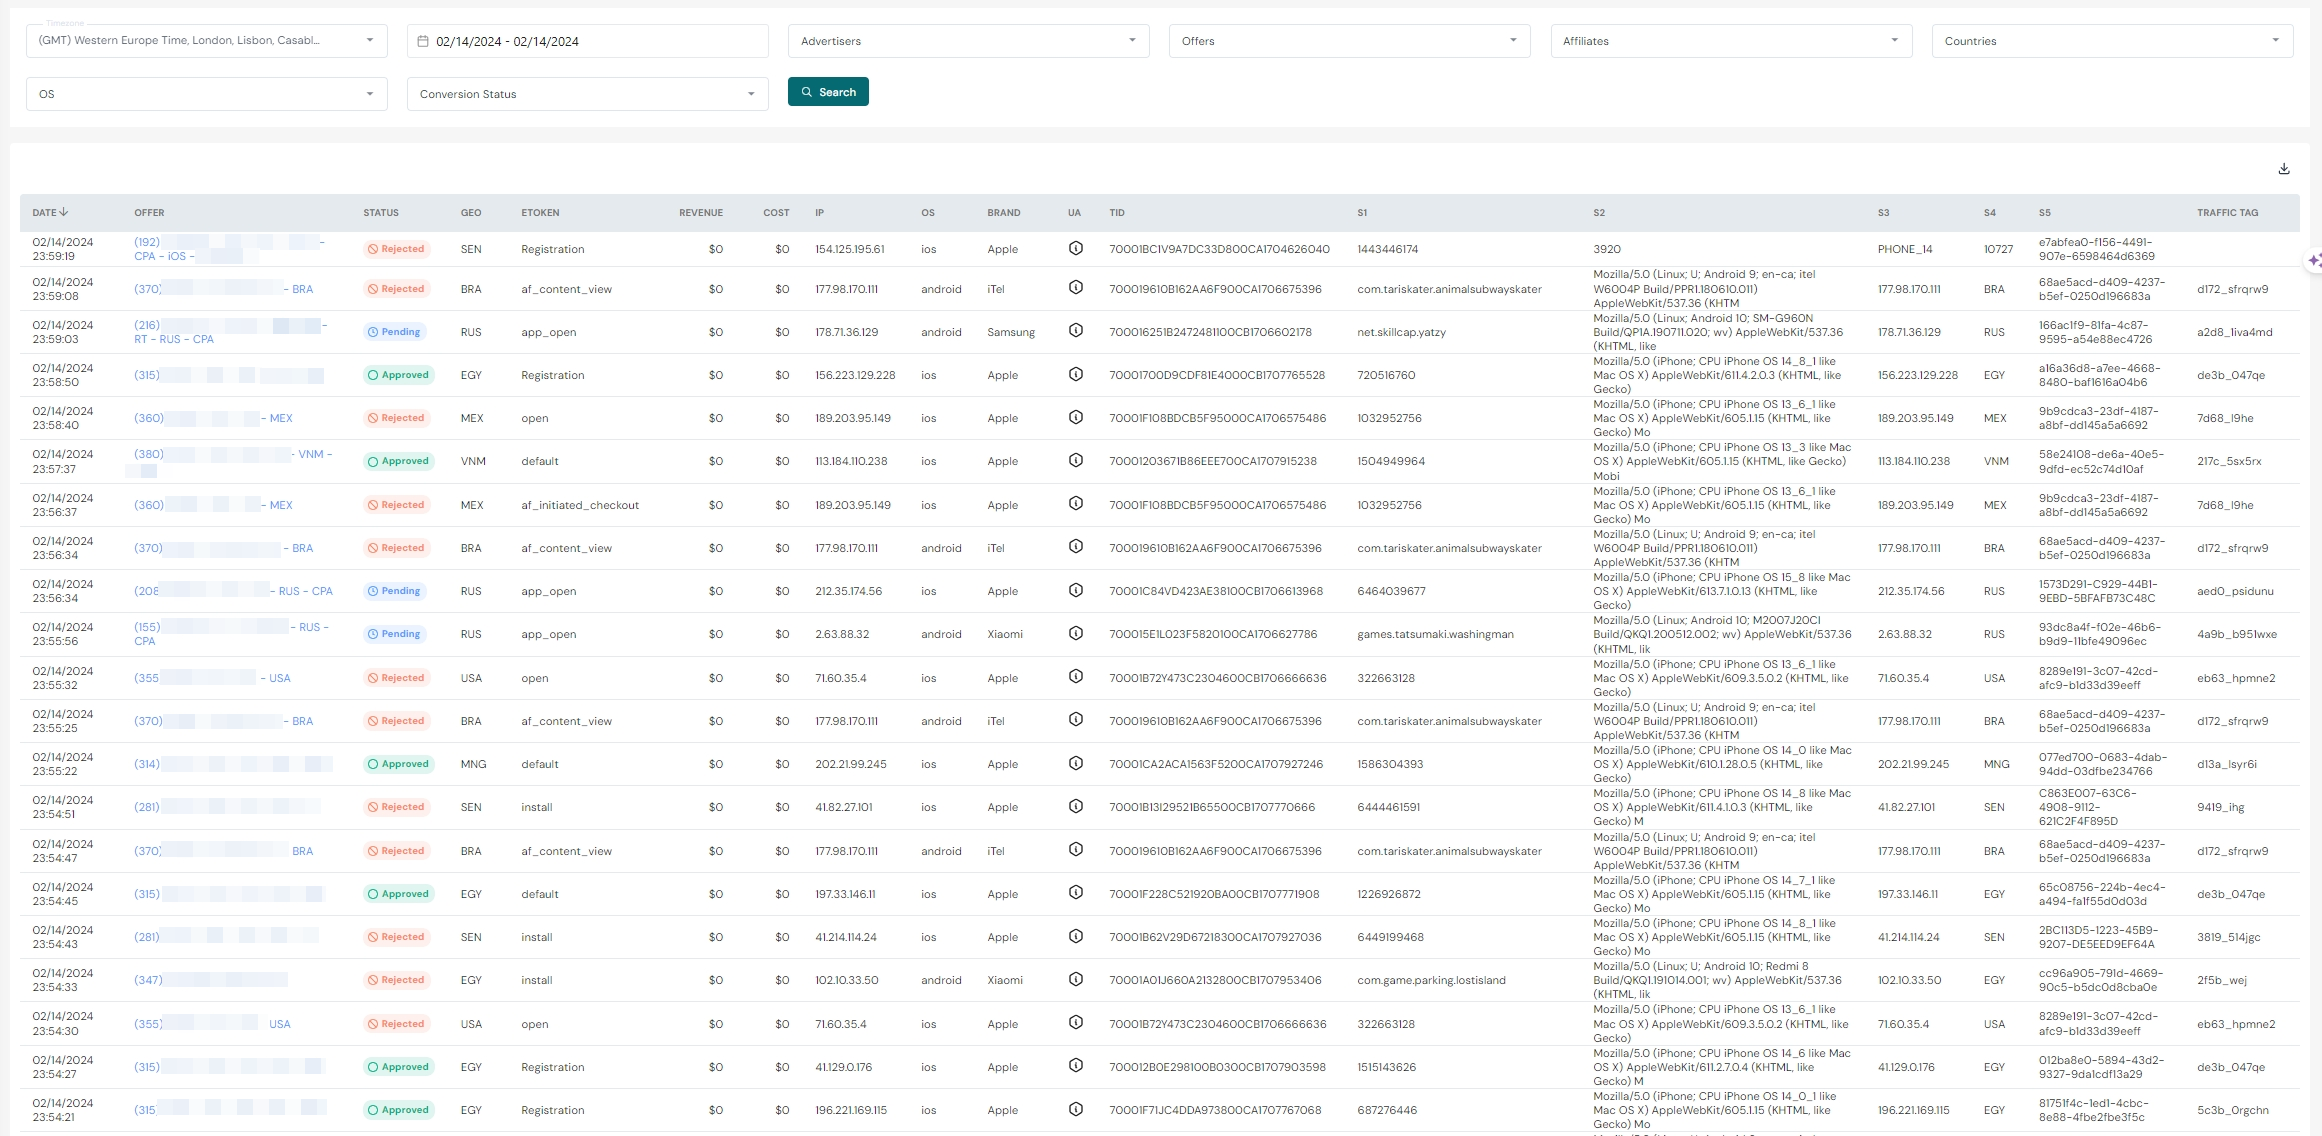
Similar to the Overall Report, the Conversions Report page is divided into a filter area and a data area.
The filter area provides various query filtering options:
- Timezone
- Date Range
- Advertisers
- Offers
- Affiliates
- Countries
- OS
- Conversion Status
After set the filters, click the Search button to display the query results in the data area below.
Settings
In the Settings menu, there are two tabs: Custom Appearance for white-label customization and General Settings for global business settings.
Custom Appearance
The Custom Appearance tab allows you to customize the appearance of the system, including the system logo, login logo, title, favicon, and system domain.
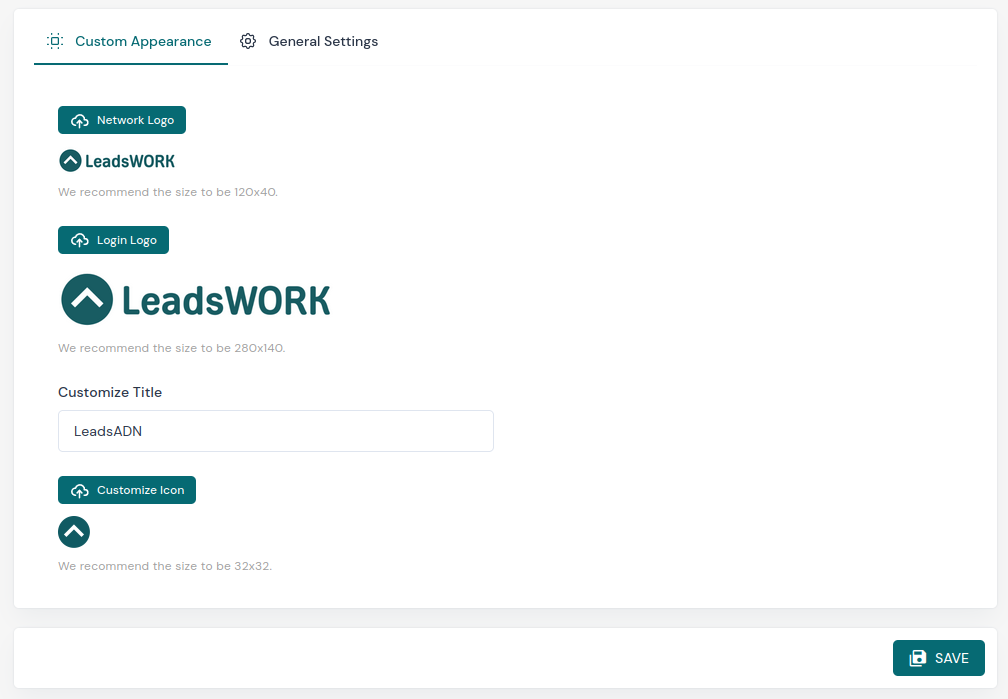
- Logo: Sets the system’s logo, which will be displayed at the top of the system menu bar.
- Login Logo: Sets the logo for the system’s login page.
- Title: Sets the system’s title, displayed in the browser’s page title.
- Favicon: Sets the system’s favicon, displayed in the browser’s page title.
- System domain, tracking domains, etc., can be set by contacting your AM.
General Settings
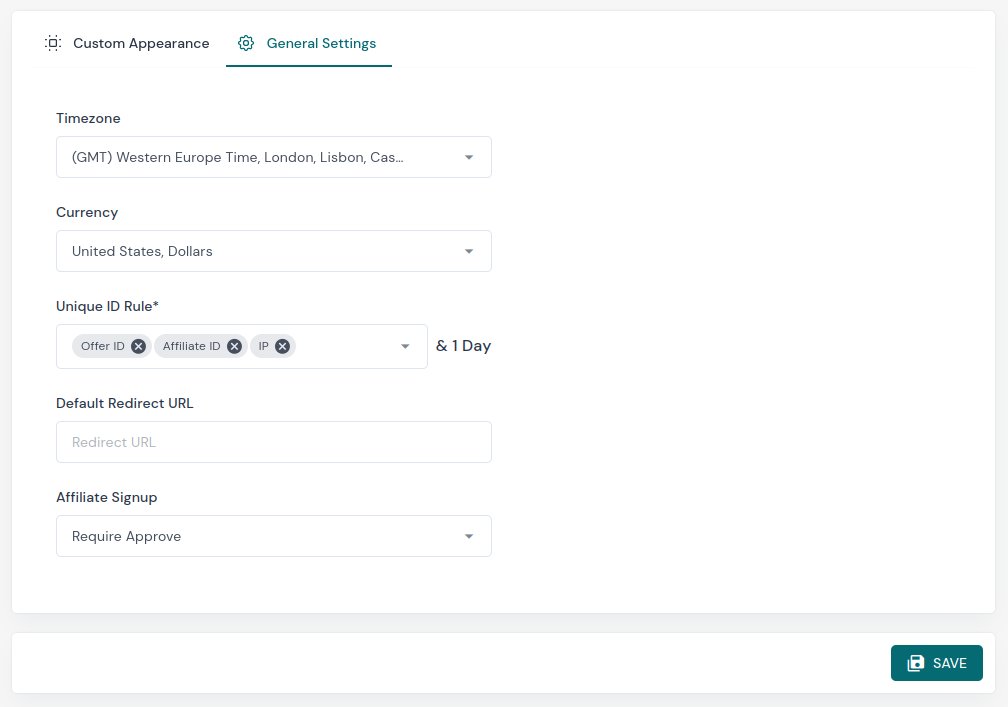
- Timezone: Sets the system’s default timezone.
- Currency: Sets the system’s default currency.
- Unique ID Rule: Sets the default statistical rule for Unique IDs in the system.
- Default Redirect URL: Sets the system’s default redirect URL. When the system fails to reach any offer according to the rules mentioned above, it will redirect the traffic to this default redirect URL.
- Affiliate Signup: Sets whether to enable the affiliate signup feature and the signup approval method.
- No Signup: Disables the affiliate’s online signup feature.
- Require Approve: Enables the affiliate’s online signup feature, and registration requires admin approval.
- Auto Approve: Enables the affiliate’s online signup feature, and registrations are automatically approved.
Manage Employees
In addition to the central system administrator, the platform also allows for the configuration of other staff members as affiliate managers or advertiser account managers.
These designated employees can authenticate into the system and gain access to view the specific data pertaining to the advertisers and affiliates under their supervision. This feature enables a tiered management structure, ensuring that each team member has the necessary information to effectively oversee and manage their respective accounts.
Employees
Navigate to the Employees page under the Users menu group to access the list of employees.

The employee list page displays all employee information in the system, including employee ID, name, email, role, status, etc.
- API Key: The system assigns an API Key to the administrator, which can be used for API calls such as creating, editing offers, and system management.
- API Freq.: The limit on the frequency of API calls.
- Joining Date: The date the employee joined the system.
- Last Login Date: The most recent login date.
- Last Login IP: The IP address of the most recent login.
Use the Edit command to edit employee information and the New Employee command to add a new employee.
Operation Logs
By selecting the "Operation Logs" option nested within the "Tools" menu category, you will be directed to the operation logs page.
This page serves as a record repository where you can review and monitor all system activities that occur post-login. It meticulously documents each operation’s timestamp, the user who executed it, the type of action performed, the object on which the operation was carried out, the specifics of the operation itself, and the outcome or result of that particular action.

Affiliate Tier
Affiliates within the system are empowered to explore a wide range of offers available.
They can apply for participation in various promotional campaigns, obtain unique tracking links for each offer they choose to promote, and subsequently monitor their progress through data-rich promotion reports. This enables affiliates to have full visibility into their performance metrics and make informed decisions about optimizing their marketing strategies.
Comments are closed.